If you wish to contribute your indicator or EBV code, please let us know at web@geobon.org.
The recommended method is to setup an instance of BON in a Box somewhere you can easily play with the script files, using the local or remote setup below. You can create a branch or fork to save your work. Make sure that the code is general, and will work when used with various parameters, such as in different regions around the globe. Once the integration of the new scripts or pipelines are complete, open a pull request to this repository. The pull request will be peer-reviewed before acceptation.
Prerequisites :
- Git
- A github account, with an SSH key registered. See Adding a new SSH key to your GitHub account.
- At least 6 GB of free space (this includes the installation of Docker Desktop)
- RAM requirements will depend on the scripts that you run.
- Windows:
- Docker Desktop
- A Linux shell (git bash, Bash through PowerShell, cygwin, etc.) necessary to run th
.shscripts in the instructions below.
- Mac: Docker Desktop
- Make sure docker is added to the path of your terminal. From a terminal, run command
docker run hello-world. If there is an error message, see https://stackoverflow.com/a/71923962/3519951. - If you encounter error
no matching manifest for linux/arm64/v8 in the manifest list entries, export DOCKER_DEFAULT_PLATFORM. See https://stackoverflow.com/a/76404045/3519951.
- Make sure docker is added to the path of your terminal. From a terminal, run command
- Linux: Docker with Docker Compose installed. It is recommended to add your user to the docker group.
To run:
-
Clone repository (Windows users: do not clone this in a folder under OneDrive.)
git clone git@github.com:GEO-BON/bon-in-a-box-pipelines.git -
Provide an environment file named
runner.envin the root folder with the following keys# Access the planetary computer APIs JUPYTERHUB_API_TOKEN= DASK_GATEWAY__AUTH__TYPE= DASK_GATEWAY__CLUSTER__OPTIONS__IMAGE= DASK_GATEWAY__ADDRESS= DASK_GATEWAY__PROXY_ADDRESS= # Access GBIF API GBIF_USER= GBIF_PWD= GBIF_EMAIL= # Access Red List Index IUCN_TOKEN= # Allows to save the pipeline directly to the server in the Pipeline Editor. # This API can be blocked on some infrastructures by changing this value. # - deny: Saving will be rejected by server. In the UI, "Save to clipboard" button can be used. # - allow, or anything else: "Save" and "Save as" buttons available in the UI. SAVE_PIPELINE_TO_SERVER=allow # Script server cache option: # - full: when a script file changes, all related caches are cleared. # - partial: when a script file changes, cache is only overriden when running with the same inputs. # NB: applied on next docker compose up SCRIPT_SERVER_CACHE_CLEANER=full # Optional: By default, server starts on localhost with port 80. # If port 80 is already in use on your server, specify another port here. # The UI will be visible in http://localhost:81 if HTTP_PORT=81 #HTTP_PORT=81 -
Using a terminal, navigate to top-level folder.
-
./server-up.sh
- The first execution will be long. The next ones will be shorter or immediate, depending on the changes.
- Network problems may fail the process. First try running the command again. Intermediate states are saved so not everything will be redone even when there is a failure.
- Windows users may need to turn on virtualization and other tools for Docker Desktop to work and update wsl ("wsl --update", see https://docs.docker.com/desktop/troubleshoot/topics/#virtualization. Access to the BIOS may be required to enable virtualization)
- In browser:
- http://localhost/ shows the UI
./server-down.sh(to stop the server when done)- On Windows, to completely stop the processes, you might have to run
wsl --shutdown
When modifying scripts in the /scripts folder, servers do not need to be restarted:
- When modifying an existing script, simply re-run the script from the UI and the new version will be executed.
- When adding or renaming scripts, refresh the browser page.
When modifying pipelines in the /pipelines folder, servers do not need to be restarted:
- In the pipeline editor, click save, paste the file to your file in the pipeline folder and run it from the "pipeline run" page.
- When adding or renaming pipelines, refresh the browser page.
Use the ansible playbook instructions.
You have an instance of BON in a Box running, either locally or remotely, and you want to run your first script or pipeline.
There is one page to run scripts, and one to run pipelines. Select the script or pipelines from the dropdown and fill the form.
The form might ask you for a file. In order to provide a file that you own locally, upload or copy it to the userdata folder. You can then refer to it with a url as such: /userdata/myFile.shp, or /userdata/myFolder/myFile.shp if there are subfolders.
The scripts perform the actual work behind the scenes. They are located in /scripts folder
Currently supported :
- R v4.3.1
- Julia v1.9.3
- Python3 v3.9.2
- sh
Script lifecycle:
- Script launched with output folder as a parameter. (In R, an
outputFoldervariable in the R session. In Julia, Shell and Python, the output folder is received as an argument.) - Script reads
input.jsonto get execution parameters (ex. species, area, data source, etc.) - Script performs its task
- Script generates
output.jsoncontaining links to result files, or native values (number, string, etc.)
See empty R script for a minimal script lifecycle example.
The script description is in a .yml file next to the script. It is necessary for the script to be found and connected to other scripts in a pipeline.
Here is an empty commented sample:
script: # script file with extension, such as "myScript.py".
name: # short name, such as My Script
description: # Targetted to those who will interpret pipeline results and edit pipelines.
author: # 1 to many
  - name: # Full name
    email: # Optional, email address of the author. This will be publicly available.
    identifier: # Optional, full URL of a unique digital identifier, such as an ORCID.
license: # Optional. If unspecified, the project's MIT license will apply.
external_link: # Optional, link to a separate project, github repo, etc.
timeout: # Optional, in minutes. By defaults steps time out after 1h to avoid hung process to consume resources. It can be made longer for heavy processes.

inputs: # 0 to many
  key: # replace the word "key" by a snake case identifier for this input
    label: # Human-readable version of the name
    description: # Targetted to those who will interpret pipeline results and edit pipelines.
    type: # see below
    example: # will also be used as default value, can be null

outputs: # 1 to many
  key:
    label:
    description:
    type:
    example: # optional, for documentation purpose only

references: # 0 to many
  - text: # plain text reference
    doi: # link
See example
Each input and output must declare a type, in lowercase. It can be a primitive or a file.
The following primitive types are accepted:
| "type" attribute in the yaml | UI rendering |
|---|---|
| boolean | Plain text |
| float, float[] | Plain text |
| int, int[] | Plain text |
| options 2 | Plain text |
| text, text[] | Plain text |
| (any unknown type) | Plain text |
Any MIME type is accepted. Here are a few common ones:
| File type | MIME type to use in the yaml | UI rendering |
|---|---|---|
| CSV | text/csv | HTML table (partial content) |
| GeoJSON | application/geo+json | Map |
| GeoPackage | application/geopackage+sqlite3 | Link |
| GeoTIFF 1 | image/tiff;application=geotiff | Map widget (leaflet) |
| JPG | image/jpg | <img> tag |
| Shapefile | application/dbf | Link |
| Text | text/plain | Plain text |
| TSV | text/tab-separated-values | HTML table (partial content) |
| (any unknown type) | Plain text or link |
Search the web to find the appropriate MIME type for your content. Here are a few references:
- http://www.iana.org/assignments/media-types/media-types.xhtml
- http://svn.apache.org/viewvc/httpd/httpd/trunk/docs/conf/mime.types?view=markup
1 When used as an output, image/tiff;application=geotiff type allows an additionnal range attribute to be added with the min and max values that the tiff should hold. This will be used for display purposes.
map:
  label: My map
  description: Some map that shows bla bla...
  type: image/tiff;application=geotiff
  range: [0.1, 254]
  example: https://example.com/mytiff.tif
2 options type requires an additionnal options attribute to be added with the available options.
options_example:
  label: Options example
  description: The user has to select between a fixed number of text options. Also called select or enum. The script receives the selected option as text.
  type: options
  options:
    - first option
    - second option
    - third option
example: third optionThe syntax and structure of the script description file will be validated on push. To run the validation locally, run validate.sh
This validates that the syntax and structure are correct, but not that it's content is correct. Hence, peer review of the scripts and the description files is mandatory before accepting a pull requests.
The output keys info, warning and error can be used to report problems in script execution. They do not need to be described in the outputs section of the description. They will be displayed specially in the UI.
Any error message will halt the rest of the pipeline.
Scripts can install their own dependencies directly (install.packages in R, Pkg.add in Julia, etc). However, it will need to be reinstalled if the server is deployed on another computer or server.
To pre-compile the dependency in the image, add it to runners/r-dockerfile or runners/julia-dockerfile. When the pull request is merged to main, a new image will be available to docker compose pull with the added dependencies.
When running a script, a folder is created for each given set of parameters. The same parameters result in the same folder, different parameters result in a different folder. The inputs for a given script are saved in an input.json file in this unique run folder.
The file contains the id of the parameters that were specified in the yaml script description, associated to the values for this run. Example:
{
    "fc": ["L", "LQ", "LQHP"],
    "method_select_params": "AUC",
    "n_folds": 2,
    "orientation_block": "lat_lon",
    "partition_type": "block",
    "predictors": [
        "/output/data/loadFromStac/6af2ccfcd4b0ffe243ff01e3b7eccdc3/bio1_75548ca61981-01-01.tif",
        "/output/data/loadFromStac/6af2ccfcd4b0ffe243ff01e3b7eccdc3/bio2_7333b3d111981-01-01.tif"
    ],
    "presence_background": "/output/SDM/setupDataSdm/edb9492031df9e063a5ec5c325bacdb1/presence_background.tsv",
    "proj": "EPSG:6623",
    "rm": [0.5, 1.0, 2.0]
}
The script reads and uses inputs from the input.json file. Example in R:
## Receiving arguments from input.json.
## outputFolder is already defined by server
library("rjson")
input <- fromJSON(file=file.path(outputFolder, "input.json"))

## Can now be accessed from the map
print(input$predictors)
The script should perform appropriate parameter validation.
Note that the inputs will be null if the user left the text box empty.
The output files generated by the script must be saved in the run folder. The script must also generate an output.json file in the same folder, that contains a map associating the output ids to their values. Example:
{
  "sdm_pred": "/output/SDM/runMaxent/b5937ba69418b65cae7c6cfcfa78b5e8/sdm_pred.tif",
  "sdm_runs":[
    "/output/SDM/runMaxent/b5937ba69418b65cae7c6cfcfa78b5e8/sdm_runs_1.tif",
    "/output/SDM/runMaxent/b5937ba69418b65cae7c6cfcfa78b5e8/sdm_runs_2.tif"
  ]
}A pipeline is a collection of steps to acheive the desired processing. Each script becomes a pipeline step.
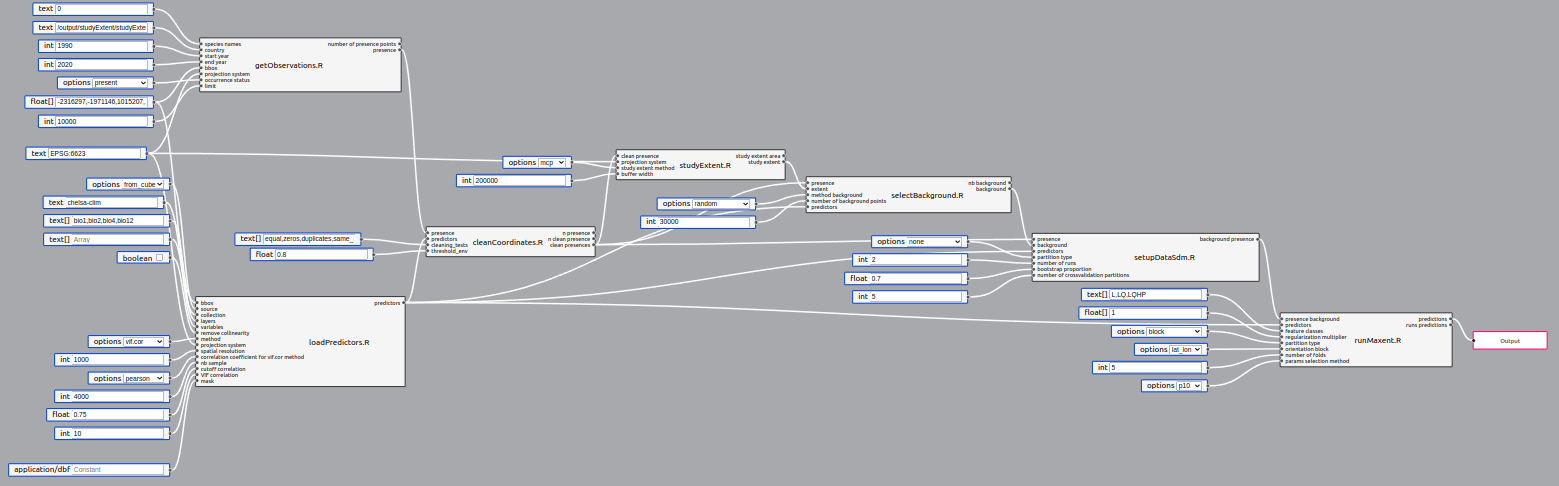
Pipelines also have inputs and outputs. In order to run, a pipeline needs to specify at least one output (rightmost red box in image above). Pipeline IO supports the same types and UI rendering as individual steps, since its inputs are directly fed to the steps, and outputs come from the step outputs.
For a general description of pipelines in software engineering, see Wikipedia.
The pipeline editor allows you to create pipelines by plugging steps together.
The left pane shows the available steps, the main section shows the canvas.
On the right side, a collapsible pane allows to edit the labels and descriptions of the pipeline inputs and outputs.
To add a step: drag and drop from the left pane to the canvas. Steps that are single scripts will display with a single border, while steps that are pipelines will display with a double border.

To connect steps: drag to connect an output and an input handle. Input handles are on the left, output handles are on the right.
To add a constant value: double-click on any input to add a constant value linked to this input. It is pre-filled with the example value.
To add an output: double-click on any step output to add a pipeline output linked to it, or drag and drop the red box from the left pane and link it manually.
To delete a step or a pipe: select it and press the Delete key on your keyboard.
To make an array out of single value outputs: if many outputs of the same type are connected to the same input, it will be received as an array by the script.

A single value can also be combined with an array of the same type, to produce a single array.

User inputs: To provide inputs at runtime, simply leave them unconnected in the pipeline editor. They will be added to the sample input file when running the pipeline.
If an input is common to many step, a special user input node can be added to avoid duplication. First, link your nodes to a constant.

Then, use the down arrow to pop the node's menu. Choose "Convert to user input".

The node will change as below, and the details will appear on the right pane, along with the other user inputs.

Any input with no constant value assigned will be considered a pipeline input and user will have to fill the value.
Add an output node linked to a step output to specify that this output is an output of the pipeline. All other unmarked step outputs will still be available as intermediate results in the UI.

Pipeline inputs and outputs then appear in a collapsible pane on the right of the canvas, where their descriptions and labels can be edited.

Once edited, make sure to save your work before leaving the page.
The editor supports saving and loading on the server, unless explicitly disabled by host. This is done intuitively via the "Load from server" and "Save" buttons.
In the event that saving has been disabled on your server instance, the save button will display "Save to clipboard". To save your modifications:
- Click save: the content is copied to your clipboard.
- Make sure you are up to date (e.g.
git pull --rebase). - Remove all the content of the target file.
- Paste content and save.
- Commit and push on a branch using git.
- To share your modifications, create a pull request for that branch through the github UI.