You can easily design your own panels via Room Editor!

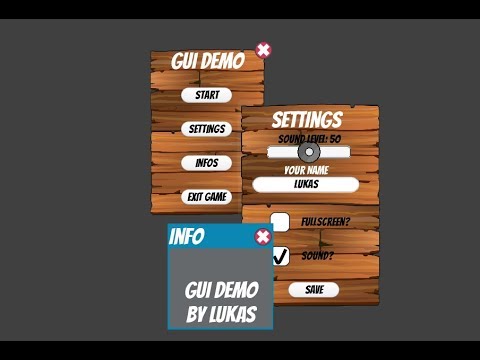
Here you can see how a simple gui would look like. There are different gui depths and a collision system, so you can´t click on buttons under the highest gui element!


- Download Package
- Import the downloaded package


- Add gui_init to a Room Start Event of your game (e. g. obj_controller). This function needs to be called everytime you change the room!
gui_init(room_width, room_height, true);

- Open gui_constants script and change GUI_LAYER macro to your gui layer, or a layer you do use in your game.
#macro GUI_LAYER "XXX"
- Create a new object obj_panel_1, which inherits from obj_gui_panel. Set the sprite to spr_gui_panel, so you will be able to stretch the sprite later in room editor.

- Copy the following code to the create event of obj_panel_1.
// Inherit the parent event
event_inherited(); // IMPORTANT!

panel_title = "Panel Tutorial";
panel_color = make_color_rgb(73, 73, 123);
panel_colorBorderLeft = make_color_rgb(51, 56, 74);
panel_colorBorderRight = make_color_rgb(51, 56, 154);
- Add the panel object to the room and stretch it like you want.
-
Create a new object obj_button_1, which inherits from obj_gui_button. Set the sprite to spr_gui_button, so you will be able to stretch the sprite later in room editor.
-
Copy the following code to the create event of obj_button_1
// Inherit the parent event
event_inherited(); // IMPORTANT!

button_title = "Open";
button_titleFont = PANEL_TITLE_FONT;
button_titleColor = c_black;
- Add the button to the room.
- At the moment the button has no function. To assign the button some functionality we will add an event handler (a script which gets called, when the button is clicked or released). We can do this by adding gui_addEventHandler to the create event of obj_button_1. Add following code to the inherited create event of obj_button_1.
gui_addEventHandler(self, eventType_button.onRelease, button1_onRelease);
- Now we need to create a script called button1_onRelease. It gets called when we release the button. Create it and add following code to it.
obj_panel_1.gui_active = true;
- The last thing we have to do is adding following code to the create event of obj_panel_1. This code will disable the panel at startup and set its inactive position outside of the room.
gui_active = false
gui_inactivePos = [-sprite_width, y];
- Start the game and you should see something like the following picture.


All gui elements provide variables you can change. You will find them in the create event of the specific parent element (e.g. obj_gui) you want to use. Here an example:
// YOU CAN USE THESE VARIABLES
gui_myPanel = noone; // reference to panel, that element is assigned to (READONLY)
gui_active = true; // set gui element active or inactive
gui_depth = 0; // smaller values means nearer to screen
gui_activePos = [x, y]; // if gui element is active it will maintain this position
gui_inactivePos = [0, 0]; // if gui element is inactive it will maintain this position
gui_slideSpeed = 0.05; // defines how fast the gui element moves/ slides


// DO NOT USE!
destPos = [0 , 0];
isCreatedByScript = false;
stopSliding = false;
alarm[0] = 1;
image_speed = 0;
only use the variables at the YOU CAN USE THESE VARIABLES section
For better understanding I have created a class/object diagram:

Every gui element inherits from obj_gui. It provides some usefull variables, that you can change in the childrens (e.g. obj_button_1).
You should not instantiate obj_gui directly (its abstract). Always use one of its childs! (button, panel...)
Variables you can change:
- This variable is a reference to the assigned panel OR noone if it is not assigned to a panel.
gui_myPanel = noone;
- Set gui element active or inactive
gui_active = true;
- Smaller value means the gui element is nearer to screen.
gui_depth = 0;
- Active and inactive position of the element.
gui_activePos = [x, y]; // if gui element is active it will maintain this position
gui_inactivePos = [0, 0]; // if gui element is inactive it will maintain this position
- Defines how fast the gui element slides from active to inactive position
gui_slideSpeed = 0.05;
Event User (0) Every gui element can use this event_user(0) event to draw additional stuff, like text over a image. This event gets called short after the gui element is drawn. Override this event in the children object to draw something.
Used to group collections of gui elements. It is like like a window from microsoft.
Variables you can change:
obj_gui variables can also be used! (e.g. gui_active, gui_XXX)
Use the default panel (assigned sprite will be ignored -> the panel uses a predefined look)
panel_useDefault = true;
- Change the name of the panel
panel_title = "Panel";
only available for default panel (panel_useDefault = true;)
Set the panel position as fixed or not
panel_isMoveable = true;
- width and height of the panel (if you use the designer, add [sprite_width, sprite_height];)
panel_size = [sprite_width, sprite_height];
- set the colors for the default panel
panel_color = 0;
panel_colorBorderLeft = 0;
panel_colorBorderRight = 0;
only available for default panel (panel_useDefault = true;)
Use a "close the panel/window" button.
panel_useExitButton = true;
only available for default panel (panel_useDefault = true;)
Variables you can change:
obj_gui variables can also be used! (e.g. gui_active, gui_XXX)
- Set the sprite of the button
sprite_index = spr_gui_button;
- Title, that gets drawn over the button sprite
button_title = "Open";
- Font of the title
button_titleFont = font_32;
- Color of the title
button_titleColor = c_black;
Usefull functions:
gui_addEventHandler(gui_element, eventType, eventHandler)
- Add an event handler to a button. A event handler is a script, which gets called, when the button is clicked!
gui_addEventHandler(self, eventType_button.onRelease, button1_onRelease);
Simple Text, which can be used to draw infos at the gui.
Variables you can change:
obj_gui variables can also be used! (e.g. gui_active, gui_XXX)
- text you want to draw
label_text = "";
- font of the text
label_font = noone;
- color of the text
label_color = c_white;
Field, which can be used to receive user input as text.
Variables you can change:
obj_gui variables can also be used! (e.g. gui_active, gui_XXX)
- default text, that is in the textfiled
textfield_text = 0;
- title of the text field
textfield_title = 0;
- font of the title
textfield_titleFont = 0;
- color of the title
textfield_titleColor = 0;
Variables you can change:
obj_gui variables can also be used! (e.g. gui_active, gui_XXX)
- minimal value of the slider
slider_minVal = 0;
- maximal value of the slider
slider_maxVal = 0;
- start or default value of the slider
slider_value = 0;
- title of the slider
slider_title = 0;
- font of the title
slider_titleFont = 0;
- color of the title
slider_titleColor = 0;
Variables you can change:
obj_gui variables can also be used! (e.g. gui_active, gui_XXX)
- title of the checkbox
cb_title = "";
- font of the title
cb_titleFont = 0;
- color of the title
cb_titleColor = 0;
- default / actual state of the checkbox (checked or not)
cb_state = 0;
Variables you can change:
obj_gui variables can also be used! (e.g. gui_active, gui_XXX)
- sprite of the image
sprite_index = spr_picture;
This function needs to be called once per room (at start up -> Room Start). It initializes the GUI Template
- width of the gui
- height of the gui
- use designer -> let you design your panels or gui via Room Editor
gui_init(gui_width, gui_height, useDesigner);
Add a gui element to a panel. A assigned element will stay on top of that panel and maintain its position relative to the panel.
gui_panel_addComponent (panel, [positionAtPanelXY], component)
Add an event handler to a interactive element (button, slider, textfield, checkbox). Eventhandlers are scripts, which gets called after "clicking on a button", moving the slider knob...
gui_addEventHandler (guiElement, event_type, eventHander)
Draw a message. The message will slide into the room and vanish after some time.
gui_showMessage (title, text, font, colorText, timerInSteps)
Draw a message. The message will slide into the room and vanish after some time.
gui_showMessage_ext ([posXY], [startPosXY], title, text, font, colorText, useExitButton, timerInSteps)
This function let you use a shader, that get applied to the gui.
gui_useShader (preShaderScript, postShaderScript, useShader)
gui_panel_create([gui_activePosXY], [gui_inactivePosXY], gui_depth, gui_slideSpeed, gui_active, [panel_sizeXY], panel_color, panel_colorBorderLeft, panel_colorBorderRight, panel_title,panel_useDefault, panel_isMoveable, panel_useExitButton, sprite_index)
gui_image_create ([gui_activePosXY], [gui_inactivePosXY], gui_depth, gui_slideSpeed, gui_active, sprite_index)
gui_button_create ([gui_activePosXY], [gui_inactivePosXY], gui_depth, gui_slideSpeed, gui_active, sprite_index, button_title, button_titleFont, button_titleColor)
gui_label_create ([gui_activePosXY], [gui_inactivePosXY], gui_depth, gui_slideSpeed, gui_active, label_text, label_font, label_color)
gui_slider_create ([gui_activePosXY], [gui_inactivePosXY], gui_depth, gui_slideSpeed, gui_active, slider_minVal, slider_maxVal, slider_value, slider_title, slider_titleFont, slider_titleColor)
gui_checkBox_create ([gui_activePosXY], [gui_inactivePosXY], gui_depth, gui_slideSpeed, gui_active, cb_title, cb_titleFont, cb_titleColor, cb_state)
gui_textField_create ([gui_activePosXY], [gui_inactivePosXY], gui_depth, gui_slideSpeed, gui_active, textfield_text, textfield_title, textfield_titleFont, textfield_titleColor)