| title | description | author | tags | date_published |
|---|---|---|---|---|
Deploying machine learning models on Kubernetes |
An introduction to machine learning model deployment operations using Python and Kubernetes. |
karan6190 |
kubernetes,MLOps |
2020-04-25 |
Contributed by the Google Cloud community. Not official Google documentation.
A common pattern for deploying machine learning (ML) models (such as models trained using the SciKit Learn or Keras packages for Python) into production environments is to expose these models as RESTful API microservices, hosted from within Docker containers. These microservices can then be deployed to a cloud environment for handling everything required for maintaining continuous availability.
Kubernetes is a container orchestration platform that provides a mechanism for defining entire microservice-based application deployment topologies and their service-level requirements for maintaining continuous availability.
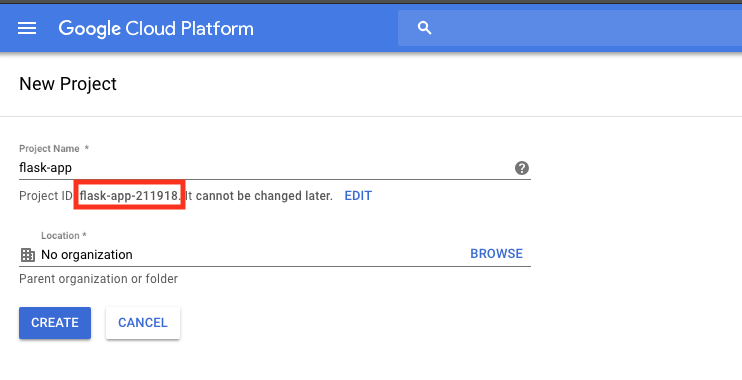
A default project is often set up by default for new accounts, but you will start by creating a new project to keep this separate and easy to delete later. After creating the project, be sure to copy the project ID, which is usually different from the project name.
Open Cloud Shell by clicking the Activate Cloud Shell button in the navigation bar in the upper-right corner of the Cloud Console.
In Cloud Shell, use the following command to create a project directory:
mkdir py-flask-ml-rest-api
This tutorial uses the contents of the py-flask-ml-rest-api directory for demonstration purposes. This directory contains
a simple Python ML model scoring REST API in the api.py module and a Dockerfile:
py-flask-ml-rest-api/
 | Dockerfile
 | api.py ## Needs to be altered according to your requirements and ML model
This is a Python module that uses the Flask framework for defining a web service (app), with a function (score), that executes in response to an HTTP request to a specific URL (or route).
from flask import Flask, jsonify, make_response, request

app = Flask(__name__)


@app.route('/score', methods=['POST'])
def score():
    features = request.json['X']
    return make_response(jsonify({'score': features}))


if __name__ == '__main__':
    app.run(host='0.0.0.0', port=5000)
FROM python:3.6-slim
WORKDIR /usr/src/app
COPY . .
RUN pip install flask

EXPOSE 5000
CMD ["python", "api.py"]
In Cloud Shell, run the following command to build the dockerfile:
$ docker build -t ml-k8s .
$ docker tag ml-k8s [HOSTNAME]/[PROJECT-ID]/ml-k8s
$ docker push [HOSTNAME]/[PROJECT-ID]/ml-k8s
For more about Container Registry, see this quickstart.
When your Docker file is built and pushed to Container Registry, you are done with containerizing the ML model.
-
Ensure that you have enabled the Google Kubernetes Engine API. You can enable an API in the Cloud Console.
-
Start a cluster:
$ gcloud container clusters create k8s-ml-cluster --num-nodes 3 --machine-type g1-small --zone us-west1-bYou may need to wait a moment for the cluster to be created.
-
Connect to the cluster:
$ gcloud container clusters get-credentials tf-gke-k8s --zone us-west1-b --project [PROJECT_ID]
For more information, see Creating a Kubernetes cluster.
The structure of this project that you create is as follows:
| api.py
| base
  | namespace.yaml
  | deployment.yaml
  | service.yaml
  | kustomize.yaml
| Dockerfile
Writing YAML files for Kubernetes can get repetitive and hard to manage, especially when there are multiple files and you need to execute them one by one. With the Kustomize utility, you can customize raw, template-free YAML files for multiple purposes, leaving the original YAML untouched.
curl -s https://api.github.com/repos/kubernetes-sigs/kustomize/releases |\
grep browser_download |\
grep linux |\
cut -d '"' -f 4 |\
grep /kustomize/v |\
sort | tail -n 1 |\
xargs curl -O -L && \
tar xzf ./kustomize_v*_linux_amd64.tar.gz && \
mv kustomize /usr/bin/
Namespaces provide a scope for Kubernetes resources, carving up your cluster in smaller units.
File contents:
apiVersion: v1
kind: Namespace
metadata:
  name: mlops
Deployments represent a set of multiple, identical Pods with no unique identities. A Deployment runs multiple replicas of your application and automatically replaces any instances that fail or become unresponsive.
File contents:
apiVersion: apps/v1
kind: Deployment
metadata:
  labels:
    app: score-app
    env: qa
  name: score-app
  namespace: mlops
spec:
  replicas: 2 # Creating two PODs for our app
  selector:
    matchLabels:
      app: score-app
  template:
    metadata:
      labels:
        app: score-app
        env: qa
    spec:
      containers:
      - image: <DOCKER_IMAGE_NAME> # Docker image name, that we pushed to GCR
        name: <CONTAINER_NAME>     # POD name
        ports:
        - containerPort: 5000
          protocol: TCP
An abstract way to expose an application running on a set of Pods as a network service.
File contents:
apiVersion: v1
kind: Service
metadata:
  name: score-app
  labels:
    app: score-app
  namespace: mlops
spec:
  type: LoadBalancer
  ports:
  - port: 5000
    targetPort: 5000
  selector:
    app: score-app
File contents:
apiVersion: kustomize.config.k8s.io/v1beta1
kind: Kustomization
resources:
- namespace.yaml
- deployment.yaml
- service.yaml
After setting up these YAML files, you can deploy your app using this single command:
kubectl apply --kustomize=${PWD}/base/ --record=true
To see all components deployed into this namespace use this command:
$ kubectl get ns
The output should look something like the following:
NAME              STATUS   AGE
default           Active   35m
kube-node-lease   Active   35m
kube-public       Active   35m
kube-system       Active   35m
mlops             Active   33s
staging           Active   34m
To see the status of the deployment, use this command:
$ kubectl get deployment -n mlops
The output should look something like the following:
NAME        READY   UP-TO-DATE   AVAILABLE   AGE
score-app   2/2     2            2           100s
To see the status of the service, use this command:
$ kubectl get service -n mlops
The output should look something like the following:
NAME        TYPE           CLUSTER-IP    EXTERNAL-IP     PORT(S)          AGE
score-app   LoadBalancer   xx.xx.xx.xx   xx.xx.xx.xx   5000:xxxx/TCP   2m3s
curl http://[EXTERNAL_IP_ADDRESS]:5000/score \
    --request POST \
    --header "Content-Type: application/json" \
    --data '{"X": [1, 2]}
The output should look something like the following:
{"score":[1,2]}
With a GKE cluster running, you can create and delete resources with the kubectl
command-line client.
To remove your cluster, select the checkbox next to the cluster name and click the Delete button.