Setup
Note: To update an existing HSG Development Environment, use these directions.
The history.state.gov (HSG) Development Environment requires a modern computer with ample memory and storage and a suite of software. These directions lead you through installing this software, downloading an up-to-date copy of all of our publications and datasets from GitHub.com, and setting up the oXygen XML Editor application to view and edit any of our files. If you need to preview how edited files will look on the history.state.gov website before you publish them, there are further directions for starting the eXist database and installing a fully functional copy of our website on your computer. The directions also describe how to save your work in our version control system and how to publish your work to the website.
- A computer with:
- 16 GB of RAM. This is to accommodate editing large XML files in oXygen, and running eXist, a web browser, and other apps at the same time.
- 100 GB of available storage space. An SSD is recommended for best performance.
- The Mac operating system (macOS). While macOS is not strictly necessary, we provide our own support and don't currently have resources for supporting other operating systems, so you'll be on your own in finding methods for installing the required software and adapting scripts, etc. to Windows or Linux.
- A GitHub account
- If you don't have one, please create one at https://github.com/join.
- Make note of your credentials (username & password), since you will need these for the steps below.
- Let your trainer know your GitHub account name so we can add you to the HistoryAtState organization on GitHub.
- Other required information that will be provided to you during your training (see the training checklist)
-
From the Apple menu in the top-left corner of your screen, choose
System Settings. ClickGeneralin the sidebar, then clickSoftware Updateon the right. Or in earlier versions of macOS, choose Apple menu >System Preferences, then clickSoftware Update. -
Open the App Store (using the Spotlight (🔍) icon in the menu bar, search for
App Store; or in Finder, selectGo>Applications, and findApp Storein the list of applications), select theUpdatestab, and install all available updates.
-
Open Terminal (using the Spotlight (🔍) icon in the menu bar, search for
Terminal; or in Finder, selectGo>Utilities). Enter (or copy and paste) the following commands into your Terminal window, one at a time, hitting return after each:mkdir ~/workspace open ~/These commands create a new directory, called
workspace, in your home directory, and open your home directory in the Finder. (You could easily have created this new directory in the Finder too, but performing these steps on the command line primes you for the steps to come.) -
We will be storing all files related to our work in this directory and accessing it a lot, so drag the new
workspacefolder from your home directory in the Finder onto that window's Favorites sidebar: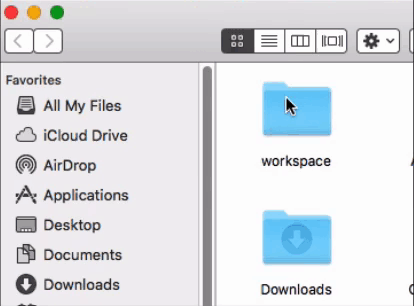
Homebrew is a free, open-source software package management system that simplifies the installation of software on Macs. We use Homebrew to install all of our applications and related dependencies (i.e., required utilities) and keep them up to date.
-
In Terminal, install Homebrew by copying and pasting this entire command and hitting return:
/bin/bash -c "$(curl -fsSL https://raw.githubusercontent.com/Homebrew/install/HEAD/install.sh)"Follow any instructions that Homebrew presents you with. For example, it may prompt you to install Xcode or accept the Xcode license (in which case you should do as directed, and once done, re-enter the command to install Homebrew).
-
To confirm that Homebrew installed correctly, enter this command:
brew doctorYou should see the following response:
Your system is ready to brew.
If, instead, Homebrew reports that there are errors or issues, try to follow the prompts to fix the problems. If you're unable to fix them, ask your trainer for help. Do not proceed until the
brew doctorcommand reports you that your system isready to brew.
-
Having installed Homebrew, enter these commands to install eXist, oXygen XML Editor, GitHub Desktop, OpenVPN Connect, as well as several other dependencies:
 brew tap homebrew/cask-versions

 brew install temurin8 exist-db github openvpn-connect oxygen-xml-editor

 brew install ant git maven

 git config --global pull.rebase false
Whenever prompted, enter the password for your the user account on your Mac.
-
eXist-db, oXygen XML Editor, GitHub Desktop, OpenVPN Connect, and all of our dependencies are now installed! To find them, go to Finder, and select
Go > Applications. -
Drag the eXist-db, oXygen XML Editor, GitHub Desktop, and OpenVPN Connect application icons into your Dock so you can always get to them easily. (oXygen XML Editor's app icon is inside a folder of the same name.)
-
In preparation for installing nvm, a utility for installing and managing versions of Node.JS, we want to ensure your Mac is using the "Z shell" (Zsh) and not the "Bash" shell as its default login shell. First, ensure the
.zshrcfile exists:touch ~/.zshrc -
Check which default login shell your Mac is using:
echo $0If the response is
-zsh, then skip ahead to the next step ("Install nvm...").If the answer is
-bash, then enter this command to change your shell from the "Bash" shell to the "Z shell" (Zsh):chsh -s /bin/zshClose the current Terminal window, and open a new window via Terminal's
Shellmenu >New Window>New Window.... Opening a new Terminal window is necessary to ensure that the next step runs in the Z shell environment instead. -
Install nvm, our required version of Node.JS, and two Node.JS-based dependencies:
 curl -o- https://raw.githubusercontent.com/nvm-sh/nvm/v0.39.3/install.sh | bash

 source ~/.zshrc

 nvm install 14.19.3

 npm install -g gulp bower
Note for users of Apple Silicon (M1, M2)-based Macs: Use the following Terminal command to start eXist:
/Applications/eXist-db.app/Contents/Resources/bin/startup.shTo quit eXist, type Control-C into the Terminal window.
-
Start eXist by clicking on its app icon in your Dock.
-
A dialog window will open asking if you want to open eXist. Select
Open. (If this dialog doesn't appear, please proceed.) -
A dialog window will open showing eXist's configuration properties. Select
Save. When prompted to create the data directory or confirm the location of the data directory, selectYes. (If this dialog doesn't appear, please proceed.) -
The eXist splash screen will appear as eXist performs its startup routine. Once the eXist splash screen disappears, a new, blueish, X-shaped icon will appear in your menu bar. This is the eXist menu bar icon. Click this icon and select
Quitto quit eXist.
-
Start oXygen XML Editor by clicking on its app icon in your Dock.
-
A dialog window will open asking if you want to open oXygen. Select
Open. -
When prompted, paste in the license key provided to you during your training.
-
Start GitHub Desktop via its app icon in your Dock, select
Openwhen prompted, and follow the prompts to set up the program: SelectSign into GitHub.comand enter your GitHub.com user account credentials. -
Select
Continue. -
Complete the setup wizard, accepting all default values. When completed, you will see a window that says, "Let's get started."
In this step, we will "clone" the hsg-project repository, which contains all of the files needed for working with history.state.gov.
-
In GitHub Desktop's "Let's get started" screen, locate the
filter your repositoriesfield, and typehsg-project. You will see an entry calledHistoryAtState/hsg-project. Select this entry, and then select theClone HistoryAtState/hsg-projectbutton. In theLocal Pathfield, click onChoose, navigate to yourworkspacefolder we created in step 1, and selectSelect, so that theLocal Pathfield reads/Users/YOUR_USER_NAME/workspace/hsg-project(replacingYOUR_USER_NAMEwith your Mac user account's name). Finally, selectClone. -
In Finder, navigate to your
workspacedirectory, and notice thathsg-projectis saved here. Inside thehsg-projectfolder, double-click on thehsg-project.xprfile. This will cause oXygen to open and activate theProjectpane, showing a list of the top level folders in thehsg-projectfolder. You can use this to open any file in our project for editing. -
In oXygen's menu bar, you will see a button with a green, triangle-shaped icon, which we'll call the "External Tools" icon, and at its right is a tiny, black, triangle-shaped icon (a "disclosure" icon, which indicates that clicking on it will display drop-down menu). Select this disclosure icon to display a drop-down list of common commands for working with hsg-project. Under the section
Setup & maintenance, select1. Apply Mac settings to hsg-project. (These commands are also available via the oXygen menu bar:Tools>External Tools.) You will know the command completed successfully when you seeBUILD SUCCESSFULin the console pane at the bottom of your oXygen window. -
In the External Tools menu, select
2. Clone all repositories & resources. This triggers a command to clone all of the data repositories for HSG, includingfrus(for the Foreign Relations series),pocom(for Principals & Chiefs), etc. These repositories will all be stored in therepossubdirectory of thehsg-projectdirectory. In our office, theClone all repositories & resourcesprocedure should take only a couple of minutes; on slower internet connections, this may take 15 minutes or longer. -
In the Project pane, right-click on the
hsg-projectfolder and selectRefresh. You should now see areposfolder. Explore thereposdirectory and notice, for example,frusandpocom. These are all of the files that make up HSG. -
Next, in the External Tools menu, select
3. Apply hsg-project settings to eXist. (Do not proceed to4. Deploy all...yet.)
To prepare your computer to be able to preview your work or publish it to HSG, you need to first set up the OpenVPN Connect application to connect to the HSG Virtual Private Network (VPN). This allows you to access our cloud infrastructure for HSG.
During your training you will be provided with an OpenVPN Profile file (it has a .ovpn file extension). To ensure this file is stored in a safe place, create a folder for it. In Finder, open your workspace folder, and use File > New Folder to create a new folder, called OpenVPN Profiles. Drag your OpenVPN Profile file (the .ovpn file) into this folder.
-
Start OpenVPN Connect via its app icon in your Dock.
-
Select the
Xicon to end theOnboarding Tour, selectAgreewhen prompted with the Data Collection notice, and selectOKto dismiss the "Updates" window. -
On the
Import Profilewindow, select theFiletab. -
Select the
Browsebutton and navigate to the OpenVPN Profile file in yourworkspacefolder. -
Select the
Addbutton at the top-right corner of the window. -
Toggle the connect/disconnect button to confirm you are able to connect. With the connection active, try opening http://hsg-prod-backend1.hsg in your browser. Now disconnect.
Now, anytime you need to publish to HSG, you can connect to the VPN.
-
Start OpenVPN Connect via its app icon in your Dock.
-
Select the connect button.
Before publishing files to the public website, you may wish to preview them on your local system. This helps ensure that your edits have the desired effect and reduces the likelihood of unforeseen problems when publishing the files.
- Start eXist via its app icon in your Dock. During startup eXist will show a splash screen. Once the splash screen disappears, you can start, stop, and quit eXist and access other eXist utilities via its menu bar entry (a blue "X"-shaped icon).
-
To prepare your local eXist database with all of the files needed to run a local copy of HSG, go to the Tools dropdown menu in oXygen and select
4. Deploy all repositories to localhost. This step takes about 10-15 minutes on our computers. On a remote computer, this step could take as long as 40 minutes, depending on your computer's hardware. -
Now a complete copy of history.state.gov is now running at http://localhost:8080/exist/apps/hsg-shell/.
-
Drill down through the folder structure of the repositories to
repos/rdcr/articles/afghanistan.xml. This is a TEI XML file that can be viewed at http://localhost:8080/exist/apps/hsg-shell/countries/afghanistan (see https://history.state.gov/countries/afghanistan for the public website). -
Make a simple change, e.g., change the word "Summary" to "Introduction" in the first
<head>element. Select theFilemenu >Saveto save your changes to the file. -
To upload the file to eXist, select the
Toolsdropdown >Upload current file to localhost. A new tab will open at the bottom pane of the oXygen window, showing the results of theUpload current file to localhostscript. When you seeBUILD SUCCESSFUL, close the tab. -
In your browser, (re-)load http://localhost:8080/exist/apps/hsg-shell/countries/afghanistan, and you will see your change. Return to oXygen, undo your change (
Edit>Undo), save the file, and selectUpload current file to localhostagain.
When you have work that you would like to publish, the following steps will ensure that your work is backed up in our version control repository and published to the live site:
With the document open in oXygen, select the Format and Indent toolbar button (also accessible via the Source menu under Document > Format and Indent), and save your document. If you've made updates to many files, see https://github.com/HistoryAtState/hsg-project/issues/31 for a time-saving tip. This Format and Indent command ensures your commit (in the next step) is clean and reveals only the changes you made, not other incidental changes.
-
With a file from the repository open in oXygen, open the Tools dropdown menu, and select
Open current file's repository in GitHub Desktop. This will open GitHub Desktop, with the current repository selected. -
You will see a button in the toolbar, called
Fetch origin(sometimesPull origin). Click on this to make sure you have the latest version of everyone else's work from this repository. -
In the left-hand pane, you will see a tab, called
Changes, with a list of files you have modified. Confirm which files you want to commit by selecting (or unselecting) the checkboxes next to each file. Clicking on any file bring up a summary of the changes you made to the file (known as a "diff"). -
Enter a brief summary of the changes in the
Summaryfield. If the description is too long, use theDescriptionfield. -
Once you've confirmed that the files and summary/description are correct, select
Commit to master. -
As soon as you make a commit, the
Fetch Origintoolbar button will becomePush Origin, meaning that you have at least one local commit that have not yet been pushed to GitHub's servers. -
Once you've made all of your commits, select
Push Originto push your changes to GitHub. (ThePush Originbutton will now return toFetch Origin, and you will receive an email confirmation of your commit from the hsg-commits mailing list.)
-
Publish the changes to HSG in oXygen using the Tools dropdown menu >
Upload current file to history.state.gov.Before you publish the first time, you must first enter the password provided to you during your training for the HSG production servers. To do this, in oXygen's External Tools toolbar dropdown menu under the
Setup & maintenance section, select5. Enter production server credentials.
To ensure your local copy of files is up to date with everyone's work, follow these steps:
-
In oXygen, under the Tools dropdown menu, select
Pull updates from all repositories. Or, if you are only interested in a single repository, open a file from that repository in oXygen and selectPull updates from current file's repository. A new tab will open at the bottom pane of the oXygen window, showing the results of the update script. These results summarize which files have been downloaded. When you seeBUILD SUCCESSFUL, feel free to close the tab. -
To update your copy of the website running in eXist, select
Deploy all repositories to localhost. Or, if you only want to update a single repository, open a file from that repository in oXygen and selectDeploy current file's repository to localhost. When you seeBUILD SUCCESSFUL, close the tab.
A more detailed set of instructions with suggestions for daily and weekly tasks is in the article on Version control.
-
Note: This is optional and used for editing files already stored in the database on your local copy of eXist. The previous section provides a convenient method of uploading individual files to eXist.
-
In oXygen, select the
Windowmenu >Show View>Data Source Explorer. A new pane will open up, calledData Source Explorer. -
In this pane's toolbar, click on the small gear icon (its tooltip labels this icon as
Configure Database Sources...). APreferenceswindow will appear. -
Under
Connectionsselect+to bring up theConnectionwindow. Modify the fields as follows:-
Name:localhost -
Data Source:WebDAV (S)FTP -
WebDAV/FTP URL:http://localhost:8080/exist/webdav/db -
User:admin -
Password: (blank)
-
-
Select
OK
Note: These steps are optional and used for editing files already stored in the database on history.state.gov. The previous section provides a convenient method of uploading individual files to eXist.
-
In oXygen, select the
Windowmenu >Show View>Data Source Explorer. A new pane will open up, calledData Source Explorer. -
In this pane's toolbar, click on the small gear icon (its tooltip labels this icon as
Configure Database Sources...). APreferenceswindow will appear. -
Under
Connectionsselect+to bring up theConnectionwindow. Modify the fields as follows:-
Name:hsg-prod-backend1.hsg -
Data Source:WebDAV (S)FTP -
WebDAV/FTP URL:http://hsg-prod-backend1.hsg:8080/exist/webdav/db -
UserandPassword: You will be provided with this information during your training
-
-
Select
OK
Transmit is a file transfer client that makes it easy to upload many files to eXist or perform other batch file processes. You will be provided with this software during your training.
-
Select
Servers>Add New Server -
Modify the fields as follows:
- Name:
hsg-prod-backend1.hsg -
Protocol:WebDAV -
Address:hsg-prod-backend1.hsg -
Port:8080 -
User NameandPassword: You will be provided with this information during your training -
Remote Path:/exist/webdav/db -
Local Path:~/workspace/hsg-project/repos
- Name:
-
Select
Save. -
For localhost, use:
- Name:
localhost hsg -
Protocol:WebDAV -
Address:localhost -
Port:8080 -
User NameandPassword: You will be provided with this information during your training -
Remote Path:/exist/webdav/db -
Local Path:~/workspace/hsg-project/repos
- Name:
Congratulations! Your HSG Development Environment is now set up!