


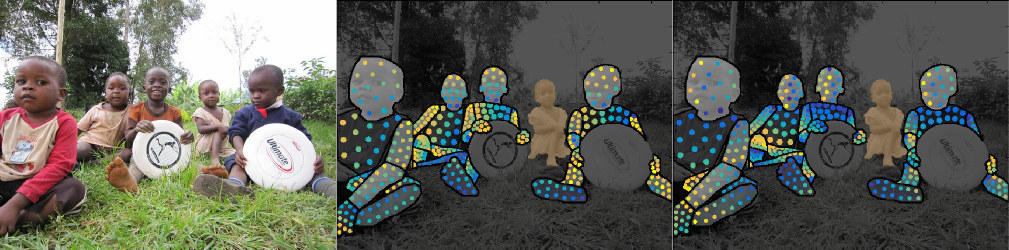
Run Detectron2 dense pose estimation algorithm. It maps all human pixels of an RGB image to the 3D surface of the human body.
We strongly recommend using a virtual environment. If you're not sure where to start, we offer a tutorial here.
pip install ikomia[Change the sample image URL to fit algorithm purpose]
from ikomia.dataprocess.workflow import Workflow
from ikomia.utils.displayIO import display

# Init your workflow
wf = Workflow()

# Add algorithm
algo = wf.add_task(name="infer_detectron2_densepose", auto_connect=True)

# Run on your image
wf.run_on(url="https://cdn.nba.com/teams/legacy/www.nba.com/bulls/sites/bulls/files/jordan_vs_indiana.jpg")

# Get graphics
graphics = algo.get_output(1)

# Display results
display(algo.get_output(0).get_image_with_graphics(graphics))Ikomia Studio offers a friendly UI with the same features as the API.
-
If you haven't started using Ikomia Studio yet, download and install it from this page.
-
For additional guidance on getting started with Ikomia Studio, check out this blog post.
- cuda (bool): If True, CUDA-based inference (GPU). If False, run on CPU.
- conf_thres (float) default 0.8: Keypoint threshold for the prediction [0,1].
Parameters should be in strings format when added to the dictionary.
from ikomia.dataprocess.workflow import Workflow
from ikomia.utils.displayIO import display

# Init your workflow
wf = Workflow()

# Add algorithm
algo = wf.add_task(name="infer_detectron2_densepose", auto_connect=True)

algo.set_parameters({
    "cuda": "True",
    "conf_thres": "0.5"
})

# Run on your image
wf.run_on(url="https://cdn.nba.com/teams/legacy/www.nba.com/bulls/sites/bulls/files/jordan_vs_indiana.jpg")

# Get graphics
graphics = algo.get_output(1)

# Display results
display(algo.get_output(0).get_image_with_graphics(graphics))Every algorithm produces specific outputs, yet they can be explored them the same way using the Ikomia API. For a more in-depth understanding of managing algorithm outputs, please refer to the documentation.
from ikomia.dataprocess.workflow import Workflow

# Init your workflow
wf = Workflow()

# Add algorithm
algo = wf.add_task(name="infer_detectron2_densepose", auto_connect=True)

# Run on your image
wf.run_on(url="https://cdn.nba.com/teams/legacy/www.nba.com/bulls/sites/bulls/files/jordan_vs_indiana.jpg")

# Iterate over outputs
for output in algo.get_outputs():
    # Print information
    print(output)
    # Export it to JSON
    output.to_json()