An Implementation of digital certified mail using Pretty Good Privacy
- https://www.slideshare.net/secret/cuerHdATH0uzg5 (ACM Documentation)
- https://www.slideshare.net/secret/MPizb4nbldCHHe (slides)
Today email is the most used media in exchanging messages and information between people and groups. However, there are not many known efficient ways of securing the email system, since it is also one of the challenging parts due to trade off among performance and security. In this project, we have done research on the digital certified mail up to implementing base algorithm and then, went through more on pretty good privacy (PGP) applied to the email system.
Digital certified mail is one of the suggested methods before and it was invented in a few decades ago so, it would not be fully utilizing now. This is using a base protocol called oblivious transfer protocol, and the story should be started from the situation where signing contract over the network. The best way must be physical solution where two parties are sitting together to sign the contracts at the same time, and then exchange the signed documents in that place. However, the scenario need to be modified when it is happening over the network. In general, fair exchange of keys and messages between sender and receiver are desired, but probable fail all or success all. The base of digital certified mail system is from oblivious transfer protocol and we tried to implement this algorithm by using NodeJS.
Oblivious Transfer Protocol has a mechanism that a receiver wants to have a specific message from a sender without notifying the selection to the sender, and the sender transmits all encrypted messages based on the protocol oblivious to what receiver get as she/he want. The key security characteristic comes from the facts that the receiver and sender do not need to specify selection and keys, but they can do exchange what they want to transfer.
Here is the description on basic 1-2 Oblivious Transfer Protocol to go for digital certified mail system.
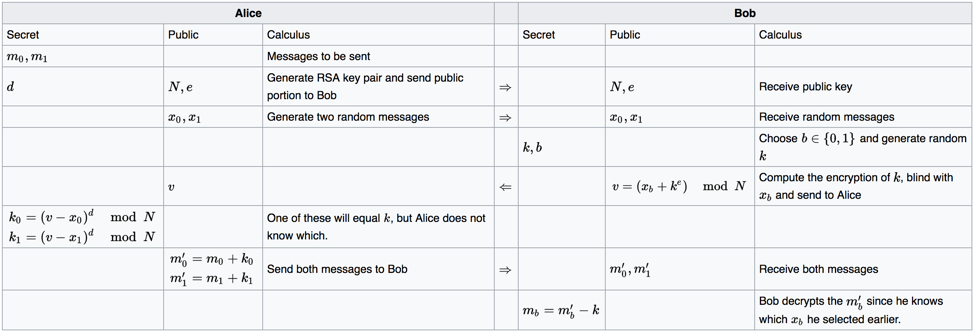
Above table shows the steps for 1-2 oblivious transfer protocol that the sender has two messages m0 and m1, and the receiver has a selection bit b. Here the receiver wants to receive mb, without the sender knowing b, while the sender wants to make sure that the receiver receives only one of the two messages. The protocol can be instantiated using RSA encryption.
PGP is a popular program used to encrypt and decrypt Internet e-mail. It can also be used to send an encrypted digital signature that identifies the identity of the sender so that it can be assured that the message has not changed in transit. PGP is a freeware, low-cost commercial version, and is the most widely used confidentiality program by individuals and businesses. This program was developed by Philip R. Zimmermann in 1991 and became the de facto standard in e-mail security. PGP can also be used to encrypt and store files so that they cannot be read by other users or intruders.
- Backend/Frontend: Node.js v7.7.4
- Language: JavaScript
- DBMS: Mongo DB v3.4.4
- Repository: https://github.com/IkwhanChang/certified-mail
- Copy the source code: git clone https://github.com/IkwhanChang/certified-mail
- Install the dependencies: npm install
- Install MongoDB by using instruction manual: https://docs.mongodb.com/manual/installation/
- Run the MongoDB: sudo mongod and create the database of “Mail”
- Run the server: node receiver.js
- Connect the GUI: http://localhost:5001
- Compose any email and see the console output

In our project, we used node.js and express.js To use the RSA algorithm; we use the node-rsa (https://github.com/rzcoder/node-rsa)
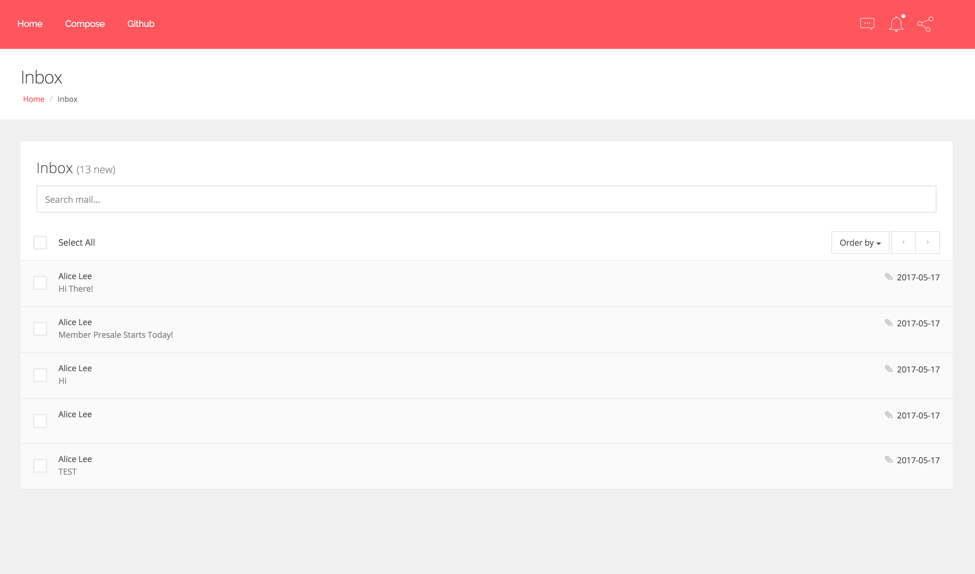
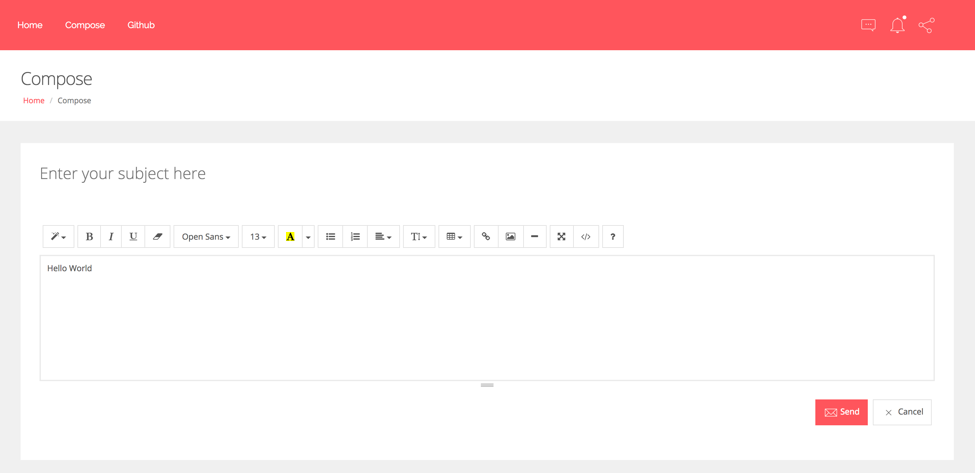
We have three GUI user interface: 1) Inbox: to see every email that received from the start 2) Compose: to compose the email with WYSIWYG text editor 3) View: to see specific email


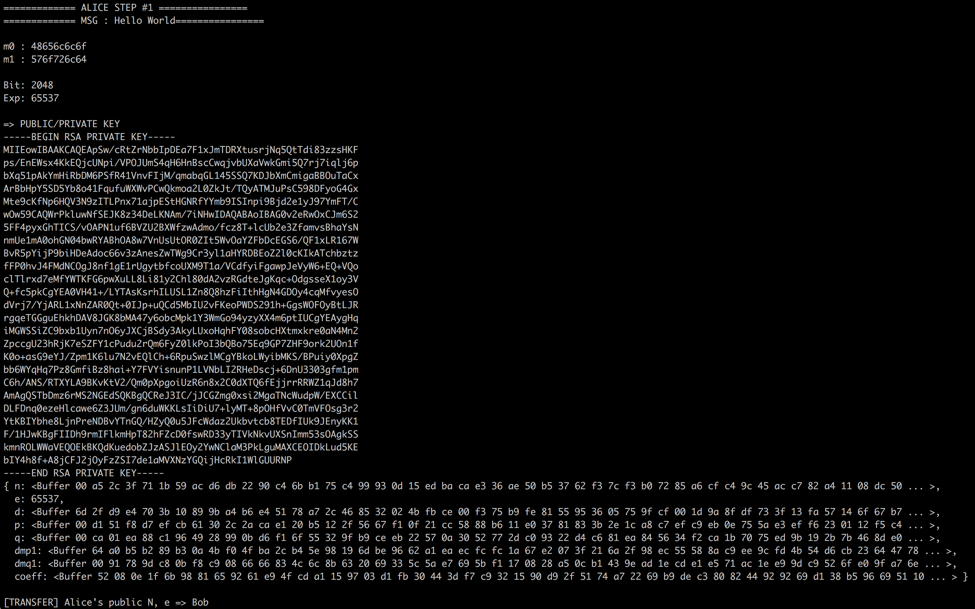
In this logic, Alice will create the RSA key pair and send the public portion (N, e) and two random messages generated by Alice to the Bob. Thus, Bob will receive (N, e) and x0 and x1
function alice_1(msg) {
  console.log("\n\n============= ALICE STEP #1 ================");
  console.log("============= MSG : "+msg.trim() + "================");
  m0 = a2hex(msg.trim().split(' ')[0]);
  m1 = a2hex(msg.trim().split(' ')[1]);
  console.log("");
  console.log("m0 : "+m0);
  console.log("m1 : "+m1);

  var key = new NodeRSA({b: 16});

  var bit = 2048;
  var exp = 65537;
  console.log("");
  console.log("Bit: "+ bit);
  console.log("Exp: "+ exp);

  key.generateKeyPair(bit, exp);
  console.log("");
  console.log("=> PUBLIC/PRIVATE KEY");
  console.log(key.exportKey('pkcs1'));
  console.log(key.exportKey('components'));

  private_D =key.exportKey('components').d;
  public_N = key.exportKey('components').n;
  public_E = key.exportKey('components').e;


  // Alice's public N, e => Bob
  console.log("");
  console.log("[TRANSFER] Alice's public N, e => Bob");
  return bob_1(key.exportKey('components').n, key.exportKey('components').e);
}
In above code, the message will be split by space (e.g. original message: Hello World, split message: Hello / World) Then, we will convert that message from ASCII to Hex for calculating. Afterward, RSA key pair will be generated by using the node-RSA library and the definition of bit and exponent (in this example, 65537 of the exponent) Finally, Alice is ready to send the public key pairs.

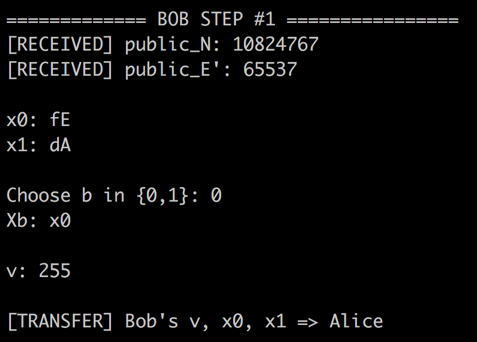
In this step, first Bob need to select either x0 or x1 that received from Alice. Once Bob select, the selected xb will be used for creating the v by using equation of v = (xb + k^e) mod N. Finally, the N will be sent to the Alice.
function bob_1(public_N, public_E){
  console.log("\n\n============= BOB STEP #1 ================");
  console.log("[RECEIVED] public_N: "+public_N.readInt32BE());
  console.log("[RECEIVED] public_E': "+public_E);
  //var private_D =key.exportKey('components').d;
  // BOB
  //var public_N = key.exportKey('components').n;
  //var public_E = key.exportKey('components').e;

  var x0 = makeid();
  var x1 = makeid();

  console.log("\nx0: "+ x0);
  console.log("x1: "+ x1);

  var xb;

  var b = Math.random() < 0.5 ? 1 : 0;
  console.log("\nChoose b in {0,1}: "+ b);
  if(b === 0){
    xb = x0;
    console.log("Xb: x0");
  }else{
    xb = x1;
    console.log("Xb: x1");
  }

  var k = 1;//Math.floor(Math.random() * 20)/100;
  //console.log(parseInt(xb, 16));
  var v = (parseInt(xb, 16) + math.mod(Math.pow(k, public_E), public_N.readInt32BE()));
  console.log("\nv: "+v);

  console.log("\n[TRANSFER] Bob's v, x0, x1 => Alice");

  return alice_2(v, x0, x1);
}
In the above code, we used static k of 1 because since we have a large number of the exponent (in this example 65531), it took a long time to calculate the v . Plus, we used the HEX to calculate every key since we have a large number of the original message.

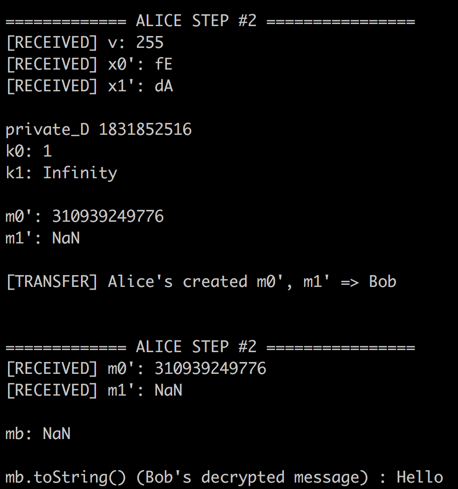
In this final step, Alice will create k0 and k1 by using the v that received in the previous step. Once Alice calculates k0 and k1, then m'0 and m'1 can be created. Then, Alice sends those extra messages to the Bob. Once Bob received the k0 and k1, Bob can simply compare with k that he randomly selected in the previous step. If either m'0 or m'1 is null or infinity number, then we can simply know which m is the original message. Finally, Bob can know the original split message.
function alice_2(v, x0, x1) {
  console.log("\n\n============= ALICE STEP #2 ================");
  console.log("[RECEIVED] v: "+v);
  console.log("[RECEIVED] x0': "+x0);
  console.log("[RECEIVED] x1': "+x1);
  // ALICE
  //var public_N = key.exportKey('components').n;
  var k0 = Math.pow((v - parseInt(x0, 16)), private_D.readInt32BE());
  var k1 = Math.pow((v - parseInt(x1, 16)), private_D.readInt32BE());
  console.log("\nprivate_D "+private_D.readInt32BE());
  console.log("k0: "+k0);
  console.log("k1: "+k1);

  var m0_ = parseInt(m0, 16) + parseInt(k0, 16);
  var m1_ = parseInt(m1,16) + parseInt(k1, 16);

  console.log(" \nm0': "+m0_);
  console.log("m1': "+m1_);
  //console.log(m0_);
  //console.log((m1_ - parseInt(k1, 16)).toString(16));

  console.log("\n[TRANSFER] Alice's created m0', m1' => Bob");

  return bob_2(m0_, m1_, k0, k1);
}

function bob_2(m0_, m1_, k0, k1){
  console.log("\n\n============= ALICE STEP #2 ================");
  console.log("[RECEIVED] m0': "+m0_);
  console.log("[RECEIVED] m1': "+m1_);
  var mb;
  //console.log(mb);
  if(isNaN(m0_)){
    mb = (m1_ - parseInt(k1, 16)).toString(16);
  }else{
    mb = (m0_ - parseInt(k0, 16)).toString(16);
  }

  console.log("\nmb: "+m1_);
  console.log("\nmb.toString() (Bob's decrypted message) : "+hex2a(mb));
  //console.log(hex2a(mb));

  return hex2a(mb);
}
The final result is hex2a(mb) (hex2a() is convert from hex to ASCII)