qlbuilder is a CLI tool which is ran from the command prompt. The tool allows Qlik Sense developers to write their Qlik scripts locally and to communicate with Qlik instance to:
- set the reload script into configured Qlik app
- reload app (the reload is performed from Qlik instance itself)
- check for syntax errors while developing without the need to save the whole app (the syntax check is performed against temporary session app)
- download Qlik app(s) with or without data
npm install -g qlbuilder
Once the global package is installed you can use qlbuilder command from any folder
(To list all commands run qlbuilder --help)
Run one of the following commands from CMD/PowerShell
-
qlbuilder create [name]- create the initial folders and files in the current folder.nameis used as root folder name-t --task(optional) - supplying this argument will createVSCodespecific files inside.vscodefolder as well. Thetasks.jsonfile describe all tasks that can be ran withqlbuilder. Change the environment name insettings.jsonfile and useVSCodeto start the tasks. (tasks.jsoncan be left as it is. No need for editing there)-s --script(optional) - the creation process will copy the script files from the specified template folder using Templates-c --config(optional) - the creation process will copy the template yml from the template folder asconfig.ymlinto the current folder using Templates
-
qlbuilder build- builds the full load script from
/src/*.qvsfiles. The produced script is saved indistfolder (LoadScript.qvs)
- builds the full load script from
-
qlbuilder checkscript [env]- builds the script (from
/src/*.qvsfiles) - connects to Qlik and checks the script for syntax errors -
envis the environment name fromconfig.yml. The check is performed against temporary session app.
- builds the script (from
-
qlbuilder reload [env]- connects to Qlik and reload the app -
envis the environment name fromconfig.yml. Once the reload has startedqlbuilderwill display the progress in the same console. -ro, --reload-output <LOCATION>- after the app is reload (with or without errors) the reload log will be saved in<LOCATION>folder. The reload log file name will be inappId_timestamp.txtformat.-roo, --reload-output-overwrite <LOCATION>- similar functionality to--reload-outputbut the file name will beappId.txt. With this option only the last reload log will be kept.
- connects to Qlik and reload the app -
-
qlbuilder setscript [env]- builds the script (from
/src/*.qvsfiles) - connects to Qlik and checks the script for syntax errors -
envis the environment name fromconfig.yml - sets the new script
- saves the app
- builds the script (from
-
qlbuilder getscript [env]- (the opposite ofsetscript) get the remote script, splits it into tabs and save the files insidescrfolder.config.ymlshould present to indicate from which env/app to extract the script-y- optional flag. Thegetscriptcommand will always ask for confirmation before overwrite the files intosrcfolder. Passing-ywill skip this confirmation and will directly executegetscriptcommand.
Steps:
- connects to Qlik and get the script from desired app -
envis the environment name fromconfig.yml - split the script into tabs/files
- saves the
qvsfiles intosrcfolder
-
qlbuilder watch [env]- enters in watch mode. The default behavior is to build and check the script syntax on any*.qvsfile insidesrcfolder. Can accept three additional flags:-r- reloads the script on anyqvsfile change-s- sets the script (and save the app) on anyqvsfile change-d- disable the auto check for syntax errors. By default the script will check for syntax errors on each save (connects to QS and checks the script for errors against session/temp app)
Inside
watchmode the console is active and the developer can perform additional actions. Just type one of the letters/commands below in the console to trigger them:sorset- build, syntax check and set scriptrorrl- build and set the script, reload the app and save. If any syntax error (during the build and set) the reload is not triggeredcorclr- clear consoleeorerr- check for syntax errors (useful only if the watch mode is started with-dargument)?- print these commandsx- exit
-
qlBuilder section [sub-command]- main commands for interactive section operationsadd- adds new script section at specified positionremove- remove one or many script sections. Once the sections/files are removed the rest of the files are re-numbered (seerenumberoperation)move- move specific script section up/down. After the file is moved (in reality the file is actually renamed) the files are re-numberedrenumber- ideally all files are prefixed with an index (1--,2--,3--etc.) if section/file is deleted/renamed manually this index can appear "broken". Executingrenumbercommand will re-index the files so the prefix will be continous
-
qlbuilder download [env]- download the specified Qlik app. Optional parameter to include or exclude the data in the exported app/file-por--path(mandatory) - path to the folder where the qvf will be downloaded-ndor--nodata- optional parameter indicating if the exported app should include the data or not. Default istrue
-
qlbuilder templates- list all available script and config templates-c --create(optional) - creates empty templates folder structure (if it doesn't exists) using Templates -
qlbuilder vscode- creates the.vscodefolder (inside the current folder) with thetasks.jsonandsettings.jsonfiles. Please check thecreatecommand description above for more info -
qlBuilder appDetails [env]- display info about the configured app -
qlBuilder createApp [env]- creates brand new (empty) app on the specified environment. Updatesconfig.ymlappId for the environment
The create command will create few folders and config.yml file. The config file is pre-populated with example values. This file specifies Qlik environments (dev, test, prod etc.)
The config file is in yaml format. The config below defines one environment (desktop) and the connection to it is made on localhost:4848 and the app that we will target there is qlbuilder Test.qvf
- name: desktop
  host: localhost:4848
  secure: false
  appId: C:\Users\MyUserName\Documents\Qlik\Sense\Apps\qlbuilder Test.qvf
(Take a look at the example above for how to specify otherApps. Used for setting the same script to additional apps)
For QSE with certificates the config will be:
- name: prod
  host: 192.168.0.100:4747 # IP/FQDN of QS engine (central node)
  appId: 12345678-1234-1234-1234-12345678901 # app ID
  authentication:
    type: certificates
For QSE with JWT the config will be:
- name: jwt
  host: 192.168.0.100/virtual-proxy-prefix # IP/FQDN with of the virtual proxy (see below)
  appId: 12345678-1234-1234-1234-12345678901a # app ID
  authentication:
    type: jwt
    sessionHeaderName: X-Qlik-Session-jwt # (optional) see below
When working with jwt port is not required. If JWТ is not the main method for authentication then the Virtual Proxy prefix need to be provided. For more information how to set this please check this
Qlik Support article
For QSE with Windows/Form the config will be:
- name: uat
  host: 192.168.0.100/virtual-proxy-prefix # IP/FQDN with of the virtual proxy (if needed)
  appId: 12345678-1234-1234-1234-12345678901a # app ID
  authentication:
    type: winform
    sessionHeaderName: X-Qlik-Session-Win # (optional) see below
For Qlik Saas with Windows/Form the config will be:
- name: saas
  host: tenant-name.eu.qlikcloud.com
  appId: 12345678-1234-1234-1234-12345678901a # app ID
  authentication:
    type: saas
By default qlbuilder will try and connect through https/wss. If the environment is QS Desktop or the communication is done via http/ws then secure: false need to be added to the environment configuration
sessionHeaderName - each Virtual Proxy should have a unique session cookie header name. The default value is X-Qlik-Session. If the default VP is used then this config value is not needed. qlBuilder will show warning message and will try to connect to Qlik with the default value.
For security reasons (mainly to avoid commit users and password) qlbuilder expects some environment variables to be set before start. The content of the variables can be pre-set using .qlbuilder.yml config file in the user home folder (see below)
-
WindowsQLIK_USER- in format DOMAIN\usernameQLIK_PASSWORD
To set env variables:
- in CMD -
set QLIK_USER=DOMAIN\UserName - in PowerShell -
$env:QLIK_PASSWORD="my_password"
-
JWTrequires one environment variable to be setQLIK_TOKEN- the content of the jwt token
-
CertQLIK_CERTS- the folder location where the certificates are stored. The script will search for 3 certificates -root.pem,client_key.pemandclient.pemQLIK_USER- username in formatDOMAIN\UserName
-
SaasQLIK_TOKEN- the API key, generated from the user settings panel
.qlbuilder.yml config file - this file should be placed in your home folder (c:\users\my-username). The file contains the credentials for the Qlik environments. The name of the environments should match the ones in the local config.yml
dev:
  QLIK_USER: DOMAIN\my-dev-user
  QLIK_PASSWORD: my-dev-password
prod:
  QLIK_USER: DOMAIN\my-prod-user
  QLIK_PASSWORD: my-prod-password
dev_jwt:
  QLIK_TOKEN: eyJhbGciOiJIUzI1NiIsInR5cCI6IkpXVCJ9.eyJzdWIiOiIxMjM0NTY3ODkwIiw...
prod_cert:
  QLIK_CERTS: c:\path\to\cert\folder
  QLIK_USER: DOMAIN\UserName
The environment name is used as an command argument (so try not to have spaces in the environment names)
At the moment (it will probably change in near future) the script is build by reading the qvs files in src folder by alphabetical order. The files should have the following naming convention:
number--name.qvs
To ensure alphabetical order the files should start with number followed by separator (--) and name. The name will be used as a tab name when setting the script in Qlik.
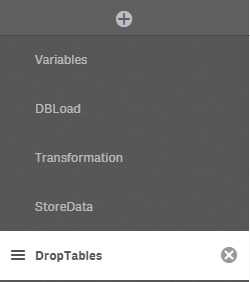
For example having the following files:
1--Variables.qvs
2--DBLoad.qvs
3--Transformation.qvs
4--StoreData.qvs
5--DropTables
Will result in the following tabs in Qlik
Having the script files as local files allows to put them in version control. This will put the src, dist and config.yml files in the repository.
In some cases the Prod environment app can be without the original (full) script and just includes (via REST API call) the final load script (the one in dist folder) from Git's master branch. This way, technically, there is no need to touch the Prod app in case of an script change ... this is just an idea how to benefit from this approach.
New projects can be initialized with predefined scripts and/or configs. In order to do this qlBuilder will search for templates in C:\<USER>\qlbuilder_templates folder. By default this folder (and its sub-folders) do not exists and can be created either manually or with:
qlBuilder templates createThere are two types of templates - config and script. Check the sections below for more information. Both Script and config template arguments are optional and if used can be provided independently to each other or both at the same time.
Under qlbuilder_templates folder create a folder named config. The config folder is where the config templates will be stored. Each template config should be valid qlBuilder config (yml file). There are no limitations on what the template file name should be (as long as is a valid file name).
For example: if there are 3 config template files: dev_config.yml, uat_config.yml and test.yml. Each template can be invoked with the following commands:
qlBuilder create my-project-name -c dev_configqlBuilder create my-project-name -c uat_configqlBuilder create my-project-name -c testAs seen when specifying config in the command the file extension (.yml) is omitted.
Note Only files with
ymlextension are valid config templates
Under qlbuilder_templates folder create a folder named script. This folder will contain the folders with the script templates. Each template folder will contain the qvs script files that will be copied across when create command is used (if -s argument is provided). The script files should be prefixed (1--xxx, 2-xxx, 3--xxx etc).
For example: if there are 3 config template folders: dev-env, uat-env and test. Each template can be invoked with the following commands:
qlBuilder create my-project-name -s dev_envqlBuilder create my-project-name -s uat_envqlBuilder create my-project-name -s testNote Only files with
qvsextension will be copied to the result folder
Have a look at the issues labeled as an enhancement
If you have any issues, comments, suggestions etc please use the GitHub issue tracker