Getting started
Warning: Infusion currently supports Third Dawn (3.x) clients only. Other client versions may work as well but I don't test them and you will be most likely disappointed with serious bugs.
- Make sure that you have .NET Framework 4.6 or newer installed. If you are using Windows 10, you have already .NET Framework 4.6 installed.
- Download Infusion binary distribution. For example currently there are 3 files on the download page: Infusion-1.0.2-alpha.zip, Source code (zip), Source code (tar.gz). The binary distribution is in Infusion-1.0.2-alpha.zip. The other files contain Infusion source code and you don't need to worry about them.
- Unpack the downloaded zip file to an Infusion installation folder. It can be any folder, for example c:\Program Files\Infusion.
Note: If you put Infusion to c:\Program Files\Infusion folder, make sure that you have read/write access to Logs and Scripts sub-folders. Infusion modifies files in these folders. It is the same problem as with Desktop folder of Ultima Online client.
- Infusion requires that you use a client without encryption. If your Ultima Online server allows using Third Dawn (3.x) clients, you can download a client without encryption here. The zip file contains
NoCryptClient.exe. Copy it to your Ultima Online installation folder (typically c:\Program Files\Ultima Online 2D).
Note: SHA-256 checksum of client306m-patches.zip archive is
b8aad641350334b714c567883ef065f44e541b166efd5031efeca4015471af85. You can verify that nobody has hacked the file and inserted a virus by comparing SHA-256 checksum.
Now, Infusion is ready to start.
- Start
Run.cmdfrom the Infusion installation folder (for example c:\Program Files\Infusion). Infusion launcher window appears:
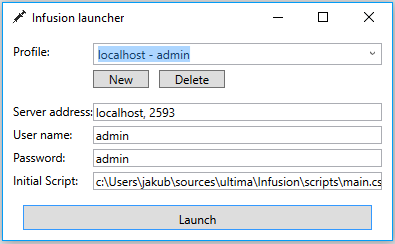
- Put your profile name to
Profileedit box. The profile name doesn't have any meaning for Infusion and contain any text that is understandable for you. I use this pattern for my profile names:<server> - <character name>. - Put an address of you server with port to
Server address. - You can use
Initial Scriptto load different script at startup for each profile. For example I loadcraft.csxscript for my craft character andmage.csxfor my mage. Infusion by default tries to load and executestartup.csxfile from scripts folder that is part of binary distribution. If Infusion cannot findstartup.csxfile, then this field is empty. -
User nameandPasswordfields are optional. Infusion uses them to pre-fill login dialog in Ultima Online client. - Click
Launch.
Infusion starts Ultima Online client by executing NoCryptClient.exe from Ultima Online installation folder (typically c:\Program Files\Ultima Online 2D) and you can login to the game as usually.
Infusion doesn't support popular UO client patches like FPS patch. Still you can enable some of these patches using UOPatcher. To do so, you can watch a video or follow these steps:
- Download UOMod.dll and UOPatcher.exe from GitHub and put them to a folder.
- Start Infusion and sign in to game.
- Start UOPatcher.exe.
- Select game client window in UOPatcher.
- Check FPS patch in UOPatcher window.
The Infusion main window is a very simple text console. In this window you can see 'journal' from the game and script output and you can enter your character speech and commands on the input line prefixed with >>. It is the main communication channel with Infusion.
Switch to Infusion console and start typing a message you want your character to say and then press enter.


You can start commands either from Infusion console or Ultima Online client by prefixing the command name with comma, for example:
,help
prints all known command to Infusion console.
,help info
prints info command documentation to the Infusion console.
Injection and other tools use very similar way to invoke commands.