DISCLAIMER: This is not an official product by Airsoft Softwair.
This extension adds support for Hollywood version 10: Xcelicious to Visual Studio Code (Windows, macOS, Linux). Hollywood is a multimedia-oriented programming language designed to create applications and games and is available for AmigaOS, Windows, macOS, and Linux. Hollywood (and therefore this extension) is capable of compiling to the following target plattforms:
- AmigaOS
- Android
- AROS
- iOS
- Linux
- macOS
- MophOS
- WarpOS
- Windows

In order to make use of the extension you need to buy a copy of Hollywood here: https://www.hollywood-mal.com/purchase.html
More information about Hollywood is available here: https://www.hollywood-mal.com
You can find the Hollywood documentation here: https://www.hollywood-mal.com/docs/html/hollywood/
NOTICE: The major version number of this plugin correspondes with the major version number of Hollywood. Therefore the first release version of this extension was 8.0.1.
- Hollywood for Visual Studio Code (hw4vsc)
First of all you can use the great inbuilt editing features of Visual Studio Code like quick file navigation including fuzzy search (press Ctrl + P), Multi-Cursor, easy code editing (like line cloning, deletion, and swapping), project/workspace support, bracket matching and so forth. Please consult the Visual Studio Code documentation for more infos.
Additionally this extension supports:
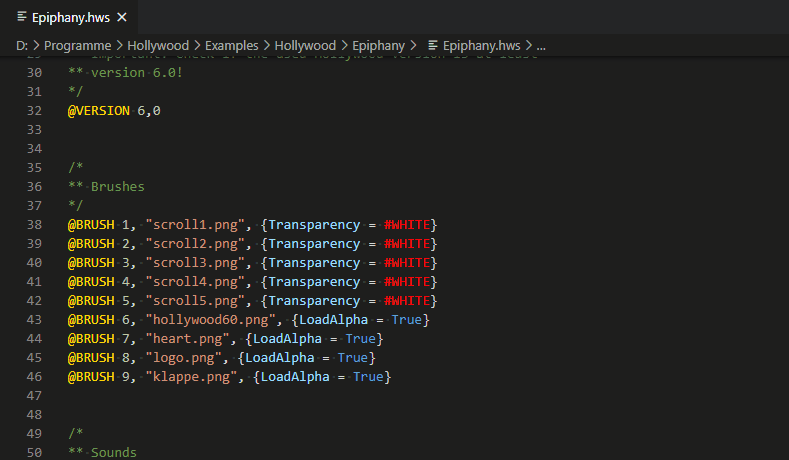
- Hollywood specific syntax highlighting including a Light and Dark Theme
- Hollywood specific Code Snippets
- Go to definition functionallity for variables, constants, and functions
- Document Symbols for showing your variables, constants, and functions in the Outline and Breadcrump view and for easy code navigation
- Code indention
- Code folding
There are several ways to install this extension:
- Install and open Visual Studio Code.
- Press
Ctrl+Shift+XorCmd+Shift+Xto open the Extensions pane or click on the corresponding button in the side bar. - Find the Hollywood extension (look for "Hollywood MAL") and click
Install.
Alternatively you can use this direct link: https://marketplace.visualstudio.com/items?itemName=michaeljurisch.hollywood-mal
or
- Download the latest release in the form of a
.vsixfile in this extensions GitHub releases tab - Open a command prompt (like cmd or PowerShell on Windows), navigate to the downloaded extension and enter
code --install-extension hollywood-mal-10.0.0.vsix, wherehollywood-mal-10.0.0.vsixhas to be the name of the downloaded file.
or
Download/check out the content of the GitHub repo and copy it to your extension folder:
- Windows:
%USERPROFILE%\.vscode\extensions - macOS:
~/.vscode/extensions - Linux:
~/.vscode/extensions
Now create or open a .hws file. The extension is activated now.
Open User or Workspace Settings by pressing Ctrl+Shift+P and enter settings or open the extension pane, click the manage icon on the Hollywood extension and select Extension Settings.
There are two types of settings supported by this extensions: User Settings and Workspace Settings. While the first ones are globally set for all Visual Studio Code instances the latter ones are set just in a workspace which you can imagine as a project.
In order to create a workspace for your code, create a folder for your project, open it in Visual Studio Code, select File -> Save Workspace As... in the menu and set a name for your workspace file.
For a detailed description, please consult the docs User and Workspace settings
Setting: hollywood.exePath
In order to run and compile your Hollywood scripts you have to define the location of the Hollywood main program on your computer. Although you could use the standard Hollywood.exe it makes more sense to use Hollywood_Console.exe which resists in the same folder. In the context of this extension the advantage of the Console version is that output like debug statements (DebugPrint()) or error messages (with console argument -printerror, see the tasks.json example file) are send to the Terminal panel of Visual Studio Code - which increases the integrated experience - and not opened in a separate window or modal dialog.
Normally this should be a User Setting (and not a Workspace Setting), so the executeable is defined globally for all your Hollywood projects.

Example settings.json: "hollywood.exePath": "C:\\Program Files\\Hollywood\\Hollywood_Console.exe"
Setting: hollywood.mainFile
Whether your Hollywood project consists of one or more files, you should define the main Hollywood file of your project. This will help you compiling and running your project via Tasks.
This is a setting that should be defined as a Workspace Setting (so create a Workspace first if you haven't done yet (File -> Save Workspace as ...)).

Example in YOUR_PROJECT.code-workspace: "hollywood.mainFile": "mainApp.hws"
Setting: hollywood.mainOutputFile
This settings lets you define the name of the compiled program which is the output of the compiling process. It comes in handy when using Tasks. The setting should not contain a file extension like .exe as this is added by the executable output format.
This is a setting that should be defined as a Workspace Setting (so create a Workspace first if you haven't done yet (File -> Save Workspace as ...)).

Example in YOUR_PROJECT.code-workspace: "hollywood.mainOutputFile": "mainApp"
Setting: hollywood.outputExeType
This setting specifies the output format of the executable that the Hollywood compiler shall create.
The best approach is to define this in the user settings (so it is defined globally for all your projects) and override it in workspace settings if needed, so you can have different output formats for different workspaces/projects.
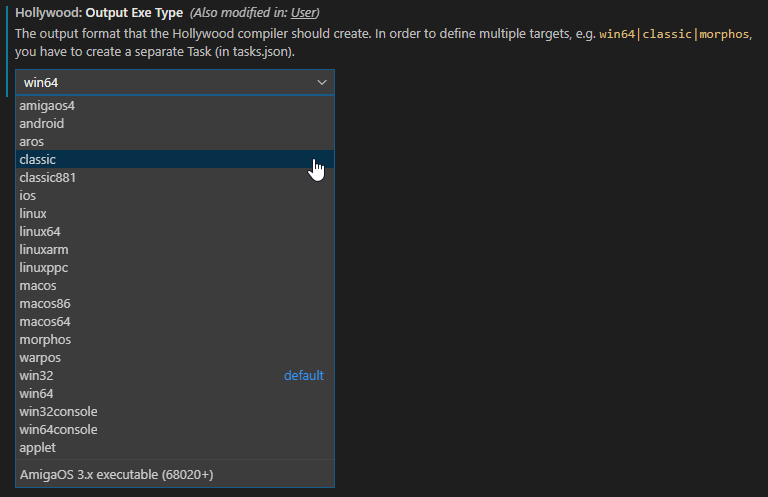
Example in YOUR_PROJECT.code-workspace: "hollywood.outputExeType": "classic"
In order to define multiple targets, e.g. win64|classic|morphos, you have to create a separate Task (see description below or have a look for the example file.
For a complete list of all output formats check the -exetype console argument under https://www.hollywood-mal.com/docs/html/hollywood/ManualUsage.html
You have to create Tasks in Visual Studio Code in order to run or compile a Hollywood file/project. For a deeper dive into Tasks it is recommended to read the official Visual Studio Code documentation for Tasks.
For every project you have to create the task definitions. There are two ways to achieve this:
- Create a new
tasks.jsonfile- Press
Ctrl+Shift+XorCmd+Shift+Xand enterConfigure Task - Select
Create tasks.json file from template - Select
Others - The freshly created
tasks.jsonfile is opened in Visual Studio Code. For later reference: This file is created in the.vscodefolder of your project/workspace. - Add new tasks or copy tasks from the example file.
- Press
- Clone an exisiting
tasks.jsonfile- Look for an exisiting
tasks.jsonfile in.vscodefolder of another Hollywood project or download the example file to your.vscodefolder. - Open the file and edit those defined tasks or add new ones.
- Look for an exisiting
Several working tasks are shown in the example file, so be sure to consult the file.
A minimal task confguration consists of 4 or 5 properties.
"label": This is the label you will see in the task list when you run a task."type": Defines whether the task is run as a process or as a command inside a shell. Normally you set it to"shell"."group": Defines to which execution group this task belongs. This is optional, but if you want to define a standard task (like building or running your project) which is easily accessable by pressingCtrl+Shift+Byou have to define such a group (see the example file)."command": This is the actual command that is executed. Normally you will only use the configured path to the Hollywood executeable here, which is${config:hollywood.exePath}(see here)."args": This is an array which contains arguments passed to the command when the task is invoked. Besides several inbuilt Visual Studio Code variables like${workspaceFolder},${file}and${fileBasenameNoExtension}and Hollywood's command line arguments (like-printerrorto print syntax errors into the Terminal panel) you can use the following extension specific variables (see the provided settings under Configuration):${config:hollywood.mainFile}: The configured main project file${config:hollywood.mainOutputFile}: The name of the compiled program${config:hollywood.outputExeType}: The configured standard output exe format
NOTICE: By default the current working directory is the current workspace root. If you ever need to change this for your task because your source code that has to be compiled is in a different folder you can change the current working directoy by using the "cwd" option (see this link for details).
This is a complete example of a task definition:
{
    "label": "Compile Hollywood Main script to default target",
    "type": "shell",
    "command": "${config:hollywood.exePath}",
    "args": [
         "${config:hollywood.mainFile}",
         "-compile",
         "${config:hollywood.mainOutputFile}",
         "-exetype",
         "${config:hollywood.outputExeType}"
   ],
    "group": {
        "kind": "build",
        "isDefault": true
    }
}If you have set default task simple press Ctrl+Shift+B to run that specific task.
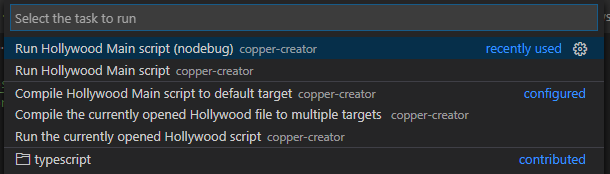
For all other tasks you have to follow these steps:
- Press
Ctrl+Shift+Pto show the Command Palette - Enter
Run Task - Pick the task you want to run
- Select
Continue without scanning the task outputorNever scan the task output for this taskif you want to ignore this message in the future
If you have already worked with the official Hollywood IDE you may be used to press F5 to run the current script. You can adopt the same behaviour with this extension through overriding the keybinding. In this example we will run the project's main script by starting the corresponding task we created above and you can see in the task.json example.
In order to override the setting you have to follow these steps:
- Press
Ctrl+Shift+Pto show the Command Palette - Enter
Open Keyboard Shortcuts (JSON) - The file
keybindings.jsonwhich may be nearly empty is opened. Please copy the following code between[and]and save the file:
{
   "key": "f5",
   "command": "workbench.action.tasks.runTask",
   "args": "Run Hollywood Main script",
   "when": "resourceLangId == hollywood"
}
It is important to set the "args" parameter exactely like the corresponding tasks "label" you configured in your tasks.json. Of course it is possible to start another task and/or use other keys (see the "key" parameter).
"when": "resourceLangId == hollywood" ensures that F5 is just overriden for Hollywood files, so if you additionally code in other languages like JavaScript or TypeScript you don't override the default behaviour for those languages.
Dark Theme
Light Theme
There are two ways to activate or switch the theme:
- Via Extension Pane
- Go to the Extension pane and look for the Hollywood extension
- Click on the Manage icon and chosse
Set Color Theme - Now select
Hollywood (Dark)orHollywood (Light)
- Via Command Palette
- Press
Ctrl+Shift+Pto show the Command Palette - Enter
Color Theme - Pick
Hollywood (Dark)orHollywood (Light)from the list
- Press
This feature lets you jump to variable, constant, or function definitions/declarations by pressing F12 when on a proper symbol. This is also possible with Ctrl+Click on a symbol.
If your files are organized in a workspace, all workspace files are used.
If you hover over a symbol and press Ctrl you see a preview of the declaration.
For additonal information see the official Visual Studio Code documentation
All defined/declared document symbols (variables, constants, functions) are shown in the Outline view and Breadcrump view which can also be used for code navigation.
Keep in mind that only variables introduced by Local or Global are taken into account.

Each symbol is represented by its own icon:


You can also show a list of all symbols (also for navigating) by Ctrl+Shift+O (alternatively: Ctrl+P followed by the @ sign). Then, if you type :, the symbols will be grouped.
For additonal information see the official Visual Studio Code documentation
You can use code snippets to quickly generate code patterns you regularly need, like function definitions, loops and so on. Please have a look at the Snippets section for a list of all supported snippets.
I would like to thank the following people for their help and support:
- Michael Rupp (mrupp12bit), creator of TAWS - The Amiga Workbench Simulation and SonosController
- midwan
- root from a1k.org
- Andreas Falkenhahn for his support and creating Hollywood
- Both of my two AmigaSons for interest and motivation and my wife for understanding and providing free time for my hobby
If this extension is helpful to you and you want to support me feel free to buy me a coffee or send a tip via PayPal.
If you find a bug or want to see a feature added, please fill an Issue on the GitHub page. I try my best to improve this extension.
This extension is far from complete or bug free. The overall goal is: Provide nearly or the same feature subset as the official Hollywood IDE for Windows and hw4cubic for Amiga.
This includes and adds: