在 React 出来之前,已有无数前端框架或库诞生,功能非常强大、也非常好用,伴随着我们前端开发人员走过一年又一年。但为什么 React 一出,受到国内外热捧,它到底解决了前端哪些痛点? 个人理解有如下两点:
- Web Component
- Virtual DOM
Web Component 是一个概念,其实就早已出现。早在 HTML 4.0 时代,我们在页面使用 include 语法来复用 header 和 footer 里。但无法给这种 component 传参,更别谈约束和验证参数了,稍微有不同场景,我们不得不复制一份 component 改改后再用,在项目中会就出现类似于 header1.html、header2.html 和 header3.html 文件,复用率和抽象程度都较低。
但 React 的 Web Component 解决上述的参数约束、参数验证,还多了参数值范围、参数默认值。并且 React Component 跟 React Page 有一样的生命周期。
static defaultProps = {
  titleNormalStyle: null,
  checked: false,
  titleLines: 0,
};
属性参数默认值都写在 static defaultProps 里,因为是静态成员,所以程序初始化时就声明好了。当组件使用者没有给属性设置值时,就会自动使用默认值。
static propTypes = {
  onPress: PropTypes.func.isRequired,
  title: PropTypes.string.isRequired,
  bgCheckStyle: PropTypes.object,
  checked: PropTypes.bool,
  titleLines: PropTypes.number,
};
PropTypes 后面的 func、string 等就是参数约束,isRequired 是参数验证,表示必填。
常见基本约束类型有:PropTypes.array,PropTypes.bool,PropTypes.func,PropTypes.number,PropTypes.object,PropTypes.string,PropTypes.symbol(ES6 新类型),其中的 PropTypes.func 是指 function。
React 约束类型有:PropTypes.node,PropTypes.element,PropTypes.oneOf,PropTypes.oneOfType,PropTypes.arrayOf,PropTypes.shape,PropTypes.any 等。
node所有可以被渲染的对象:数字,字符串,DOM 元素或包含这些类型的数组element参数类型为React元素oneOf在规定的参数值选项中多选一,比如:PropTypes.oneOf(["house", "job", "car"]);oneOfType在规定的参数类型选项中多选一,比如:PropTypes.oneOfType(["number", "string"]);arrayOf只允许使用某种类型的数组,比如:PropTypes.arrayOf(PropTypes.number);shape采用指定样式的参数对象PropTypes.shape({color: PropTypes.string,fontSize: PropTypes.number});any不可空的任意类型PropTypes.any;
更多资料:https://github.com/facebook/prop-types
- 创建期:
constructor,componentWillMount,render,componentDidMount - 存在期:
componentWillReceiveProps,shouldComponentUpdate,componentWillUpdate,componentDidUpdate - 销毁期:
componentWillUnmount
不是今天讨论的重点,以后再讲。
组件代码:
class Greeting extends Component {
  render() {
    return <Text>Hello, {this.props.name}!</Text>;
  }
}
调用代码:
import Greeting from "./Greeting";

class LotsOfGreetings extends Component {
  render() {
    return (
      <View>
        <Greeting name="Growth FE" />
        <Greeting name="Growth Android" />
        <Greeting name="Growth iOS" />
      </View>
    );
  }
}组件代码:
class MyComponent extends Component {
  static propTypes = {
    children: PropTypes.element.isRequired
  };
  render() {
    return <View>{this.props.children}</View>;
  }
}
调用代码:
import MyComponent from './MyComponent';

class ShowElement extends Component {
  render() {
    return (
      <MyComponent>
        <View>
          <Text>一个神奇的网站<Text>
          <Text>人人信赖的生活服务平台<Text>
        </View>
      </MyComponent>
    );
  }
}
写一个自定义组件就是这么简单,有没有? 但说好的参数约束,验证呢? 请看下面高级用法:
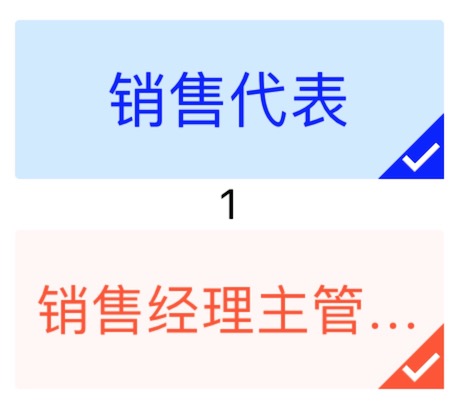
效果图:
组件代码:
import React, { PropTypes, PureComponent } from "react";
import { Text, View, TouchableOpacity } from "react-native";

const styles = {
  // 样式代码略
};

export default class CheckBoxButton extends PureComponent {
  static propTypes = {
    onPress: PropTypes.func.isRequired,
    title: PropTypes.string.isRequired,

    titleNormalStyle: PropTypes.object,
    titleCheckStyle: PropTypes.object,
    bgNormalStyle: PropTypes.object,
    bgCheckStyle: PropTypes.object,

    checked: PropTypes.bool,
    titleLines: PropTypes.number
  };

  static defaultProps = {
    titleNormalStyle: null,
    titleCheckStyle: null,
    bgNormalStyle: null,
    bgCheckStyle: null,

    checked: false,
    titleLines: 0
  };

  render() {
    let bgStyle = this.props.bgNormalStyle || [
      styles.bg.base,
      styles.bg.normal
    ];
    let titleStyle = this.props.titleNormalStyle || styles.text.normal;
    let triangleStyle = null;

    if (this.props.checked) {
      bgStyle = this.props.bgCheckStyle || [styles.bg.base, styles.bg.checked];
      titleStyle = this.props.titleCheckStyle || styles.text.checked;
      triangleStyle = [
        styles.triangle.base,
        styles.triangle.corner,
        styles.triangle.position,
        {
          borderTopColor:
            titleStyle.color || styles.triangle.bgColor.borderTopColor
        }
      ];
    }

    return (
      <View>
        <TouchableOpacity
          activeOpacity={1}
          style={bgStyle}
          onPress={this.props.onPress || null}
        >
          <Text numberOfLines={this.props.titleLines || 1} style={titleStyle}>
            {this.props.title}
          </Text>
        </TouchableOpacity>
        {this.props.checked ? (
          <View style={triangleStyle}>
            <View style={[styles.correct.base, styles.correct.position]} />
          </View>
        ) : null}
      </View>
    );
  }
}
调用代码:
import React, { Component } from "react";
import { Text, View } from "react-native";

import CheckBoxButton from "./checkBoxButton";

const styles = {
  container: {
    flex: 1,
    justifyContent: "center",
    alignItems: "center",
    backgroundColor: "#FFF"
  },
  welcome: {
    fontSize: 16,
    textAlign: "center",
    margin: 10
  }
};

export default class CheckBoxButtonDemo extends Component {
  static navigationOptions = {
    title: "复选框按钮"
  };

  constructor(props) {
    super(props);
    this.state = {
      checkBoxButton1: false,
      checkBoxButton2: true
    };
  }

  checkBoxButton1Handler = () => {
    this.setState({ checkBoxButton1: !this.state.checkBoxButton1 });
  };

  checkBoxButton2Handler = () => {
    /* eslint react/no-string-refs:0 */
    if (this.refs.a2 && !this.refs.a2.props.checked) {
      console.debug(this.refs.a2.props.value);
    }
    this.setState({ checkBoxButton2: !this.state.checkBoxButton2 });
  };

  render() {
    return (
      <View style={styles.container}>
        <Text style={styles.welcome}>
          Welcome to React Native CheckBoxButton!
        </Text>
        <CheckBoxButton
          titleLines={1}
          title={"销售代表"}
          value={"xsdb"}
          titleNormalStyle={{ fontSize: 20, color: "gray" }}
          titleCheckStyle={{ fontSize: 20, color: "blue" }}
          bgNormalStyle={{
            width: 143,
            height: 53,
            borderRadius: 1.5,
            alignItems: "center",
            justifyContent: "center",
            backgroundColor: "#F7F7F7"
          }}
          bgCheckStyle={{
            width: 143,
            height: 53,
            borderRadius: 1.5,
            alignItems: "center",
            justifyContent: "center",
            backgroundColor: "#D1EAFF"
          }}
          checked={this.state.checkBoxButton1}
          onPress={this.checkBoxButton1Handler}
        />
        <Text>1</Text>
        <CheckBoxButton
          ref="a2"
          title={"销售经理主管与总监"}
          value={"xsjlzgyzj"}
          checked={this.state.checkBoxButton2}
          onPress={this.checkBoxButton2Handler}
        />
      </View>
    );
  }
}
代码分析:
Text,View,TouchableOpacity是react native控件,相当于HTML页面里的span,div, 支持oncick事件的控件- 在
React Native里,没有类似.css的文件,样式文件都是以 JS 文件形式书写和引用 PureComponent是自带优化功能的Component,后面会详谈- 在
static defaultProps = { }里编写属性参数的默认值 - 在
static propTypes = { }里编写属性参数的约束
Component vs PureComponent
优化前:

优化后:
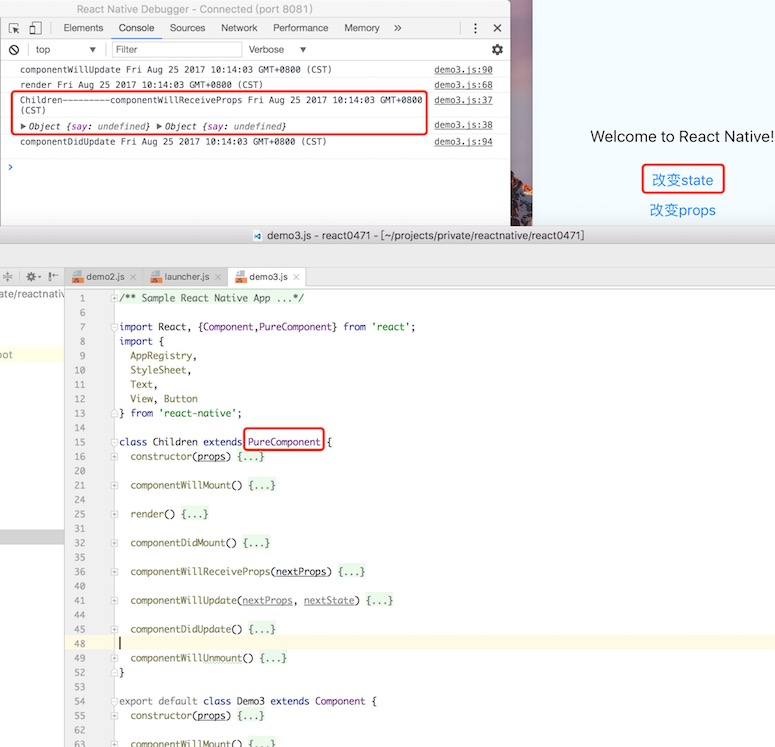
Component 和 PureComponent 的区别就是:PureComponent 已经定义好了 shouldUpdateComponent 而 Component 需要显示定义。
我们从简短的源码一看究竟:
// 定义 CompositeTypes
var CompositeTypes = {
  ImpureClass: 0, // 继承自 Component 的组件
  PureClass: 1, // 继承自 PureComponent 的组件
  StatelessFunctional: 2 // 函数组件
};

// 这个变量用来控制组件是否需要更新
var shouldUpdate = true;

// inst 是组件实例
if (inst.shouldComponentUpdate) {
  shouldUpdate = inst.shouldComponentUpdate(nextProps, nextState, nextContext);
} else {
  if (this._compositeType === CompositeType.PureClass) {
    // 用 shallowEqual 对比 props 和 state 的改动
    // 如果都没改变就不用更新
    shouldUpdate =
      !shallowEqual(prevProps, nextProps) ||
      !shallowEqual(inst.state, nextState);
  }
}简而言之,ReactCompositeComponent 会在 mount 的时候判断各个组件的类型,设定 _compositeType,然后根据这个类型来判断是非需要更新组件。实际跟 PureComponent 有关的就是 shallowEqual 的那两行,无非是在判断 props 和 state 的是否变化,最终决定要不要重新执行 render。
如果我们不继承 PureComponent,又想要优化,就得自己来处理 shouldComponentUpdate 事件,就老老实实的写如下判断(注:下面为伪码)
shouldComponentUpdate(nextProps, nextState) {
  if((nextProps.a !== this.props.a) || (nextState.a !== this.state.a) || (nextProps.b !== this.props.b) || (nextState.b !== this.state.b) ......) {
     return true;
  }
  return false;
}最后补充几点开发 React 自定义组件周边的一些知识点,比如 ESLint、shouldComponentUpdate 的注意事项。
- ESLint 如果使用了
ESLint + Airbnb,会强制要求组件里的每一个属性都必须有默认值(defaultProps 里)。 - shouldComponentUpdate 使用
PureComponent时,避免使用可变对象作为props和state,取而代之的是每次返回一个全新的对象,比如数组参数就通过concat来返回新的数组。
参考文档:
- PureComponent https://segmentfault.com/a/1190000006741060
- shouldComponentUpate https://segmentfault.com/a/1190000008402834