OSMNavigator
OSMNavigator is a generic map application for Android, based on OSMBonusPack library. It is simple and compact.
It can be downloaded on Google Play.
In the option menu "Tile Provider" item, you can choose the tile source between:
- OSM Standard map,
- OSM by MapQuest,
- MapBox Satellite (a wonderful satellite map),
- MapsForge offline map: see "Working off-line" below.
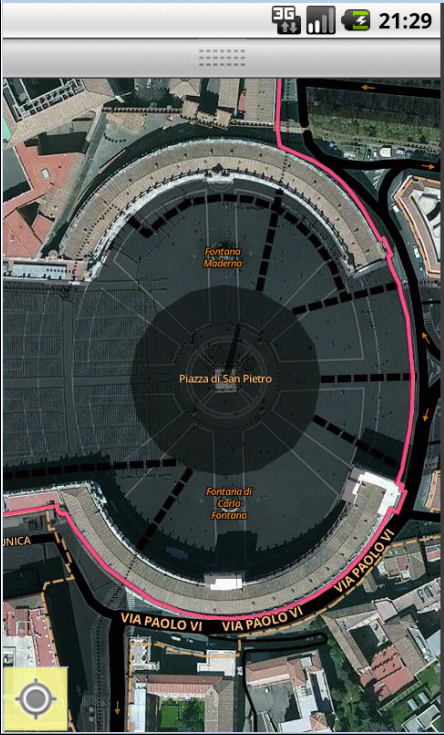 MapBox Satellite map
When the GPS is on, a green arrow shows the current location. When moving, this arrow shows the direction of the move. With the button in the lower-left corner, you can switch between 2 modes:
- tracking/driving mode: the map stays centered on the current location, and oriented to the direction of the move
- static mode: the map remains oriented to the north
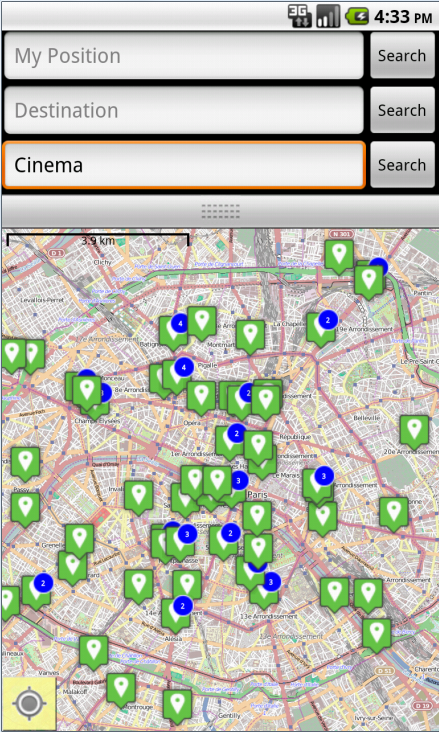
Using the top panel, you can search for a departure address ("My Position" text field) and for a Destination address.
Note that the top panel can be hidden/shown by just tapping on its horizontal separator.
You can also set the departure/destination location by a long-press on the map at the desired position.
Once the departure/destination is set, a marker is displayed. After a long-press on this marker, you can drag it at another location.
When a destination is defined, the route is automatically computed.
On the "Road Provider" option in the option menu, you will find the following options:
- OSRM-Fastest: for car,
- GraphHopper-Fastest: for car,
- GraphHopper for bicycle
- and GraphHopper for pedestrian.
To add a "via-point" (an intermediate point on the route), long-press on the map at the desired position, and choose "Via-point" item.
To remove a point (the departure, the destination, or any via-point), tap on its marker, then in the bubble, tap on the "Delete" icon on the right.
In the option menu, use "Itinerary" item to display the route directions as a list. Tap on a direction to show it on the map.
In the top panel, use the "Features" text field to search for various map features (fuel, cinema, supermarket, shoe shop, etc, etc...). If you just enter some letters, suggestions will be proposed.
Features are searched in the "view", the area of the map currently displayed. If you move the view (by panning/zooming), there is no automatic refresh: tap "Search" again everytime you want to search.
Warning: the search returns a maximum of 100 results. Narrow your view if needed.
In the options menu, you can use "Features list" item to display all the features as a list. Tap on a feature to show it on the map.
In the Features text field, you can type "wikipedia". This will search for geolocalized Wikipedia entries.
In the Features text field, you can type "picasa" or "flickr". This will search for geolocalized pictures from these services. (Note : the picasa service providing geolocalized pictures is currently broken)
! New feature !
In the options menu, select "Share with Friends" item. In the form, set:
- Your nickname. This is the name that your friends will see.
- The name of the group you want to belong. You will see the position of all users belonging to this group. And all users belonging to this group will see your position. So choose a group name according to the level of privacy you want.
- Optionaly, a message to the group.
Then Start Sharing.
While you are sharing, the "Friends" button appears in the bottom right of the screen. Press this button to list all current members of the group. Tap on an item to show it on the map.
Sharing is active until you select "Stop Sharing" item in the options menu.
If you exit the application without stopping sharing, your latest position remains visible to your friends, but shown as "offline".
In the options menu, the "KML Toolbox" item is the entry point for handling KML layer.
opens a KML file from its url (KMZ and GeoJSON content are not supported).
opens a file. The type is defined from the file name extension: .kml for KML, .kmz for KMZ, .json for GeoJSON.
Files are loaded from the SD card directory, from the "kml" sub-directory. Using the Android file manager, it is also possible to open a file located anywhere on the device, as long as its extension is .kml, .kmz or .json.
With "OverpassAPI Wizard", you can directly query OpenStreetMap underlying data using OverpassAPI service, and get the resulting OSM features (nodes, ways and relations) displayed as KML features. The query should be an OSM tag, in the form "key=value", or just "key".
Some examples: "shop=bakery", "amenity=cinema", or "building".
When you activate "Record Tracks" item, you start recording of your own track, and of the track of all your friends (see the Sharing feature above). Each track is displayed on the map, and recorded in a KML Track.
With "Pick Overlays", all overlays currently displayed are copied as KML features.
opens a simple KML editor, where you can:
- Edit the name and description of a Feature
- Set its visibility
- Set its style, by choosing one of the Shared Styles of the KML document (see below)
- For a Folder:
- list all its items
- open an item: tap on it
- copy/cut an item: long-press on it to open the menu
- paste item from clipboard: using the option menu
- add a new folder: using the option menu
- show the selected item on the map
lists all Shared Styles of the current KML document. You can add a new style (option menu), delete a style (long-press), and edit a style (tap). When editing a style, you can:
- change its "style id"
- define its icon. 2 methods:
- It can be the full url.
- If the KML document was opened from a local file, it can be the path relative to this local file (e.g. "img/icon.png").
- define the fill & outline colors
- define the outline width
saves the current KML layer, either as a KML or GeoJSON file, depending on the extension (.kml or .json). Files are saved on the SD card directory, in the "kml" sub-directory.
empties the current KML layer.
With a long-press directly at the desired location on the map, you can add a KML Point. Long-press on a KML Point marker to drag it at another location.
The options to display a map when offline are described below. Note that when offline, you will have no search and no routing.
You can create maps using MOBAC. Most MOBAC formats mentionning "osmdroid" should be supported. Use Osmdroid ZIP format if you don't care. You can refer to this StackOverflow answer for more details.
Copy the resulting file on your device, in your SD card directory, inside an "osmdroid" sub-directory (if you already used OSMNavigator before, this "osmdroid" sub-directory already exists).
All compatible map files found in this directory will be loaded by OSMNavigator when the application starts.
You can download a MapsForge map on MapsForge Download server. Copy it on your device, in your SD card directory, inside a "mapsforge" sub-directory. In the "Tile Provider" option item, take care to select MapsForge.
If you have multiple ".map" files in this directory, the first one (in alphabetical order) will be loaded.
In the options menu, you can use the "Cache Manager" option to download in advance the tiles of an area.
Note that the "depth" is limited to 5 zoom levels, from the current zoom level.
The Cache Manager downloads the tiles in the standard osmdroid cache. It can be used multiple times, at various positions and zoom levels.