ParC-Net PyTorch 代码
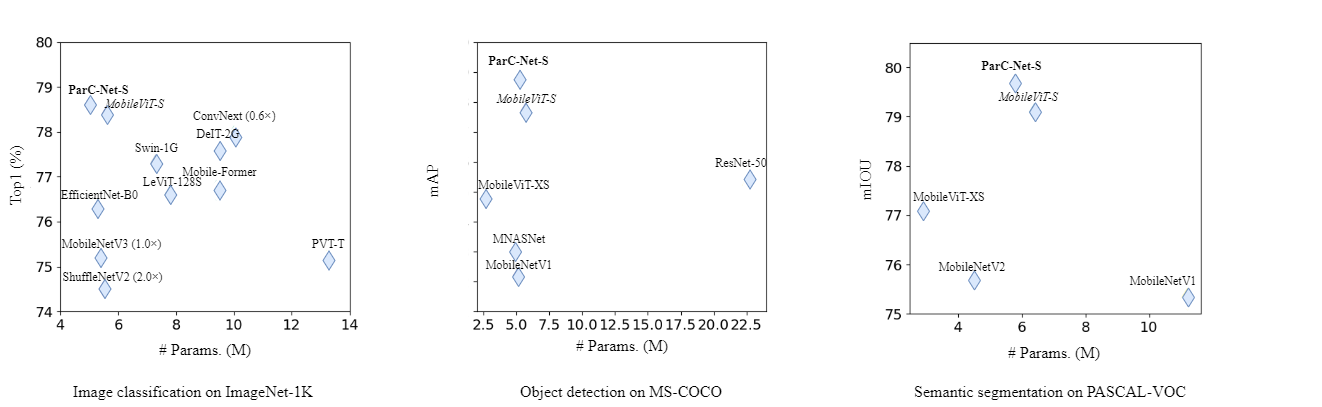

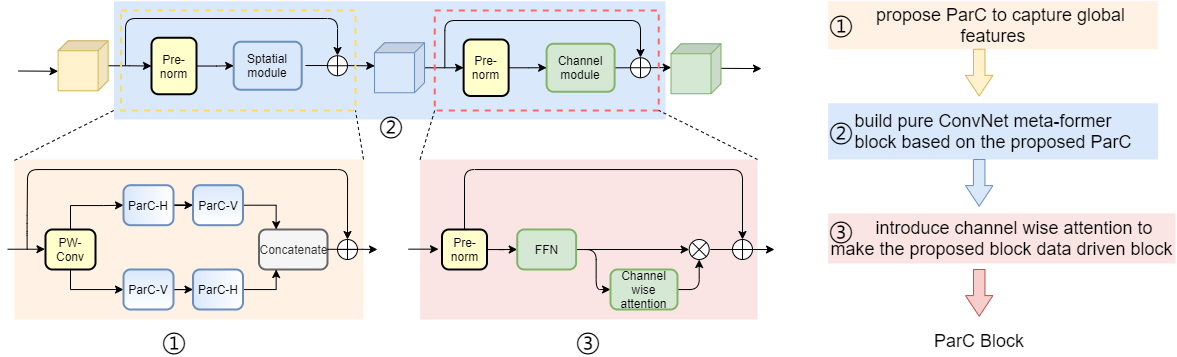
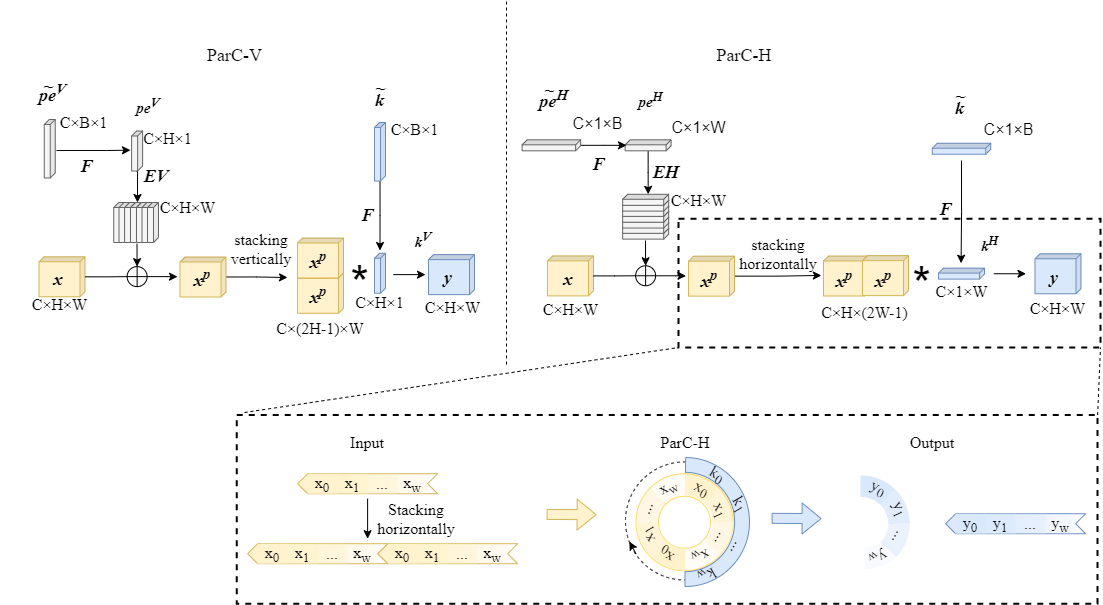
ParC-Net 是一个纯卷积结构的轻量化骨干模型,它继承了卷积网络的优点,又融合了vision transformer 模型的长处。 具体来说,首先,我们提出了一个轻量化的操作,位置信息敏感的循环卷积(position aware circular convolution, ParC)。ParC中,我们以全局循环的形式提取全局特征,引入位置编码确保该操作对位置信息的敏感性。然后,基于ParC, 我们构建了一个纯卷积结构的meta-former结构。该结构舍弃了self attention 硬件支持不友好的操作, 但是保留了传统transformer block 提取全局特征的特点。最后,我们在纯卷积结构的meta-former中引入硬件支持较为友好的通道注意力机制在channel mixer 部分,使得我们的纯卷积meta-former结构也具备attention的特点。 我们将最终得到的结构命名为ParC block, 这是一个即插即用的模块结构,可以插入到当前的现有的卷积模型和vision transformer 模型中去。 实验结果表明,我们所提出的ParC-Net在图像分类,目标检测及语义分割三个视觉任务上取得了比现有的轻量化卷积网络结构及vision transformer 模型更高的精度。拿在ImageNet-1k上的分类任务来说,我们的ParC-Net 仅使用约500万参数,取得了78.6 的分类精度。 跟苹果公司22年ICLR22 上提出的模型MobileVit 相比,节省了11% 参数,节省了13% 运算量,但是在RK3288 板子上,速度提升了23%, 并且精度高了0.2%。
| Tasks | performance | #params | pretrained models |
|---|---|---|---|
| Classification | 78.6 (Top1 acc) | 5.0 | model |
| Detection | 28.8 (mAP) | 5.2 | model |
| Segmentation | 79.7 (mIOU) | 5.8 | model |
我们将ParC-Net 和 基线模型MobileVit 部署到低算力的芯片板子RK3288及自研微功耗芯片上进行推理速度测试。 我们首先将pytorch 模型转换为ONNX 格式,然后将ONNX格式转换维MNN格式,最终部署到板子上测速。 为了保证结果的稳定,我们测速了一百次,并对比平均速度。
| Models | #params (M) | Madds (M) | RK3288 inference speed (ms) | 自研微功耗芯片推理速度 (ms) | Top1 acc |
|---|---|---|---|---|---|
| MobileViT-S | 5.6 | 2010 | 457 | 368 | 78.4 |
| EdgeFormer-S | 5.0 (-11%) | 1740 (-13%) | 353 (+23%) | 98 (3.77x) | 78.6 (+0.2%) |
分类实验
| Models | # params | Top1 acc |
|---|---|---|
| ConvNext-XT | 7.44 (M) | 77.5 |
| ParC-ConvNext-XT | 7.41 (M) | 78.3 (+0.8) |
检测实验
| Models | # params | AP box | AP50 box | AP75 box | AP mask | AP50 mask | AP75 mask |
|---|---|---|---|---|---|---|---|
| ConvNext-XT | - | 47.2 | 65.6 | 51.4 | 41.0 | 63.0 | 44.2 |
| ParC-ConvNext-XT | - | 47.7 | 66.2 | 52.0 | 41.5 | 63.6 | 44.6 |
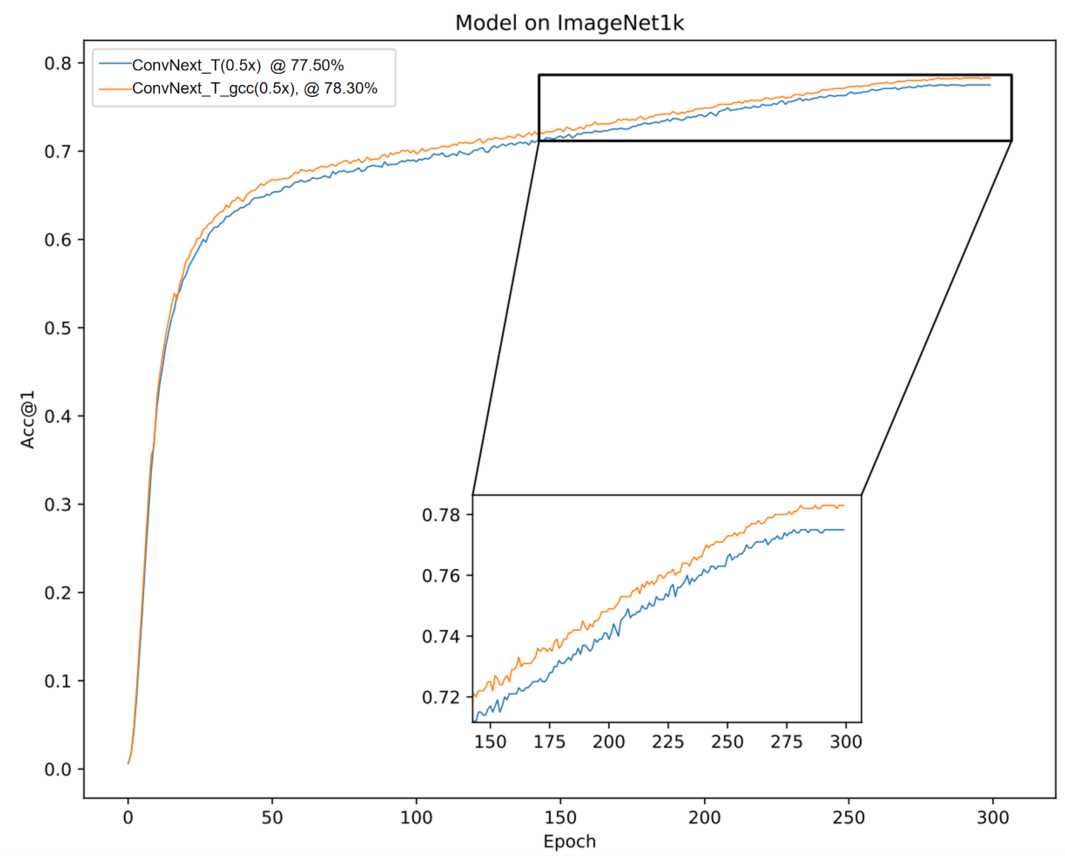
ConvNext 和 我们提出地ParC-Net 都是纯卷积地结构。这两份工作是同时期独立研究的,方法中涉及的创新点是不同的,也是互补的。为了验证这一点,我们结合两者所长,构建了一个合并网络。具体来说,我们用几个ParC 模块替换了ConvNext 后两个stage 里边的几个模块。 这样一个替换,有效地提升了分类精度(提升0.8 个点),同时还轻微地减少了参数量和运算量。 我们分析,这个改进使得整个合并网络在浅层关注local信息,在深层关注global 信息,这一结构比一直使用local conv 更合理。对应的code 很快会更新。
我们的实验环境是Pytorch 1.9.0, CUDA-11.1. 实际上 PyTorch 1.8.0 都是可以work的, Pytorch 1.8.0 更早的版本我们没有测试过。
可以通过如下命令,构建实验环境。:
pip install -r requirements.txt
我们之后会提供一个docker 镜像
训练的具体设置都在yaml 文件里(./config/classification/xxx/xxxx.yaml, ./config/detection/xxx/xxxx.yaml, ./config/segmentation/xxx/xxxx.yaml )。可以通过如下命令进行各个实验。
分类实验。我们的分类实验是在8块v100(32G), 或8块a100(40g/80g) 上进行的. Edgeformer-XS, Edgeformer-S 两个模型需要训练近两天时间。 Edgeformer-H 需要训练2.7天。
cd EdgeFormer-main
CUDA_VISIBLE_DEVICES=0,1,2,3,4,5,6,7 python main_train.py --common.config-file ./config/classification/edgeformer/edgeformer_s.yaml
检测实验。检测实验是在4块v100或4块RTX3090 上进行的。
cd EdgeFormer-main
CUDA_VISIBLE_DEVICES=0,1,2,3 python main_train.py --common.config-file --common.config-file config/detection/ssd_edgeformer_s.yaml
分割实验。检测实验是在4块v100或4块RTX3090 上进行的。
cd EdgeFormer-main
CUDA_VISIBLE_DEVICES=0,1,2,3 python main_train.py --common.config-file --common.config-file config/segmentation/deeplabv3_edgeformer_s.yaml
分类
cd EdgeFormer-main
CUDA_VISIBLE_DEVICES=0 python eval_cls.py --common.config-file ./config/classification/edgeformer/edgeformer_s.yaml --model.classification.pretrained ./pretrained_models/classification/checkpoint_ema_avg.pt
检测
cd EdgeFormer-main
CUDA_VISIBLE_DEVICES=0 python eval_det.py --common.config-file ./config/detection/edgeformer/ssd_edgeformer_s.yaml --model.detection.pretrained ./pretrained_models/detection/checkpoint_ema_avg.pt --evaluation.detection.mode validation_set --evaluation.detection.resize-input-images
分割
cd EdgeFormer-main
CUDA_VISIBLE_DEVICES=0 python eval_seg.py --common.config-file ./config/detection/edgeformer/deeplabv3_edgeformer_s.yaml --model.segmentation.pretrained ./pretrained_models/segmentation/checkpoint_ema_avg.pt --evaluation.segmentation.mode validation_set --evaluation.segmentation.resize-input-images
我们的Edgeformer实现时,借用了MobileViT 的代码。 对MobileViT 的作者分享代码表示感谢。如果大家觉得我们的代码对您的科研有帮助,可以考虑引用我们的文章和MobileViT.