- MVC
- Organizing our project
- Working without a storyboard
- Navigation programmatically
- Extending our project
By the end of this lesson, students should be able to:
- Describe and use MVC in an Xcode project
- Implement navigation programmatically
- Send information between view controllers programmatically
Eventually projects get bigger: more swift files, xib files, assets, etc.
If we are not careful we'll end up with spaghetti code 🍝
- without structure
- difficult to follow
- hard to maintain
We can avoid this by using an architectural pattern.
"An architectural pattern is a general, reusable solution to a commonly occurring problem in software architecture within a given context"
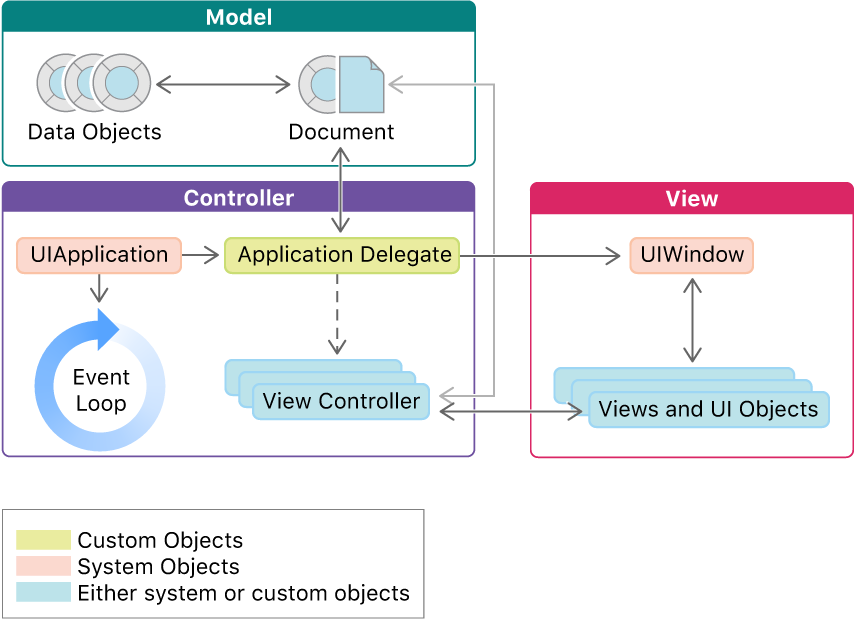
MVC is Apple's recommended architecture for iOS apps.
It's made up of three main objects:
- The Model: Where your data lives.
- The View: What the user sees.
- The Controller: Mediator between the view and the model.
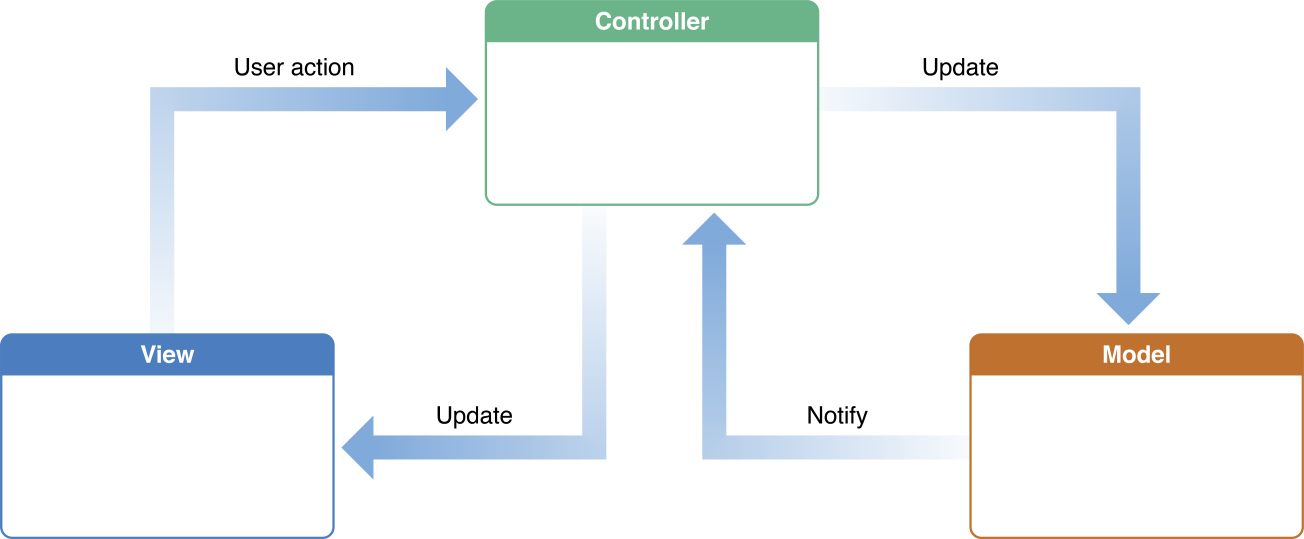
- Model Objects (classes, structs, etc)
Often reusable and doesn't handle any business logic.
- UIView subclasses
How to know if we are doing views right?
Does it interact with the model layer?
Does it contain any business logic?
Does it try to do anything not related to UI?
The least reusable part of an app 😰
What are its responsibilities? It's basically the 🧠 of the app.
- Order of method calls.
- Refreshing the app.
- Presenting new views.
- Sending object between views.
- Handle user interaction (What happens after the user taps a button?)
From what you just learned, draw your own version of the MVC diagram and review the responsibilities for each component.
Can you explain it using a real world scenario with an analogy?
You can take your Subscription Box project and arrange your files with MVC in mind.
- Right click on the project navigator → New Group
- Move files accordingly

So far we've been building apps with one screen. Most of the time you will need to interact with two screens or more, and we should handle these transitions.
- Navigation can be done using Segues or programmatically. We'll cover the second option.
Follow along with the Starter Code
Steps to setup a project with without a Storyboard.
- Delete the storyboard file.
- Remove the storyboard name on Project Navigator > Select Project > General > Deployment Info > Main Interface
- Remove the Storyboard name from the .plist
- Change the SceneDelegate to tell our app what to use as the initial ViewController.
func scene(_ scene: UIScene, willConnectTo session: UISceneSession, options connectionOptions: UIScene.ConnectionOptions) {
        guard let windowScene = (scene as? UIWindowScene) else { return }
        window = UIWindow(frame: UIScreen.main.bounds)
        let viewController = //An instance of your view controller goes here
        window?.rootViewController = viewController
        window?.makeKeyAndVisible()
        window?.windowScene = windowScene
}Changing the rootViewController from another View Controller:
self.view.window!.rootViewController = //Instance of the VC you want to set as rootWhen using the storyboard, we would embed view controllers in navigation controllers in the interface builder.
We can also do it programmatically:
let navigationController = UINavigationController(rootViewController: //some VC)
self.view.window!.rootViewController = navigationController

//or

present(navigationController, animated: true, completion: nil) present it on top of an existing VC
Having a navigation controller gives us a navigation bar and the stack to show and dismiss view controllers.
let nextVC = ViewController()
self.navigationController?.pushViewController(nextVC, animated: true)let nextVC = ViewController()
self.navigationController?.present(nextVC, animated: true, completion: nil)If you used the present method:
self.dismiss(animated: true, completion: nil)If you used the push method:
self.navigationController?.popViewController(animated: true)Return to root:
self.navigationController?.popToRootViewController(animated: true)We assign the value of properties right after creating the instance of the second view controller.
let nextVC = ViewController()
nextVC.color = UIColor.red //The instance of ViewController has a property called `color` and we are sending over the value `UIColor.red` to use it later in the next VC.Scenarios:
The end of an onboarding flow.
User logged out.
extension UINavigationController {
    /**
     It removes all view controllers from navigation controller then set the new root view controller and it pops.

     - parameter vc: root view controller to set a new
     */
    func initRootViewController(vc: UIViewController, transitionType type: String = "kCATransitionFade", duration: CFTimeInterval = 0.3) {
        self.addTransition(transitionType: type, duration: duration)
        self.viewControllers.removeAll()
        self.pushViewController(vc, animated: false)
        self.popToRootViewController(animated: false)
    }

    /**
     It adds the animation of navigation flow.

     - parameter type: kCATransitionType, it means style of animation
     - parameter duration: CFTimeInterval, duration of animation
     */
    private func addTransition(transitionType type: String = "kCATransitionFade", duration: CFTimeInterval = 0.3) {
        let transition = CATransition()
        transition.duration = duration
        transition.timingFunction = CAMediaTimingFunction(name: CAMediaTimingFunctionName.easeInEaseOut)
        transition.type = CATransitionType(rawValue: type)
        self.view.layer.add(transition, forKey: nil)
    }
}Apple Documentation on MVC
About App Development with UIKit
MVC analogy
More on MVC
Wikipedia - architectural pattern
MVC tutorial with networking
Manual Navigation - article