Welcome to OpenStack Heat installation manual !
This document is based on the OpenStack Official Documentation for Juno.
Contributors:
Chaima Ghribi: chaima.ghribi@it-sudparis.eu
Marouen Mechtri : marouen.mechtri@it-sudparis.eu
Djamal Zeghlache : djamal.zeghlache@it-sudparis.eu
Contents
In this guide, we will go over the installation of an awesome OpenStack service !
OpenStack Heat !
Heat is an openstack service that handles the orchestration of complex deployments on top of OpenStack clouds. Orchestration basically manages the infrastructure but it supports also the software configuration management.
Heat provides users the ability to define their applications in terms of templates.
Just write a Heat template that describes your infrastructure resources (instances, networks, database, images ...) and send it to Heat! It will talk to all the other OpenStack APIs to deploy your stack!
If you want to extend or redesign your infrastructure, modify the template and update your stack. Heat will do everything for you ;)
Let's Install it ;)
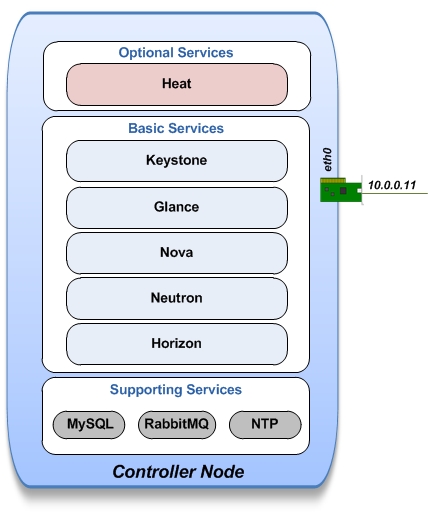
In our previous OpenStack Juno installation guide, we 've installed the basic services on the controller node.
Now we will add the Heat orchestration service ;)
Change to super user mode:
sudo su
Create a MySql database for heat:
mysql -u root -p

CREATE DATABASE heat;
GRANT ALL PRIVILEGES ON heat.* TO 'heat'@'localhost' IDENTIFIED BY 'HEAT_DBPASS';
GRANT ALL PRIVILEGES ON heat.* TO 'heat'@'%' IDENTIFIED BY 'HEAT_DBPASS';
exit;
Configure service user and role:
vi admin_creds
#Paste the following:
export OS_TENANT_NAME=admin
export OS_USERNAME=admin
export OS_PASSWORD=admin_pass
export OS_AUTH_URL=http://controller:35357/v2.0


source admin_creds

keystone user-create --name heat --pass service_pass
keystone user-role-add --user heat --tenant service --role admin
Create heat_stack_owner role and give it to users (admin and demo) who create Heat stacks:
keystone role-create --name heat_stack_owner

keystone user-role-add --user demo --tenant demo --role heat_stack_owner
keystone user-role-add --user admin --tenant admin --role heat_stack_owner
Create the heat_stack_user role:
keystone role-create --name heat_stack_user
Register the service and create the endpoint:
keystone service-create --name heat --type orchestration --description "Orchestration"

keystone endpoint-create \
--service-id $(keystone service-list | awk '/ orchestration / {print $2}') \
--publicurl http://controller:8004/v1/%\(tenant_id\)s \
--internalurl http://controller:8004/v1/%\(tenant_id\)s \
--adminurl http://controller:8004/v1/%\(tenant_id\)s \
--region regionOne

keystone service-create --name heat-cfn --type cloudformation --description "Orchestration CloudFormation"

keystone endpoint-create \
--service-id $(keystone service-list | awk '/ cloudformation / {print $2}') \
--publicurl http://controller:8000/v1 \
--internalurl http://controller:8000/v1 \
--adminurl http://controller:8000/v1 \
--region regionOne
Install heat packages:
apt-get install -y heat-api heat-api-cfn heat-engine python-heatclient
Edit the /etc/heat/heat.conf file:
vi /etc/heat/heat.conf

[database]
connection = mysql://heat:HEAT_DBPASS@controller/heat

[DEFAULT]
verbose = True

rpc_backend = rabbit
rabbit_host = controller
rabbit_password = service_pass

heat_metadata_server_url = http://controller:8000
heat_waitcondition_server_url = http://controller:8000/v1/waitcondition

[keystone_authtoken]
auth_uri = http://controller:5000/v2.0
identity_uri = http://controller:35357
admin_tenant_name = service
admin_user = heat
admin_password = service_pass

[ec2authtoken]
auth_uri = http://controller:5000/v2.0
Synchronize your database:
su -s /bin/sh -c "heat-manage db_sync" heat
Restart the Orchestration services:
service heat-api restart
service heat-api-cfn restart
service heat-engine restart
Remove heat SQLite database:
rm -f /var/lib/heat/heat.sqlite
Verify configuration, list stacks:
source admin_creds
heat stack-list
That's it ;)
Installation is too easy and quick but results are really great!
If you want to create your first template with Heat, follow the instructions in our stack creation guide available here
Institut Mines Télécom - Télécom SudParis
Copyright (C) 2014 Authors
Original Authors - Marouen Mechtri and Chaima Ghribi
Licensed under the Apache License, Version 2.0 (the "License"); you may not use this file except
in compliance with the License. You may obtain a copy of the License at:
http://www.apache.org/licenses/LICENSE-2.0

Unless required by applicable law or agreed to in writing, software
distributed under the License is distributed on an "AS IS" BASIS,
WITHOUT WARRANTIES OR CONDITIONS OF ANY KIND, either express or implied.
See the License for the specific language governing permissions and
limitations under the License.
Copyright (C) Marouen Mechtri : marouen.mechtri@it-sudparis.eu
Copyright (C) Chaima Ghribi : chaima.ghribi@it-sudparis.eu