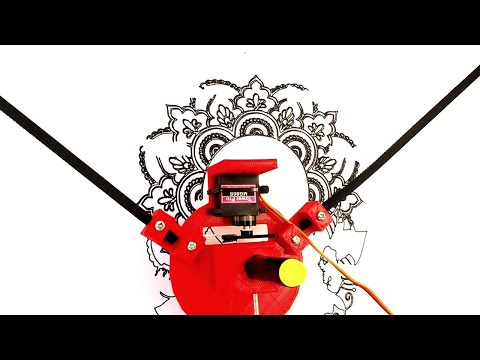
In this project we gonna make XY Plotter Drawing machine with mXY Board. With Drawing Robot you can draw images on wall, panel or A4 paper. You can print pictures or print text. The machine is a simple device, that draws picture using a normal pen, some motors and some string. All required hardware for this project are listed below. We will learn how to install and use the Polargraph program for drawing control.

My goal was to design the mXY board to make low budget the XY plotter drawing machine. So I designed a board that makes it easier for those who want to make this project. In the previous project, while using 2 pcs Nema17 stepper motors, this board uses 2 pcs 28YBJ-48 DC 5V 4 Phase 5 Wire Stepper Motors. Also in the previous project, Arduino Uno R3 was used as microcontroller and Adafruit Motor Shield as motor driver. This board uses Atmega328P and ULN2003 stepper driver. So you will be able to make this project with a single board. A 5V 1A adapter or powerbank is sufficient for this project to power consumption. The maximum current was observed as 0.4A when both motors were running.
Full tutorial: https://youtu.be/0QjO08HNXos
Get the PCB - Schematic - Gerber files :
https://www.pcbway.com/project/shareproject/mXY_Board___Low_Budget_XY_Plotter_Drawing_Robot_Board.html
Get the mXY Assembled Board from PCBWayer Bazaar : https://bit.ly/3dmsU89
The board shown in the video is the test version, the updated and upgraded version of the board is at the link below. Also, for those who do not want to solder, the mXY board will be sold at PCBWay Bazaar with all components assembled. Many thanks to PCBWay for this support.

- 1x ATmega328P-PU with Bootloader: https://bit.ly/2U9iwJw
- 2x ULN2003 DIP16: https://bit.ly/3dtexif
- 2x 28YBJ-48 5V 5 Wire Stepper Motor: https://bit.ly/3gHHxVs
- 1x CH340G SOP16: https://bit.ly/2TZXNaC
- Type B USB Socket: https://bit.ly/2WBSQqw
- DIP Socket 28/16 Pins: https://bit.ly/2UahQDK
- 12/16 MHz Crystal: https://bit.ly/33FNTyL
- L7805 TO-220: http://bit.ly/2N5WnYG
- 10uF Capacitor: https://bit.ly/2U98JTU
- 22pF/0.1uF/10nF Ceramic: https://bit.ly/2WCuQ6Y
- LED: http://bit.ly/37OajhS
- Resistor 10K/ 1K: https://bit.ly/2WFsNPl
- Power Jack Socket: http://bit.ly/2QAzFdp
- 2 Pin Terminal Block: http://bit.ly/2lEgy58
- Male Pin Header: https://bit.ly/3ab5h0w
- 2x JST B5B-XH Connector: https://bit.ly/2yXfJeI
- 1x MG90S Servo Motor: https://bit.ly/2XWWytT
- GT2 Pulley 16 Teeth Set: https://bit.ly/36Wfayk
- GT2 Rubber Belt (5M): https://bit.ly/2XTgbTT
- 3 in 1 Jumper Wire: http://bit.ly/2J6de9E
- Soldering Tools: http://bit.ly/2PEiyVx

An extension wire will be required for stepper motors and servos.
- 5M Extension Wire Cable: https://bit.ly/3gMZMJa

You can find gondola and stepper motor mounting bracket 3D models in the ZIP file 'Gondola_Bracket_Models'
JGAURORA A5S 3D printer was used for 3D models.
- JGAURORA A5S 3D Printer: https://bit.ly/2QH6GUP
- It works fine in Arduino IDE v1.8.5 & Processing v2.2.1
- Download and install the Arduino IDE v.1.8.5 https://www.arduino.cc/en/Main/OldSoftwareReleases#previous
- Download and install the Processing v2.2.1 https://processing.org/download/?processing
- Download mXY-Plotter-Drawing-Machine https://github.com/MertArduino/mXY-board-xy-plotter-drawing-machine/archive/master.zip
- Go to the mXY-Plotter-Drawing-Machine\arduino-source-code-libraries\libraries folder.
- Copy the contents of arduino-source-code-libraries\libraries into your C:\Users\YourPCname\Documents\Arduino\libraries folder.
- Go to the mXY-Plotter-Drawing-Machine\arduino-source-code-libraries folder.
- Copy the polargraph_server_a1 folder and paste it your C:\Users\YourPCname\Documents\Arduino folder.
The "polargraph_server_a1.ino" file is the edited copy for the ULN2003 driver and 28YBJ-48 stepper motor. You can get the original version here https://github.com/euphy/polargraphcontroller/releases/tag/2017-11-01-20-30 - Open Arduino IDE
- Go to File -> Sketchbook -> polargraph_server_a1 | Open the polargraph_server_a1 source code.
- Go to Tools -> Board -> Arduino/Genuino Uno | Select the Board
- Go to Tools -> Port -> COMx | Select the Port
- Press the "verify" button in the toolbar to try and compile it.
- If it compiles, press the "upload" button in the toolbar to upload it.
- Once you do that, you should confirm that it is working properly - use the serial monitor on the board, set to 57600 baud to make sure that it is issuing "READY" every couple of seconds.
- Go to the mXY-Plotter-Drawing-Machine\processing-source\Processing libraries folder.
- Copy the contents of processing-source\Processing libraries into your C:\Users\YourPCname\Documents\Processing\libraries folder.
- Copy the polargraphcontroller folder and paste it your C:\Users\YourPCname\Documents\Processing folder.
- Open Processing
- Go to File -> Sketchbook -> polargraphcontroller | Open the polargraphcontroller app source code.
- Press the Run button in the toolbar to run the sketch.
Stepper Motor Specifications:
- Press the SETUP button in the toolbar.
- Define the value for MM PER REV as 64
- Define the value for STEPS PER REV as 4076
- Define the value for MOTOR MAX SPEED as 1000
- Define the value for MOTOR ACCELERATION as 200
- For more information about 28BYJ-48 Stepper Motor https://lastminuteengineers.com/28byj48-stepper-motor-arduino-tutorial/
Machine Dimensions:

- Remember that your machine size is NOT the same as your surface size.
- Your PAGE or drawing AREA size will be smaller.
- Machine Width - This is the distance between two closest points on the sprockets (between two pulleys). Adjust the size between two pulleys on the Machine Width
- Machine Height - This is the distance from the sprocket axis to bottom of your drawing (board) area. Adjust the Machine Height (height between the pulleyand the end of the panel)
- After machine dimensions, adjust the size the area you will draw. (If ou will draw on an A4 paper, set the A4 size.)
- Home Point - This is a magic point marked on the centerline, exactly 120mm (12cm) down from the top edge of your machine.
- Then, first clicthe Center Page and then set the Page Pos Y value 120.
- Secondly click Center Home Point and set Home Pos Y value 120.
Servo motor (Pen) settings: - Pen Up Position and Pen Down Position values are the operating angle of the servo motor.
- Click Serial Port and select Arduino's port from the list of connected devices.
- When the correct port is selected, the 'No Serial Connection' display will turn GREEN and the port number to which it is CONNECTED will be displayed.
- Click on 'Command Queue' and command transmission is activated.
- Click Upload Lift Range, then click Test Lift Range and test the servo motor angle.
Last Settings - Upload vector image and start the print: - Save your setting. Load your setting every time you turn on the program.
- Click the Input tab and switch to the main screen of the program.
- Then we will anually set the gondola for 'Set Home' manually. Move the gondola by manually and move it to the previously defined home point. The gondola must be adjusted this way before each drawing before clicking 'Set Home'.
- After this adjustment is done, Set Home and Set Pen Position are clicked.
- Click Set Area to specify your drawing are. Then click Set Frame to Area to make all necessary settings for drawing.
Draw Vector: - Find any vector drawing image. Convert image to the SVG format from any converter platform.
- After select Load Vector from program. Adjust image size with Resize Vector. Move the image to the desired area with Move Vector. Then adjust the area to be printed with Select Area and Set Frame to Area.
- Finally, click the Draw Vector command to start the machine.

- Polargraph controller Copyright Sandy Noble 2018.
- http://www.polargraph.co.uk/
- https://github.com/euphy/polargraphcontroller