This instruction is based on https://orenbell.com/?p=436 for JetPack 4.3 with some modification to support JetPack 4.4
You’ll need a host machine running Ubuntu (tested on 18.04) to compile your kernel and flash your Jetson board. You can find the link to Jetpack here. Install it, run it, and you should see this screen:
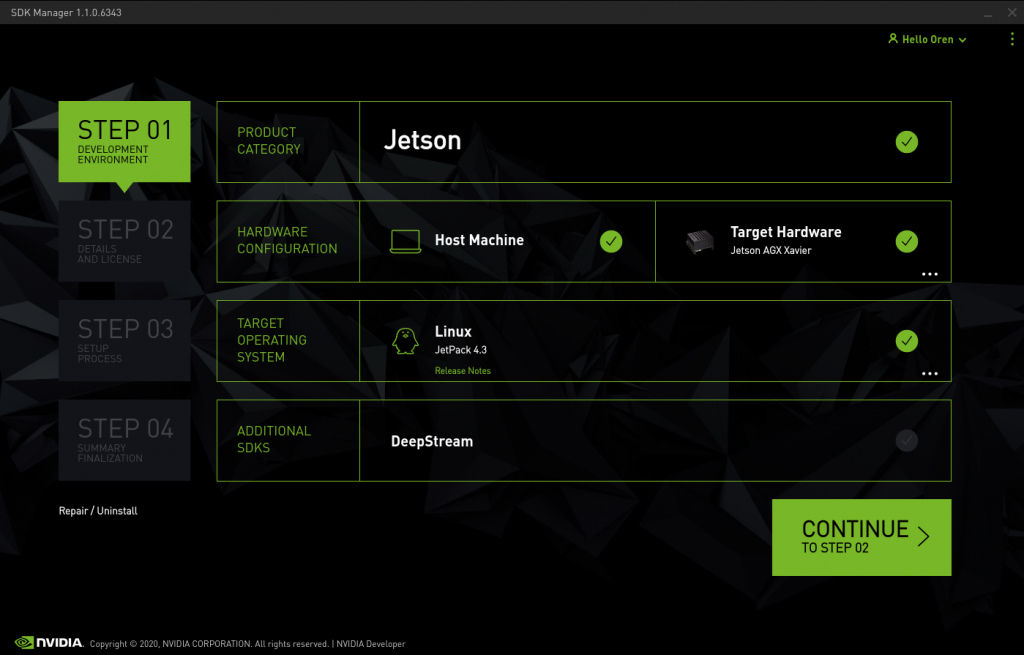
Select your hardware, and the version of Jetpack you want to use. They will have the developer preview, 4.4 selected by default, but I recommend using 4.3. Click Next

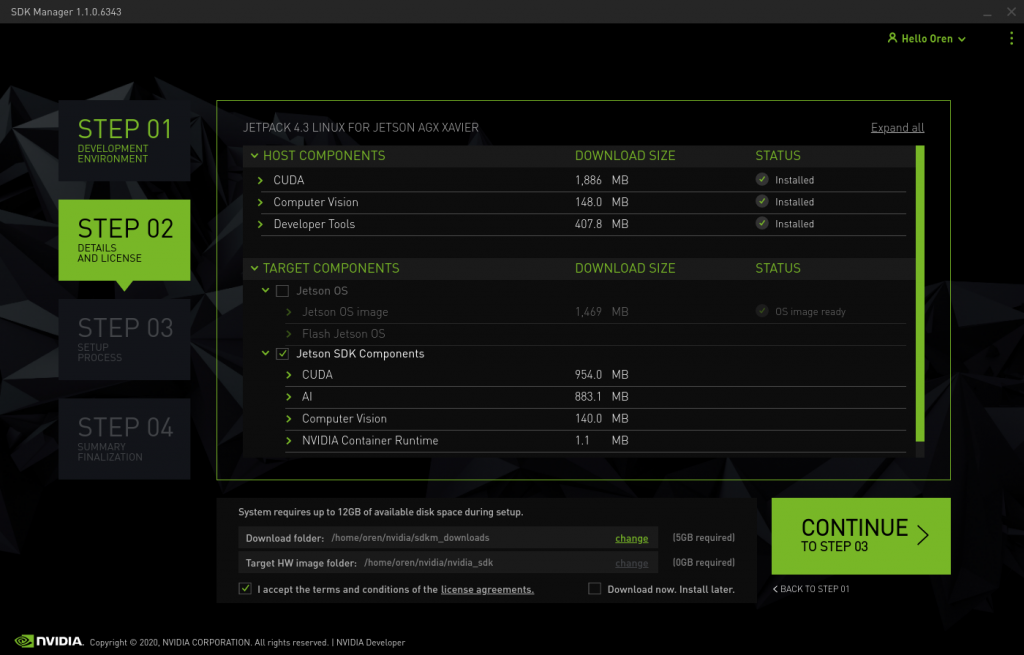
On this screen, you’ll install the host components (I’ve already installed them in the screenshot). Deselect the Jetson OS, as we’ll be installing our own custom image with a realtime kernel. Also deselect Jetson SDK components as those will be installed later. Press continue and go grab coffee while CUDA, OpenCV, Visionworks, and the like are installed on your host machine.
Nvidia’s SDK manager installs OpenCV in an unconventionally named directory. This can be confusing for other software that doesn’t know where to look. Run the following commands to correct this
cd /usr/include
sudo ln -s opencv4/opencv2/ opencv
Exit when finished.
Now create a folder in your home directory to store your kernel source and auxillary goodies.
mkdir nvidia
cd nvidia
Clone the jetson-agx-build repo into it.
git clone https://github.com/jtagxhub/jetpack-agx-build.git build
This provides useful scripts to build your own kernel and flash it onto the Jetson. It downloads a lot of the same things the SDK Manager does; but also downloads the Jetson source code, complete with realtime kernel patches.
This repo does not support JetPack 4.4 yet. To make JetPack 4.4 available, 2 file needed to be created.
Assuming you are in the root folder of the repo, create 2 files ./config/TX2_Xavier-4.4 and ./config/Xavier-4.4. The file content should be the following:
For ./config/TX2_Xavier-4.4
# JetPack 4.4

## Download Links
KERNEL_TOOLCHAIN_LINK=https://developer.nvidia.com/embedded/dlc/l4t-gcc-7-3-1-toolchain-64-bit
BSP_TOOLCHAIN_LINK=$KERNEL_TOOLCHAIN_LINK
SOURCES_LINK=https://developer.nvidia.com/embedded/L4T/r32_Release_v4.3/Sources/T186/public_sources.tbz2
BSP_LINK=https://developer.nvidia.com/embedded/L4T/r32_Release_v4.3/t186ref_release_aarch64/Tegra186_Linux_R32.4.3_aarch64.tbz2
ROOTFS_LINK=https://developer.nvidia.com/embedded/L4T/r32_Release_v4.3/t186ref_release_aarch64/Tegra_Linux_Sample-Root-Filesystem_R32.4.3_aarch64.tbz2

# Toolchain
KERNEL_TOOLCHAIN=$KERNEL_TOOLCHAIN_ROOT/gcc-linaro-7.3.1-2018.05-x86_64_aarch64-linux-gnu/bin/aarch64-linux-gnu-
BSP_TOOLCHAIN=$KERNEL_TOOLCHAIN
BSP_TOOLCHAIN_ROOT=$KERNEL_TOOLCHAIN_ROOT

# DOWNLOAD
KERNEL_TOOLCHAIN_PACKAGE=$DOANLOAD_ROOT/gcc-linaro-7.3.1-2018.05-x86_64_aarch64-linux-gnu.tar.xz
BSP_TOOLCHAIN_PACKAGE=$KERNEL_TOOLCHAIN_PACKAGE
BSP_PACKAGE=$DOANLOAD_ROOT/Tegra186_Linux_R32.4.3_aarch64.tbz2
ROOTFS_PACKAGE=$DOANLOAD_ROOT/Tegra_Linux_Sample-Root-Filesystem_R32.4.3_aarch64.tbz2

# Kernel
KERNEL_VERSION=4.9
TARGET_KERNEL_CONFIG=tegra_defconfig

# Override
SOURCE_UNPACK=$DOANLOAD_ROOT/Linux_for_Tegra/source/public
KERNEL_PACKAGE=$SOURCE_UNPACK/kernel_src.tbz2
CBOOT_PACKAGE=$SOURCE_UNPACK/cboot_src_t19x.tbz2
For ./config/Xavier-4.4
# JetPack 4.4

source $CONFIG_DIR/common/TX2_Xavier-4.4

# OUT
OUT_ROOT=$TOP/Xavier
To set up the repo, run
source build/envsetup.sh
It’ll prompt you for your target board, your release, your user and password for your board, and your device IP. Answers should be the following:
- Probably Xavier or TX2, but put whatever you’re using
- 4.3, if you heeded my recommendations above
- The username and password you plan on using when you install Ubuntu on your Jetson
- 192.168.55.1, this is the IP address the Jetson assigns to itself in the Ethernet-over-USB mini-network
Finish setup with:
l4tout_setup
bspsetup
Now your nvidia directory will resemble the structure seen in the build/README.md. You’re ready to edit kernel code.
cd sources/kernel/kernel/kernel-4.9
This is the source for your kernel. It includes patches for realtime functionality. Apply these with:
./scripts/rt-patch.sh apply-patches
Your kernel is now realtime! Do some quick config and build it
kdefconfig
kmenuconfig     # You don't HAVE to change anything
ksavedefconfig
kbuild -a
Go grab coffee.
Unplug your Jetson and replug it in. The only things connected should be power, a keyboard, an HDMI monitor, and a USB connecting it to your host machine. Mouse is optional. Do not connect ethernet.
Enter recovery mode by holding down the Recovery switch (location varies by board) and then holding down the Power button. Release both after a couple seconds. Also plug in a monitor now.
Back on your host, run:
flash
It’ll prompt you for a conf file. If you’re using an AGX, it’s probably not the 8GB one, fyi. Go get coffee again. If this process isn’t done in 10 minutes, something went wrong.
The guaranteed way you know your flash works is the that the Jetson will power up, and you’ll see an install screen on its monitor. Connect a keyboard and do all the things.
When it prompts you for username and password, be sure to use the same ones you specified in step 2 after running envsetup.sh.
When installation is complete, and your Jetson restarted, login and run uname -a to see what kernel you have. If it has PREEMPT RT in it, congratulations! Your Jetson is running a fully preemptive realtime kernel!
, bring up the SDK Manger again. Select all the same things on Step 1 (be careful not to accidentally select 4.4) and press continue.
This time, only leave Jetson OS unchecked, since we already flashed it. Take note of the Target HW Image Folder. Notice how I made mine a subfolder of the same nvidia directory we used before.
Press continue and take a quick potty break on account of the three coffee breaks you had during this tutorial.
When this is done, there will be CUDA and Visionworks demos installed on your Jetson. JetsonHacks has a YouTube video exploring these. Check that out if you want, but if not, you’re finished!