This repository contains training neural networks for learning path planning using reinforcement learning, specifically Deep Deterministic Policy Gradient (DDPG) and its variance Twin Delayed DDPG (TD3).
The inputs to the model are data from the lidar sensors, distance to the target, theta angle and speed and have the speed of the robot as output. The entire environment was carried out in ROS Noetic and Gazebo v11.
This repository presents a novel approach to replace the ROS Navigation Stack (RNS) with a Deep Reinforcement Learning model for robots equipped with wheels. The goal of this model is to provide a simple and versatile architecture that can be easily integrated into any environment and robot platform. The code is designed to be clean and organized, with all configuration config.yaml parameters stored in a single config file. Additionally, pre-trained weights are included for immediate use.
This repository was developed using Docker, ensuring compatibility with ROS and adaptability to a wide range of machine configurations, including those running MacOS. The code has been tested and is ready for use, with all necessary commands provided in the accompanying Makefile.
The agent's perception of the environment is based on 1D Lidar sensor data, including the robot's orientation relative to the objective, and its angular and linear velocity. The agent must take actions in the form of an angular and linear vector, with both values ranging from -1 to 1.
The purpose of the task is episodic, resetting at each stage of the episode. The agent receives a negative reward penalty of -100 if he collides with an obstacle. On the other hand, if the agent successfully reaches the goal, he will receive a reward of 100. In addition, the agent will also incur a penalty if he walks too close to the walls or if his movement is not smooth.
To utilize the environment to your desired specifications, follow these steps to run the agent:
-
Configure the environment parameters as needed
-
Run the agent using the specified configuration
-
Observe and analyze the agent's performance and make adjustments as necessary
Warning : It is advisable to thoroughly understand the environment, observation, and action space before making any modifications or running the agent.
Clone the repository and run the following commands:
mkdir <your_workspace>/src
cd <your_workspace>/src
git clone https://github.com/Nicolasalan/reinforcement.git
Build the image Dockerfile:
cd <your_workspace>/src/reinforcement
make build
Warning : This part can take a while, so be patient and go take another ☕ or 🍫.
(Optional) Install weights for the model:
cd <your_workspace>/src/reinforcement
make install
Note : The weights will be saved in the checkpoint folder under
src/reinforcement/checkpoints.
Set the waypoints and cry the world:
cd <your_workspace>/src/reinforcement
make waypoint
Note : The world will be saved in the
src/reinforcement/models/map/map.daefile.
For a better organization and structuring of the robot's movement planning, it is recommended to separate the waypoints into three distinct categories: targets, robot positions and object spawn.
Targets are specific points in the environment that the robot must reach or interact with. Robot positions refer to locations where the robot can move or stand while executing the task. Finally, the object spawn is used to define the initial position of objects that will be used during the task.
To make waypoints easier to read and maintain, it is recommended to separate the information into two different YAML files: poses.yaml and random.yaml. In poses.yaml, information regarding robot positions and targets must be stored. In random.yaml, information about the spawn of objects must be stored
To verify that everything is working correctly, run the unit tests.
cd <your_workspace>/src/reinforcement
make setup # no visualization
In the second terminal, start the tests.
make integrationBefore starting the training, it is important to set up a requirements file for using your mobile robot. This file must specify all the necessary details for the efficient use of the robot.
# ==== parameters ros ==== #
topic_cmd: 'cmd_vel' # topic to publish the velocity
topic_odom: 'odom' # topic to get the odometry
topic_scan: 'base_scan_front' # topic to get the laser scan
robot: 'robot' # name of the robot in gazebo
# ==== parameters for the environment ==== #
goal_reached_dist: 0.4 # distance to the goal to consider it reached
collision_dist: 0.3 # distance to the obstacle to consider it a collision
orientation_threshold: 0.1 # threshold to consider the orientation reached
environment_dim: 150 # size of the environment
robot_dim: 4 # x, y, theta, velocity
action_dim: 2 # angular and linear
time_delta: 0.1 # 10 Hz
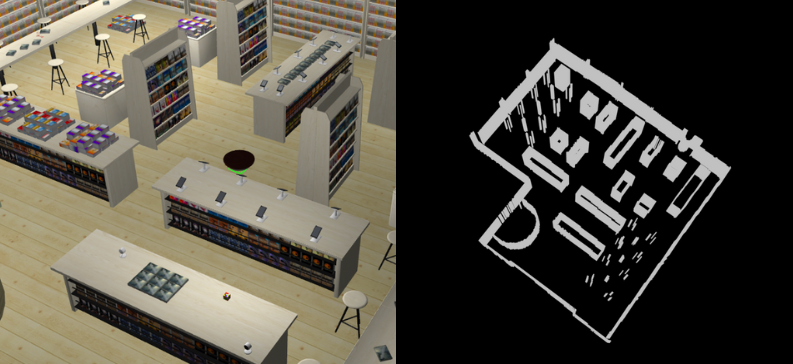
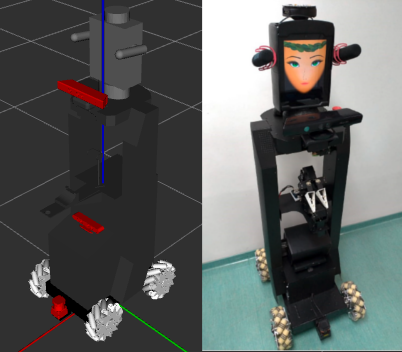
noise_sigma: 0.5 # noise for the laser scanFor training, the robot Hera from the RoboFEI At Home team was used, which is intended for domestic use.
Note : There are a wide variety of parameters in this config.yaml file, but most are defaults. In addition, they are already configured for use by the AWS bookstore world and the Hera robot.
Note : If necessary, use the Makefile help feature, where all available commands are listed. To use it, run the command
make help.
To start the Gazebo sandbox, you need to start the world first and then the robot. Afterwards, you can spawn the target in the world to complete the simulation.
cd <your_workspace>/src/reinforcement
make spawn
To start training:
cd <your_workspace>/src/reinforcement
make start # or make start-gpu
To view agent results
cd <your_workspace>/src/reinforcement
make tensorboardThe project is structured as follows:
.
├── .github/           # [dir] Github actions
├── config/            # [dir] Configuration files
│   └── map/           # [dir] Map files
├── launch/            # [dir] Launch files
├── models/            # [dir] Model SDF files
├── src/reinforcement/         # [dir] Source code
│   ├── checkpoints/   # [dir] Pre-trained weights for the agent
│   └── run/           # [dir] Logs and results of the agent
├── test/              # [dir] Unit tests
├── world/             # [dir] Gazebo world
├── .gitignore         # [file] Files to ignore in git
├── Dockerfile         # [file] Dockerfile image
├── entrypoint.sh      # [file] Entrypoint for the docker image
├── Makefile           # [file] Commands to run
├── README             # [file] This file
├── requirements.txt   # [file] Project requirements
├── setup.py           # [file] Setup file for the project
├── CMakeLists.txt     # [file] Colcon-enabled CMake recipe
└── package.xml        # [file] ROS Noetic package metadata
This project is licensed under the MIT license - see archive LICENSE for details.