Remotely open your garage door, using your Raspberry Pi, without messing around with your garage door!
The way it works is it uses a servo motor to press a button on a garage door remote. The steps are explained below.
- Part 1
- Part 2
This varies from remote to remote. If it is working then when rotated, it should click the button on the remote. I did it by taking apart my garage door opener and building some lego around it.
A servo motor has 3 connectors: Power, Ground, and PWM. Usually the power pin has a red wire, and the ground pin has a black wire. The remaining pin is the PWM pin. You must connect these pins to the corresponding GPIO pins on the Raspberry Pi.
A diagram of the Raspberry Pi's GPIO pins are below:
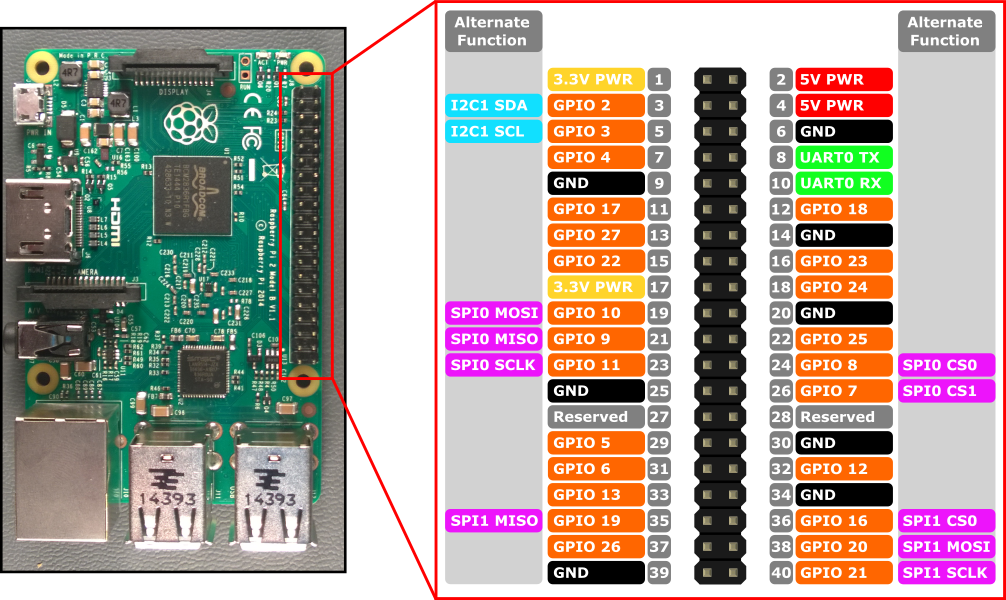
Pin 2 (5 Volt Power). You may need to connect it to Pin 1 (3.3 Volt Power) if it is a 3.3 Volt servo, which you can usually find in the manufacturer's information, or just on its Amazon page. I connected the ground pin to Pin 6 (Ground).
You must connect the PWM pin to a GPIO pin. I connected mine to GPIO 23, or Pin 16. You can connect it to any GPIO pin. Keep track of which GPIO number you connected it to!
This is where the client comes in. You must install it's dependencies, and then install it by building the source.
- Part 1
- Part 2
- Part 3
You need Go in order to compile the client. To install Go on my Raspberry Pi, I followed this excellent tutorial. If you don't want to go through it, you can run the following commands:
sudo apt update
sudo apt full-upgradecd ~/Downloads
wget https://dl.google.com/go/go1.16.4.linux-armv6l.tar.gz -O go.tar.gz
sudo tar -C /usr/local -xzf go.tar.gzUse
nano ~/.bashrcThis will bring up a file editor. Scroll to the bottom of the file (by using the down arrow key or the scroll wheel), and add the following lines:
export GOPATH=$HOME/go
export PATH=/usr/local/go/bin:$PATH:$GOPATH/bin
Finally, use ctrl+x to bring up the save menu and then press y to confirm the changes. This will bring you back to the terminal.
The servo library I am using requires pi-blaster to work. You can follow the instructions at their repository. However, I used the following commands:
sudo apt-get install autoconfcd ~/Downloads
git clone https://github.com/sarfata/pi-blaster.git
cd pi-blaster./autogen.sh
./configure
makesudo make installNow, you need to install the client. Do this by using the following commands:
git clone https://github.com/Nv7-GitHub/gdo_client.git
cd gdo_client/client
go installNow, you can just use the client command to run the client.
When you run the command, you will be prompted to login or make an account. If this is your first time following these steps, then answer Y. Otherwise, you have already made an account and can answer N.
Now, enter in your username and password. If you are making an account, then come up with a unique username and a strong password. Otherwise, use the username and password of the account you already made. You will use this to log into the user-facing client.
Now, you need to setup the client. First, it will ask you if your garage door is open. This initializes its internal state. Say Y if its open, N if it isn't. Next, it will ask you for your servo pin. This is the servo pin from the hardware step.
Now, its ready to go!
To use GDO, you need to use The GDO Web App - https://gdoweb.tk.
Enter in the username and password from Part 1. Now, press Log In.
Press Open/Close Door to Open or Close your garage door, remotely!