Deployment guide
To begin, you will need:
-
An Azure subscription where you can create the following kind of resources:
-
App service
-
App service plan
-
Bot channels registration
-
Azure storage account
-
Azure search
-
Application Insights
-
A copy of the Great Ideas app GitHub repo
Register one Azure AD applications in your tenant's directory: for the bot and tab app authentication.
-
Log in to the Azure Portal for your subscription, and go to the "App registrations" blade here.
-
Click on "New registration", and create an Azure AD application.
-
Name: The name of your Teams app - if you are following the template for a default deployment, we recommend "Great Ideas".
-
Supported account types: Select "Accounts in any organizational directory"
-
Leave the "Redirect URL" field blank.

-
Click on the "Register" button.
-
When the app is registered, you'll be taken to the app's "Overview" page. Copy the Application (client) ID; we will need it later. Verify that the "Supported account types" is set to Multiple organizations.

-
On the side rail in the Manage section, navigate to the "Certificates & secrets" section. In the Client secrets section, click on "+ New client secret". Add a description for the secret and select Expires as "Never". Click "Add".

-
Once the client secret is created, copy its Value, please take a note of the secret as it will be required later.
At this point you have 3 unique values:
-
Application (client) ID which will be later used during ARM deployment as Bot Client id and in manifest files as
<<botid>> -
Client secret for the bot which will be later used during ARM deployment as Bot Client secret
-
Directory (tenant) ID
We recommend that you copy these values into a text file, using an application like Notepad. We will need these values later.
- Click on the "Deploy to Azure" button below.

-
When prompted, log in to your Azure subscription.
-
Azure will create a "Custom deployment" based on the ARM template and ask you to fill in the template parameters.
-
Select a subscription and resource group.
-
We recommend creating a new resource group.
-
The resource group location MUST be in a data center that supports: Application Insights; and Azure Search. For an up-to-date list, click here, and select a region where the following services are available:
-
Application Insights
-
Azure Search
-
-
Enter a "Base Resource Name", which the template uses to generate names for the other resources.
-
The app service names
[Base Resource Name], must be available. For example, if you selectcontosogreatideasas the base name, the namescontosogreatideasmust be available (not taken); otherwise, the deployment will fail with a Conflict error. -
Remember the base resource name that you selected. We will need it later.
-
-
Fill in the various IDs in the template:
-
Bot Client ID: The application (client) ID registered in Step 1.
-
Bot Client Secret: The client secret registered in Step 1.
-
Tenant Id: The tenant ID registered in Step 1. If your Microsoft Teams tenant is same as Azure subscription tenant, then we would recommend to keep the default values.
Make sure that the values are copied as-is, with no extra spaces. The template checks that GUIDs are exactly 36 characters.
-
-
If you wish to change the app name, description, and icon from the defaults, modify the corresponding template parameters.
NOTE: If you plan to use a custom domain name instead of relying on Azure Front Door, read the instructions here first.
-
Agree to the Azure terms and conditions by clicking on the check box "I agree to the terms and conditions stated above" located at the bottom of the page.
-
Click on "Purchase" to start the deployment.
-
Wait for the deployment to finish. You can check the progress of the deployment from the "Notifications" pane of the Azure Portal. It can take more than 20 minutes for the deployment to finish.
-
Go back to the "App Registrations" page here
-
Enter the Bot client id created in Step 1 under Owned applications search box.
-
Click on the application (this should be the same application registered in step 1)
-
Under left menu, select Authentication under Manage section.
-
Select 'Accounts in any organizational directory (Any Azure AD directory - Multitenant)' under Supported account types and click "+Add a platform".
-
On the flyout menu, Select "Web"
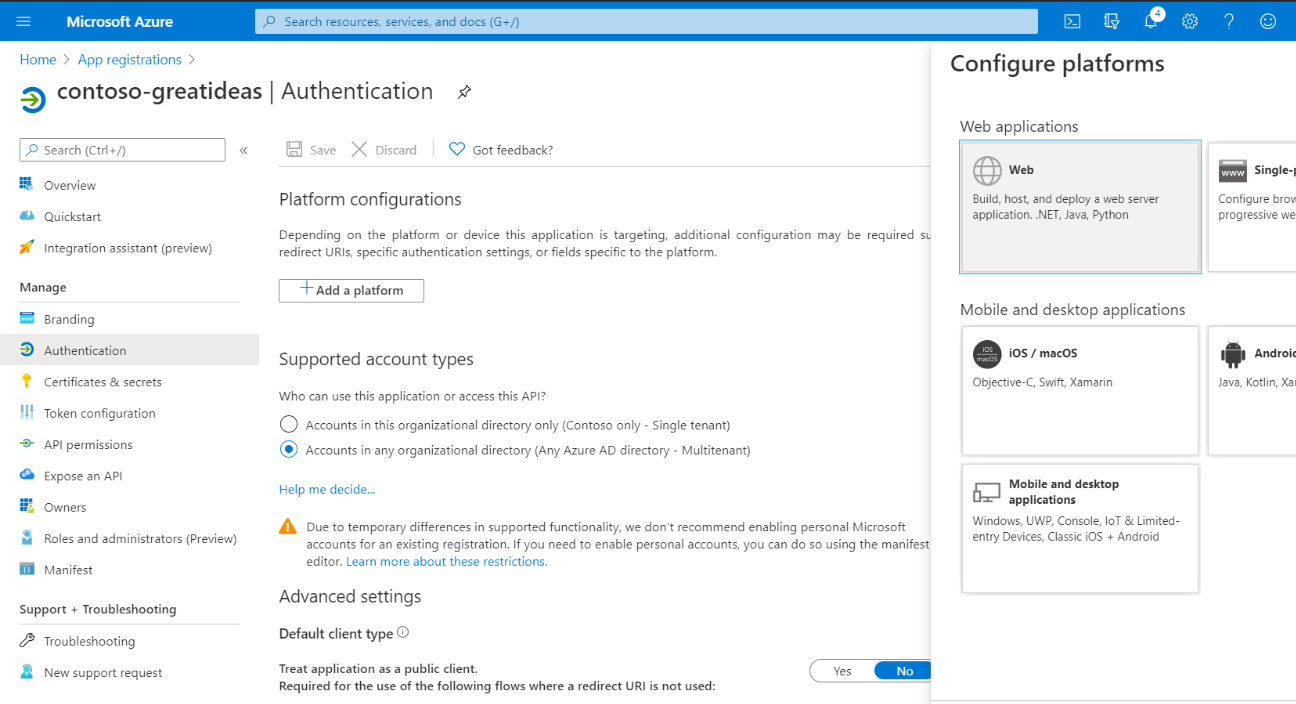
-
Add
https://[baseresourcename].azurefd.net/signin-simple-endunder Redirect URLs and click Configure button. For e.g.
-
Once the flyout menu close, scroll bottom to section 'Implicit Grant' and select check boxes "Access tokens" and "ID tokens" and click "Save" at the top bar.

-
Under left menu, select Expose an API under Manage.

-
Select the Set link to generate the Application ID URI in the form of
api://{BotID}. Insert your fully qualified domain name (with a forward slash "/" appended to the end) between the double forward slashes and the GUID. The entire ID should have the form of:api://fully-qualified-domain-name.com/{BotID}- for e.g.:
api://subdomain.example.com:6789/c6c1f32b-5e55-4997-881a-753cc1d563b7.
- for e.g.:
-
Select the Add a scope button. In the panel that opens, enter
access_as_useras the Scope name. -
Set Who can consent? to "Admins and users"
-
Fill in the fields for configuring the admin and user consent prompts with values that are appropriate for the
access_as_userscope. Suggestions:- Admin consent display name: Great ideas
- Admin consent description: Allows Teams to call the app’s web APIs as the current user.
- User consent display name: Teams can access your user profile and make requests on your behalf
- User consent description: Enable Teams to call this app’s APIs with the same rights that you have
-
Ensure that State is set to Enabled
-
Select Add scope
- Note: The domain part of the Scope name displayed just below the text field should automatically match the Application ID URI set in
the previous step, with
/access_as_userappended to the end; for example:api://subdomain.example.com:6789/c6c1f32b-5e55-4997-881a-753cc1d563b7/access_as_user
- Note: The domain part of the Scope name displayed just below the text field should automatically match the Application ID URI set in
the previous step, with
-
In the same page in below section Authorized client applications, you identify the applications that you want to authorize to your app’s web application. Each of the following IDs needs to be entered. Click "+Add a client application" and copy-paste the below id and select checkbox "Authorized scopes". Repeat the step for second GUID.
-
1fec8e78-bce4-4aaf-ab1b-5451cc387264(Teams mobile/desktop application) -
5e3ce6c0-2b1f-4285-8d4b-75ee78787346(Teams web application)
- Under left menu, navigate to API Permissions, and make sure to add the follow permissions of Microsoft Graph API > Delegated permissions:
- User.Read (enabled by default)
- offline_access
- openid
- profile
Note: The detailed guidelines for registering an application for SSO Microsoft Teams tab can be found here
This step covers the Teams application package creation for teams scope and make it ready to install in Teams.
-
Open the
Manifest\manifest.jsonfile in a text editor. -
Change the placeholder fields in the manifest to values appropriate for your organization.
-
developer.name(What's this?) -
developer.websiteUrl -
developer.privacyUrl -
developer.termsOfUseUrl
-
-
Change the
<<botId>>placeholder to your Azure AD application's ID from above. This is the same GUID that you entered in the template under "Bot Client ID". -
Replace
<appbaseurl>placeholder in configurationTabs.configurableUrl with the Azure front door URL created i.e.'https://[BaseResourceName].azurefd.net'. For example if you chose contoso-greatideas then the appbaseurl will be https://contoso-greatideas.azurefd.net.
- note : please make sure to keep the URL path
/curator-tabas is.
- In the "validDomains" section, replace the
<<appDomain>>with your Bot App Service's domain. This will be[BaseResourceName].azurefd.net. For example if you chose "contosogreatideas" as the base name, change the placeholder tocontosogreatideas.azurefd.net.
- note : please make sure to not add https:// in valid domains.
-
In the "webApplicationInfo" section, replace the
<<botId>>with Bot Client ID of the app created in Step 1. Also replaceapi://<<applicationurl>>/<<botId>>with following Application URI appended with bot client id. This will be as follows for exampleapi://contoso-greatideas.azurefd.net/19c1102a-fffe-46c4-9a85-016bec13e0abwhere contoso-greatideas is the base resource URL used under valid domains and configurable tabs and 19c1102a-fffe-46c4-9a85-016bec13e0ab is the bot client id. -
Create a ZIP package with the
manifest.json,color.png, andoutline.png. The two image files are the icons for your app in Teams. -
Make sure that the 3 files are the top level of the ZIP package, with no nested folders.

Repeat the steps above but with the file Manifest\manifest_curator.json (Important note: Before following point 7 delete manifest.json and rename manifest_curator.json to manifest.json). Name the resulting package greatideas-curator.zip, so you know that this is the app for curator.
-
If your tenant has side loading apps enabled, you can install your app by following the instructions here
-
You can also upload it to your tenant's app catalog, so that it can be available for everyone in your tenant to install. See here
- We recommend using app permission policies to restrict access to this app to the members of the experts team.
-
Install the app (the
GreatIdeas.zippackage) to your team.
Please see our Troubleshooting page.