在 IOS 上实现PP识图功能,此 Demo 有很好的的易用性和开放性,如在 Demo 中跑自己训练好的模型等。 本文主要介绍PP识图 Demo 运行方法和如何在更新模型/输入/输出处理下,保证PP识图 Demo 仍可继续运行。
- 在本地环境安装好 Xcode 工具,详细安装方法请见Xcode 官网。
- 准备一部 Iphone 手机,并在 Xcode 中连接自己的手机 (第一次连接 IPhone 到电脑时,需要在 IPhone 的
设置->通用->设备管理中选择本电脑并信任)

- PP识图 Demo 位于
Paddle-Lite-Demo/PP_shitu/ios/PPshitu目录 - cd
Paddle-Lite-Demo/libs目录,运行download.sh脚本,下载所需要的 Paddle Lite 预测库 - cd
Paddle-Lite-Demo/PP_shitu/assets目录,运行download.sh脚本,下载 OPT 优化后模型
cd Paddle-Lite-Demo/libs
# 下载所需要的 Paddle Lite 预测库
sh download.sh
cd ../PP_shitu/assets
# 下载OPT 优化后模型
sh download.sh
cd ..-
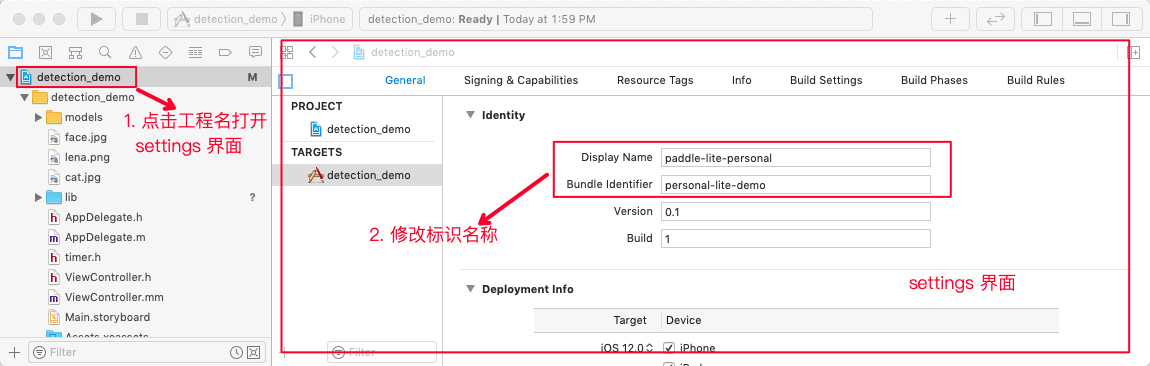
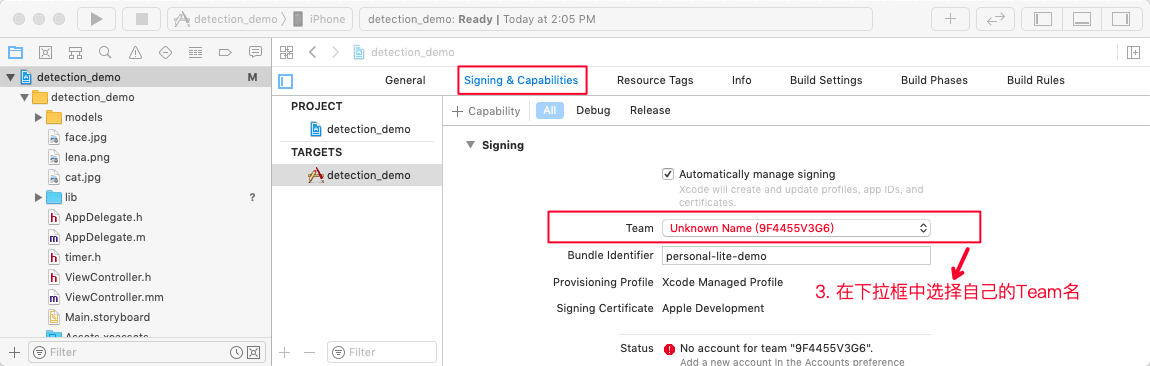
用 Xcode 打开
PPshitu/PPshitu.xcodeproj文件,修改工程配置。依次修改General/Identity和Signing&Capabilities属性,替换为自己的工程代号和团队名称。(必须修改,不然无法通过编译) -
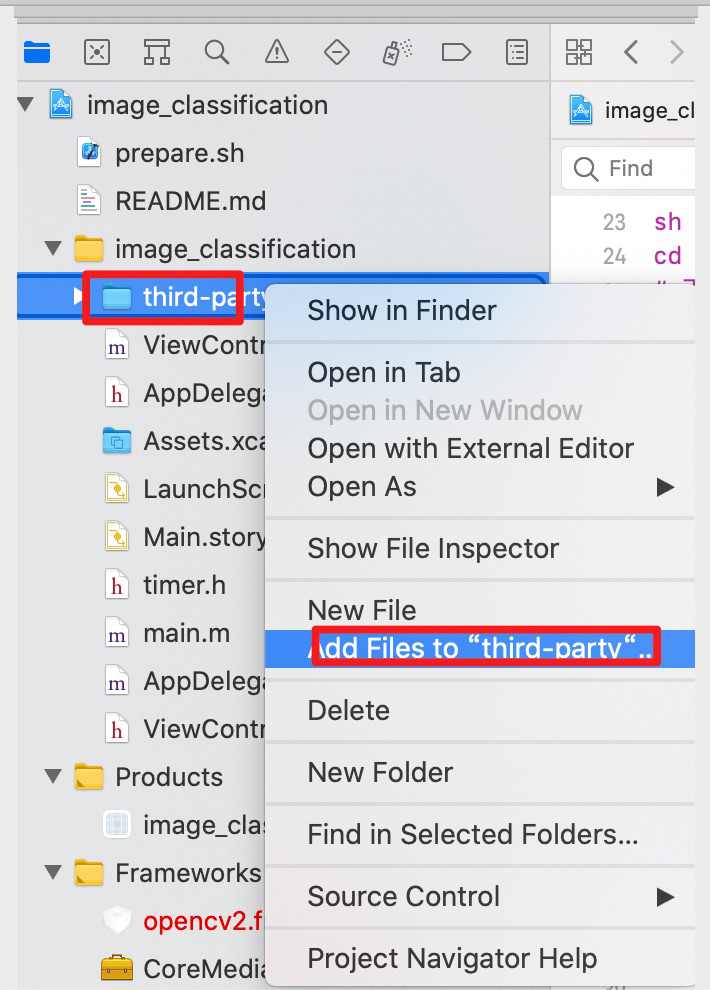
选中
PPshitu/third-party目录 ,右击选择Add Files to "third-party" ...选项,将预测库、Opencv库和 assets内容(模型、测试图片及标签文件)添加到工程中。操作过程如下图:- 添加
assets案例
-
添加预测库案例
-
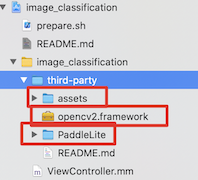
添加完成后,工程目录如下:
注意: 如果觉得上述方法比较麻烦,可以使用工程下的
prepare.sh脚本,完成上述资源的拷贝# path = Paddle-Lite-Demo/ios/PP_shitu sh prepare.sh - 添加
-
IPhone 手机连接电脑,在 Xcode 中连接自己的手机 (第一次连接 IPhone 到电脑时,需要在 IPhone 的
设置->通用->设备管理中选择本电脑并信任)


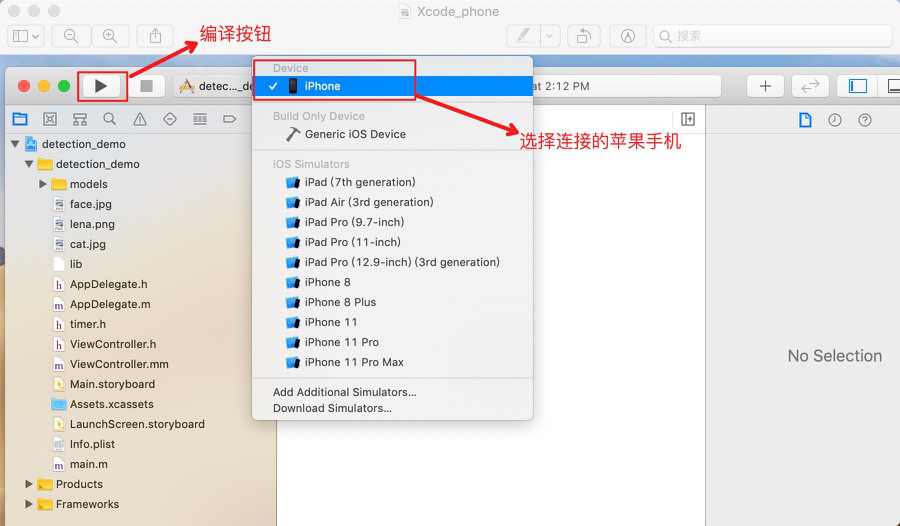
- 按下左上角的 Run 按钮,自动编译 APP 并安装到手机。在苹果手机中设置信任该 APP(进入
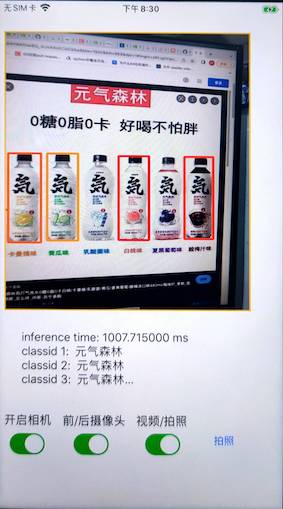
设置->通用->设备管理,选中新安装的 APP 并验证该应用) 成功后效果如下:
| APP 效果 |
|---|
*Paddle Lite 项目:https://github.com/PaddlePaddle/Paddle-Lite
- 参考 Paddle Lite 源码编译文档,编译 iOS 预测库
- 编译最终产物位于
build.lite.xxx.xxx.xxx下的inference_lite_lib.xxx.xxx- 替换 c++ 库
- 头文件
将生成的
build.lite.ios.xxx.clang/inference_lite_lib.ios64.xxx/include文件夹替换 Demo 中的Paddle-Lite-Demo/PP_shitu/ios/PPshitu/shitu/third-party/PaddleLite/include - 替换 arm64-v8a 库
将生成的
build.lite.ios.ios64.armv8/inference_lite_lib.ios64.armv8/libs/libpaddle_api_light_bundled.a库替换 Demo 中的Paddle-Lite-Demo/PP_shitu/ios/PPshitu/shitu/third-party/PaddleLite/lib/libpaddle_api_light_bundled.a
- 头文件
将生成的
- 替换 c++ 库
注意: 如果要使用 armv7 库,则可将 armv7 库替换至相应目录下:
- armeabi-v7a 将生成的
build.lite.ios.ios.armv7/inference_lite_lib.ios.armv7/libs/libpaddle_api_light_bundled.a库替换 Demo 中的Paddle-Lite-Demo/PP_shitu/ios/PP_shitu/PP_shitu/third-party/PaddleLite/lib/libpaddle_api_light_bundled.a
先整体介绍下目标检测 Demo 的代码结构,然后再介绍 Demo 每部分功能.
-
third-party: 存放预测库、模型、测试图片等相关信息assets: 存放预测资源- models:模型文件,opt 工具转化后 Paddle Lite 模型
- images:测试图片
- labels:标签文件
PaddleLite:存放 Paddle Lite 预测库和头文件- lib
- include
opencv2.framework:opencv 库和头文件
# 位置:
PPshitu/shitu/third-party/
example:
# IOS 预测库
PPshitu/shitu/third-party/PaddleLite/lib/libpaddle_api_light_bundled.a
# 预测库头文件
PPshitu/shitu/third-party/PaddleLite/include/paddle_api.h
PPshitu/shitu/third-party/PaddleLite/include/paddle_use_kernels.h
PPshitu/shitu/third-party/PaddleLite/include/paddle_use_ops.h
-
ViewController.mm:主要预测代码
  # 位置
PPshitu/shitu/ViewController.mm-
viewDidLoad方法 APP 界面初始化、推理引擎 predictor 创建和运行方法,这个方法包含界面参数获取、predictor 构建和运行、图像前/后处理等内容 -
processImage方法 实现图像输入变化时,进行新的推理,并获取相应的输出结果
IOS 示例基于 C++ API 开发,调用 Paddle Lite C++s API 包括以下五步。更详细的 API 描述参考:Paddle Lite C++ API 。
#include <iostream>
// 引入 C++ API
#include "include/paddle_api.h"
#include "include/paddle_use_ops.h"
#include "include/paddle_use_kernels.h"

// 1. 设置 MobileConfig
MobileConfig config;
config.set_model_from_file(<modelPath>); // 设置 NaiveBuffer 格式模型路径
config.set_power_mode(LITE_POWER_NO_BIND); // 设置 CPU 运行模式
config.set_threads(4); // 设置工作线程数

// 2. 创建 PaddlePredictor
std::shared_ptr<PaddlePredictor> predictor = CreatePaddlePredictor<MobileConfig>(config);

// 3. 设置输入数据
std::unique_ptr<Tensor> input_tensor(std::move(predictor->GetInput(0)));
input_tensor->Resize({1, 3, 224, 224});
auto* data = input_tensor->mutable_data<float>();
for (int i = 0; i < ShapeProduction(input_tensor->shape()); ++i) {
  data[i] = 1;
}
// 如果输入是图片,则可在第三步时将预处理后的图像数据赋值给输入 Tensor

// 4. 执行预测
predictor->run();

// 5. 获取输出数据
std::unique_ptr<const Tensor> output_tensor(std::move(predictor->GetOutput(0)));
std::cout << "Output shape " << output_tensor->shape()[1] << std::endl;
for (int i = 0; i < ShapeProduction(output_tensor->shape()); i += 100) {
  std::cout << "Output[" << i << "]: " << output_tensor->data<float>()[i]
            << std::endl;
}- 将优化后的模型存放到目录
third-party/assets/models/下; - 如果模型名字跟工程中模型名字一模一样,即均是使用
third-party/assets/models/model.nb,则代码不需更新;否则话,需要修改./ViewController.mm中代码
  std::string det_model_path = app_dir + "/models/det_new.nb";
  std::string rec_model_path = app_dir + "/models/rec_new.nb";
  std::string label_path = app_dir + "/labels/label.txt";
  std::string img_path = app_dir + "/images/wu_ling.jpg";
  std::vector<int> det_input_shape{1,3,640,640};
  std::vector<int> rec_input_shape{1,3,224,224};
  std::vector<cv::Mat> batch_imgs;
  std::vector<PPShiTu::ObjectResult> det_result;
  int cpu_num_threads = 1;
  int warm_up = 0;
  int repeats = 1;
  pp_shitu =
        new PipeLine(det_model_path, rec_model_path, label_path, det_input_shape,
                     rec_input_shape, cpu_num_threads, warm_up, repeats);
注意:
-
如果更新后模型的输入信息如Shape、Tensor个数等发生改变,需要更新
object_detector.cc和recognition.cc文件中preprocess(...)输入预处理方法,完成模型输入更新 -
如果更新后模型的输出信息发生改变,需要更新
object_detector.cc和recognition.cc文件中postprocess(...)输出后处理方法,完成模型输出更新即可 -
如果需要更新
label.txt,则需将更新后的标签文件,存放至third-party/assets/labels/目录下。 若更新后标签名字不一样,应修改代码文件./ViewController.mm中代码
  std::string det_model_path = app_dir + "/models/det.nb";
  std::string rec_model_path = app_dir + "/models/rec.nb";
  std::string label_path = app_dir + "/labels/new_label.txt";
  std::string img_path = app_dir + "/images/wu_ling.jpg";
  std::vector<int> det_input_shape{1,3,640,640};
  std::vector<int> rec_input_shape{1,3,224,224};
  std::vector<cv::Mat> batch_imgs;
  std::vector<PPShiTu::ObjectResult> det_result;
  int cpu_num_threads = 1;
  int warm_up = 0;
  int repeats = 1;
  pp_shitu =
        new PipeLine(det_model_path, rec_model_path, label_path, det_input_shape,
rec_input_shape, cpu_num_threads, warm_up, repeats);- 更新输入数据
- 将更新的图片存放在
third-party/assets/images/下; - 更新文件
detection_demo/ViewController.mm中的代码
以更新 dog.jpg 为例,则先将 dog.jpg 存放在 third-party/assets/images/ 下,然后更新代码
  std::string det_model_path = app_dir + "/models/det_new.nb";
  std::string rec_model_path = app_dir + "/models/rec_new.nb";
  std::string label_path = app_dir + "/labels/label.txt";
  std::string img_path = app_dir + "/images/dog.jpg";
  std::vector<int> det_input_shape{1,3,640,640};
  std::vector<int> rec_input_shape{1,3,224,224};
  std::vector<cv::Mat> batch_imgs;
  std::vector<PPShiTu::ObjectResult> det_result;
  int cpu_num_threads = 1;
  int warm_up = 0;
  int repeats = 1;
  pp_shitu =
        new PipeLine(det_model_path, rec_model_path, label_path, det_input_shape,
                     rec_input_shape, cpu_num_threads, warm_up, repeats);
注意: 本 Demo 是支持图片/视频流/拍照三种输入方式,如果需更新输入图片建议通过 APP 的拍照或视频流方式进行更新,这样不用修改代码,则能正常推理。
-
更新输入预处理 此处需要更新
object_detector.cc和recognition.cc中的preprocess(...)输入预处理方法 -
更新输出预处理 此处需要更新
object_detector.cc和recognition.cc中的postprocess(...)输出后处理方法
time.h包含常见的计时处理函数,用于计时处理
如果你觉得当前性能不符合需求,想进一步提升模型性能,可参考首页中性能优化文档完成性能优化。