Github Repository | Github Page | Moodle
Welcome to the repository for the lab sessions of INF633 for the course 2023-2024!
Here, you will find a brief introduction to install and setup Unity, in addition to some quick tips and examples for those who didn't use this game-engine before.
Part of this information, in addition to all the content of the course sessions, tasks descriptions and tips can be found in the official page for the lab course: https://edualvarado.github.io/inf633-2022-2023/
Link to download: https://unity.com/download
- Download Unity Hub. It's a explorer tool for your projects where you can have simultaneously different Unity builds.
- Create an Unity account: It will be required when you launch the program. You can select the free option for personal use.
- Choose your Unity build. For this lab, we will be using 2021.3.8f1 LTS
- Make sure you have a text editor installed and configured for C#. Visual Studio Code is a popular option, but you can use any other code editor or IDE.
- Now you should be able to open Unity. Make sure that you can successfully launch it, that your graphics drivers are working or that you do not have any particular problem.
Before even importing the lab project, let's have a general overview of Unity. First, we first need to associate Unity with our chosen C# editor.
- In Unity, go to
Edit > Preferences > External Tools - Change
External Script Editorto your preferred text editor. - Make sure that your text editor is configured to handle C#.
- From now on, when you are writing your scripts, self-completion for the Unity API among other tools will be enable while you program your scripts in Unity.
Unity uses a modular window system. That means, that each part of the interface can be reorganized and placed as you like. By default, Unity will show a similar appearance to this one:
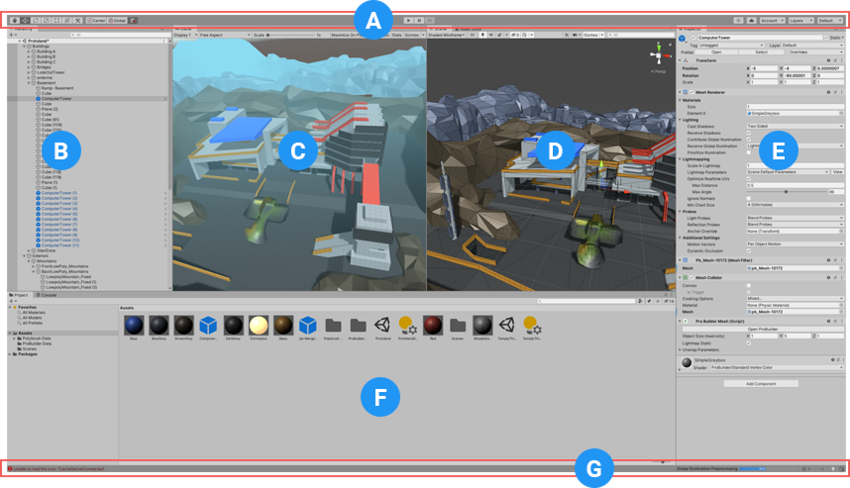
- A - Top bar. Here you can find some common tools such as Move, Rotate or Scale. Also, you can find the Play button to start your application, or Pause button, to stop it in the current frame. When it is paused, the Step button is available to go to the next frame.
- B - Hierarchy. Here are all the elements in your Scene. Those elements (commonly named as Game Objects in Unity) can be anything: 3D models, cameras, illumination... On top of that, you find the Scene. A
Sceneis the parent element that serves as a environment where you place all your Game Object. - C - Scene view. This window is the editor where you edit all your Game Objects before clicking Play in the normal Unity workflow.
- D - Game view. This window shows the rendered, running application when you click in Play. It will show whatever Display you have decided to show. Each of these displays is associated to a Camera Game Object. Keep in mind that you could still interact with the Game view during the Play mode by scripting, as you might do in any game.
- E - Inspector. One of the most important parts. Each Game Object has an Inspector associated that describes it. These descriptions are based on Components (for example, a Transform Component would describe the position, rotation and scale of the Game Object which has been associated to). You can attach the built-in components that Unity brings, or your own scripts in C#.
- F - Project. Here you can find all your assets of Unity, such as your 3D models, scripts, textures, materials...
- G - Console. The last line provided by the console, that displays errors, warnings or any other message that you have programmed to show during run-time. Next to the Project window, you can find the Console window where the entire space is dedicated to debugging.
In the Scene view:
- Left click to select a Game Object.
- Right click to rotate the camera on itself.
- Right click + WASD to move the camera in the environment.
- Middle click to pan the camera.
- Scroll wheel to zoom in/out.
- F to focus the camera on the selected Game Object.
- Alt + Left click to rate the camera around the focus point.
Some fast tips regarding the overall workflow in Unity:
- If you have errors in your scripts, they will show up in red in the bottom left corner. Otherwise, you can use the Console window.
- Any variable that you set as
publicwill be visible in the interface and editable in real-time. Although during this lab we will not focus on the code syntax and efficiency, normally it is a good practice to declared the variable asprivateand serialized it to make it visible in the Unity inspector using[SerializeField].
- Clone this repository.
- Make sure you have Unity Hub and an Unity built installed (as we describe in Introduction)
- In Unity Hub, click in
Open > Add project from disk - Select the parent folder of the repository, containing the Unity project. You will differentiate it because it contains folders such as
AssetsorPackages. - Open the project by selecting the installed built of Unity. That's all!
- To run the project, just click on the Play button at the top menu. The windows will be colored when the project is running.
- For the lab session project:
- Add new brushes before running the project, by selecting the terrain and drag-and-dropping the script in its inspector.
- Select the terrain and click on the Use button of one of the brushes
- You can then paint on the terrain (in the game view) with your brush.
- Click the Play button again to stop. Changes will be saved.