Integrate New Apps with Radar Platform
The Radar platform is a healthcare pipeline to obtain clinical and health data from various active and passive sources like questionnaires, wearable devices, phone sensors, etc. The platform is open source and is based on top of apache kafka ADD URL and is built as such to accommodate easy integration of future devices and applications to the platform. The main components of the system that will be required for integration of new devices are-
- Management Portal ADD URL - This is the central management service of the Radar Platform. It offers services like authorization of different components, Creating and storing info of Subjects, Sources, Studies( or Projects),etc, Creating relationship between different components (like registering a source to a subject), etc.
- Rest Proxy ADD URL - Since the platform is based on Apache Kafka ADD URL, we can either send data directly into kafka via a producer or use a rest proxy. This is for sending data into kafka topics through a RESTful interface. This a confluent provided product so we can post data using http requests.
- Schema Registry ADD URL - The data we send into the platform from our app or device will be converted to AVRO ADD URL format before going into kafka topics. For converting our data to avro, Rest proxy needs to know the schema (or format) of the data we are sending. These schemas are stored in the schema registry so that we don't have to send them with each request as this increases the latency.
The access token from Management Portal(MP) is required for authorization across the platform. Without this token, you can neither register your device nor send data into the platform. There are 2 ways in which access token can be obtained from the MP. They are discussed in the following sub-sections
This method involves obtaining two tokens. This method is appropriate for applications that need to register themselves to a subject and send data for that subject. Note that this method will only give you access rights for that particular subject. If you need additional rights, then the other method may be more appropriate for your use-case. You can use any available library for scanning the QR code.
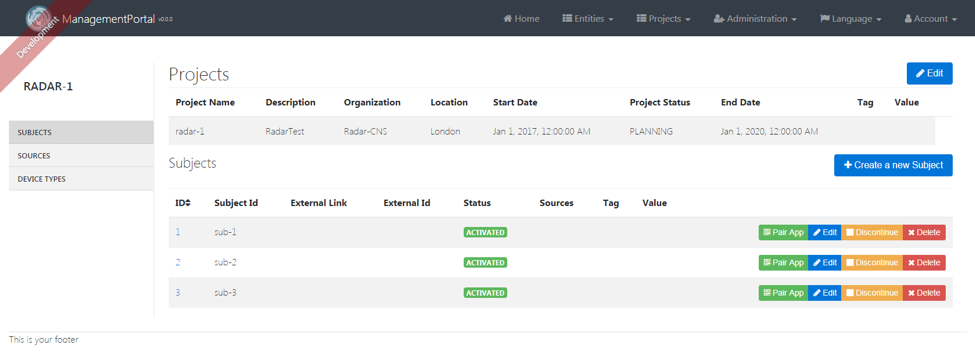
A QR code is available on the Project's page in which the subject is enrolled in. When you select pair app option on the subject on the management portal, you will be presented with a menu where you can generate a QR code for your app type.
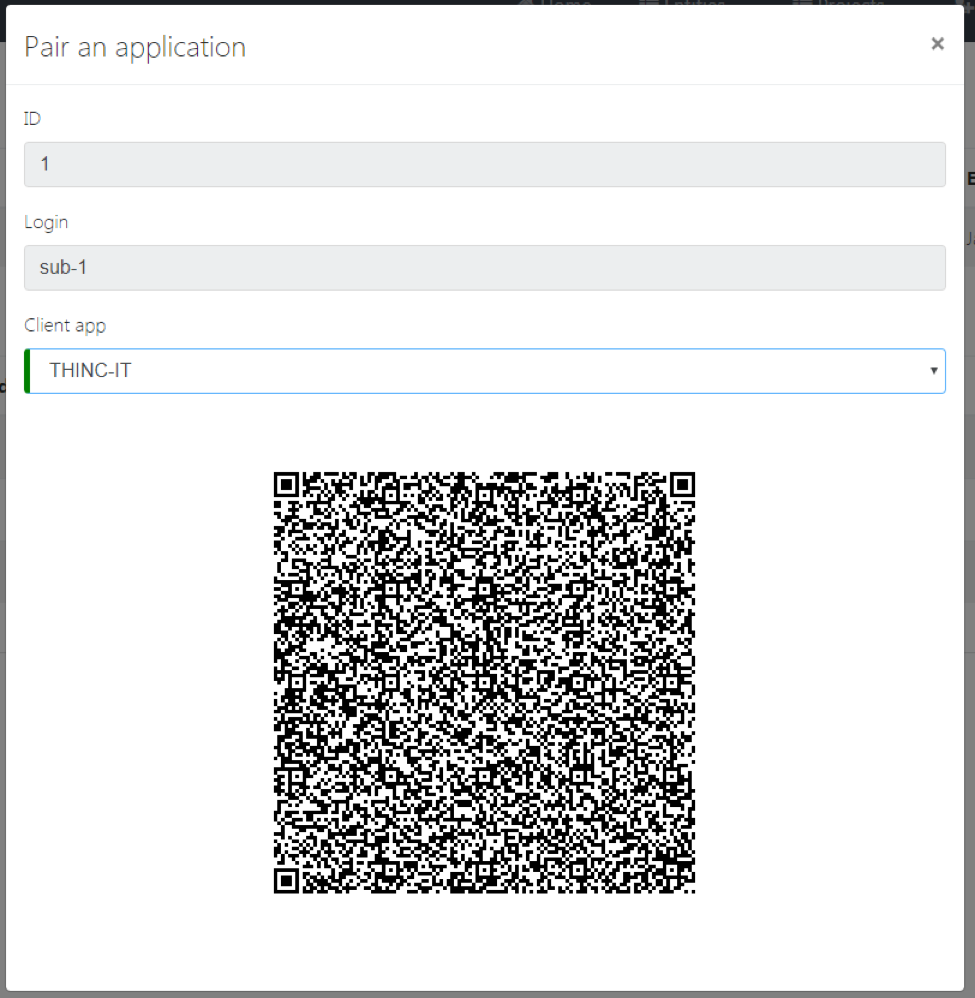
This QR code contains a refresh token. This refresh token can be used used to query the Management Portal for an access token using the client id and secret as authorization header. The QR code has a JSON structure as shown in the sample below -
{"refreshToken":"eyJhbGciOiJSUzI1NiIsInR5cCI6IkpXVCJ9.eyJzdWJqZWN0X2lkIjoxLCJzdWIiOiJzdWItMSIsInNvdXJjZXMiOltdLCJ1c2VyX25hbWUiOiJzdWItMSIsInJvbGVzIjpbInJhZGFyLTE6Uk9MRV9QQVJUSUNJUEFOVCJdLCJpc3MiOiJNYW5hZ2VtZW50UG9ydGFsIiwiYXV0aG9yaXRpZXMiOlsiUk9MRV9QQVJUSUNJUEFOVCJdLCJjbGllbnRfaWQiOiJUSElOQy1JVCIsImF1ZCI6WyJyZXNfZ2F0ZXdheSIsInJlc19NYW5hZ2VtZW50UG9ydGFsIl0sInNjb3BlIjpbInJlYWQiLCJ3cml0ZSJdLCJhdGkiOiIxNDc5MWE1MC1iZjAwLTQ1NDQtOTMzNS03NmI3ZWY4OTExZGYiLCJleHAiOjE1MTEwMTg5NTksImlhdCI6MTUwNTgzNDk1OSwianRpIjoiZmRlNDAzNTMtNzMwNS00NzdjLTgxMjQtM2E5YjNjZjE1ZDMyIn0.FgYCoUJKaeqFOEC6qZNWqwRZWjRhzQBMDhkpLSFvp_FciM4IbjTdILH432gg2Dg7nfZLfGlXTVBY-FrE9-w042Gp5WetfpjdXKmI_6_Fc8LBCHbfmLphs1MfbYDIVR05dSbG-wZeSyFhlpRoQyWn1rAvslVYQsPnPmgGcvXfFCnOXMiagBFjb5oY6ZdzH9OJIyvyZ9PafVJSWAhFwsxY4zQxJKPpOoTnWxXVzvVjLjsvucCDZ7ZVexblgQpIZ3SCGBsnjZpMaL8dklzBiznfjmEqnY6CJmoq1rl2AG-KsJ3RZJi9GJtBjHZsvCOxOUg8W5HX27myKWEjO6vYGsPJ8uOJHqQ9pxKBFtR9tIxZI4q0GV9H01wNXelOY1fFCiMuOzARUBI7nXBe_6xlSzQLaljHfbtvoPkKQlVo0C51NzW2FXbLmbOSWHFnOQELcwvp1ISoHqDqx1U8claro98QoJXIkqfrOZmpwUf-cfgcph57WQ180wDSy2WSDBNwNm2uHZGYOLPDPwjyBL5oWEKBA7EcrvSwdx21UxCaA5DOBOTAR1TLwl4lIgGMBAzfCH3qW4yVt4xS5yXjna5wLeNo59uZSIEenUxG73nfUUfRXZWcLP26JmbYPZQzlNsod-M81WYcJ_MXqwZUqT49q--lclAlZ_PYfCv1BnQ"}Now, you can request for an access token plus a new refresh token. The access token is used for getting restricted access to components of the platform and the new refresh token can be used to get a new access token + refresh token later whenever required. To get these tokens make a POST request like -
POST <management_portal_url>/oauth/token
With as content type-
application/x-www-form-urlencoded
And as body-
grant_type=refresh_token&refresh_token=<your_refresh_token>
And HTTP Basic Authorization with OAuth client Id and OAuth client secret as the username and password respectively.
The response will be a JSON structure as follows -
{
  "access_token" : "eyJhbGciOiJSUzI1NiIsInR5cCI6IkpXVCJ9.eyJzdWJqZWN0X2lkIjoxLCJzdWIiOiJzdWItMSIsInNvdXJjZXMiOltdLCJ1c2VyX25hbWUiOiJzdWItMSIsInJvbGVzIjpbInJhZGFyLTE6Uk9MRV9QQVJUSUNJUEFOVCJdLCJpc3MiOiJNYW5hZ2VtZW50UG9ydGFsIiwiYXV0aG9yaXRpZXMiOlsiUk9MRV9QQVJUSUNJUEFOVCJdLCJjbGllbnRfaWQiOiJUSElOQy1JVCIsImF1ZCI6WyJyZXNfZ2F0ZXdheSIsInJlc19NYW5hZ2VtZW50UG9ydGFsIl0sInNjb3BlIjpbInJlYWQiLCJ3cml0ZSJdLCJleHAiOjE1MDU4Nzg0OTIsImlhdCI6MTUwNTgzNTI5MiwianRpIjoiYWRiMjg1YTQtM2IwZi00NTkzLTg4ZWYtYWQzOTU2NjMwMDdmIn0.K_JbTxd8oQAJmr7yDbUKGkfWWYrOAZI4z6lN_-09nsCinf4atYiC53kGgnClZ4yYdUuPNMpTgRR0slGU8u8CYuWx_A2JBT_hyeQHqWtTh96s4Rd39WljGtKELMDnLR1ojqKi83yFEvQD7Jq83fMc-3KurU5h9CpDiPdw2nmQIFiss0x8i2WJjhYaPY0Ye3nxJueFZfxM6DDUQxIDJL5cZeBcM210trTGzw8VnBkA1V4j2fS_VLyZqGoslmcZYWHKt-dtGr8pa5AASAg2hXhNcVW9AULvq6fkGm6thZxiLSc1c0LcwywgVleSsHHGQYcov4nhaj-DRGXIZecrRggKrCMPyM56DVMxMAtToHZEoC8LZN8s-eDAjWtOQ2U5D5_JYm6_fVBOH-bILpLeNH-xKwB22fA4Fiz4mj21C9bzXk-Jsmk7flgRG86JjFXP0LHriVNUltIG5TK_BwvVJJIiP9k5WrQI3KudOVWMzOYmd19h_ONXudNT0Bxb0ruwhXeAcLPqF4EKr0IiuJeFmGvFUJCOwAlq-698HJptjkvcDQlYrau0Jqe5J170XiQgiOFLvvunYStPdSsWSKaArbQImfBcjG57ALaUqRf4dY6AEf1uZ95qYurV1MLpF36BSwQvZLT8sL5eAySpdMtUvP-CCysLlHuH9LwWm0Q",
  "token_type" : "bearer",
  "refresh_token" : "eyJhbGciOiJSUzI1NiIsInR5cCI6IkpXVCJ9.eyJzdWJqZWN0X2lkIjoxLCJzdWIiOiJzdWItMSIsInNvdXJjZXMiOltdLCJ1c2VyX25hbWUiOiJzdWItMSIsInJvbGVzIjpbInJhZGFyLTE6Uk9MRV9QQVJUSUNJUEFOVCJdLCJpc3MiOiJNYW5hZ2VtZW50UG9ydGFsIiwiYXV0aG9yaXRpZXMiOlsiUk9MRV9QQVJUSUNJUEFOVCJdLCJjbGllbnRfaWQiOiJUSElOQy1JVCIsImF1ZCI6WyJyZXNfZ2F0ZXdheSIsInJlc19NYW5hZ2VtZW50UG9ydGFsIl0sInNjb3BlIjpbInJlYWQiLCJ3cml0ZSJdLCJhdGkiOiJhZGIyODVhNC0zYjBmLTQ1OTMtODhlZi1hZDM5NTY2MzAwN2YiLCJleHAiOjE1MTA5MzI1NTUsImlhdCI6MTUwNTgzNTI5MiwianRpIjoiZmViYTcwODItYTFjYS00ZTMwLWFjMjgtYTg5Yjc3YmZjNGM4In0.KFByA27BuS_KWHaimE7U3HJC9fKN1pHIIcSf_C2JOyY6cczjs4ciEoyu16VO7yOteJ6k6XxVCLM9dZFpBOuqy6XnxVQyWML1aKwH2dm5TS4dk8mU38An4x1trJt4vmQLk-v7ORogL388AThg8kk7ef7TA7FqE4NMKqkDMrITEQh1aPE4TBfFc3Y2fuBJ_icLZMna1waLDWZ1eYOPhxp2oSQEt6LT9CvXl3CuI_zStrnZv0LbRi1KqmSRHiMXKLcFRPJEbvn8xNf73SGZUpWyi4fg1ELuahtmqJcZYkppeDrKBbscLyu28YIQM5vMEYaIoTQ9M97zqz9zwiIxIZxG0IOuu-0-lSTV71tEVSsLFor7tdEz-dCdNQNOyibVTvkMgCYFa_uCBQ50MHpyn8zsMu6HsNx6eo40WNHz55agIwru1wwrzWDlr6sKZHQQF0wMwDGnmfSQQgFvKzn-tBp5F1hX1lGk19QmvWaj_fAiRe_zPWEaJDPzQJUMuMvxg2q25TT-h5lKofjauBuxazUGuXRr40G2JZjbEu8Kfg-ifpszV7o8Pxi53Nvc56HMAjsVeolWyqc9dtCF8jZcufTzvZA_sLp7dq2ZAAqAHO6SIlv0fSQiinNGFyEi18HB7TMap9F42NRBnhScCHwtqMFcUOFa6mRFqpmDpec",
  "expires_in" : 43199,
  "scope" : "read write",
  "sub" : "sub-1",
  "sources" : [ ],
  "roles" : [ "radar-1:ROLE_PARTICIPANT" ],
  "iss" : "ManagementPortal",
  "iat" : 1505835292,
  "jti" : "adb285a4-3b0f-4593-88ef-ad395663007f"
}
Now, you can parse the access token out of this response and use it in Authorization header with each request. Note that this token will only grant you privileges to the resources related to the paired subject. Add the following to the header to get access with each request-
Authorization: Bearer <your_access_token>
If you have a component that needs to register as a source with a subject but does not have the ability to scan a QR code (like a server side app), then you can also get an access token using the client credentials grant type.
These client credentials are registered with the Management Portal using the oauth_client_credentials.csv file. More info on this at Management Portal ADD URL. When you have these credentials, you can just request a token at by making a POST request as follows -
POST <management_portal_url>/oauth/token
With as content type-
application/x-www-form-urlencoded
And as body-
grant_type=client_credentials
And HTTP Basic Auth with username=<your_client_id> and password=<your_client_secret>>
The response will look like -
{
    "access_token": "eyJhbGciOiJSUzI1NiIsInR5cCI6IkpXVCJ9.eyJzdWIiOiJyYWRhcl9yZXN0YXBpIiwiYXVkIjpbInJlc19nYXRld2F5IiwicmVzX01hbmFnZW1lbnRQb3J0YWwiXSwic291cmNlcyI6W10sInNjb3BlIjpbIlNVQkpFQ1QuUkVBRCIsIlBST0pFQ1QuUkVBRCIsIlNPVVJDRS5SRUFEIiwiREVWSUNFVFlQRS5SRUFEIl0sImlzcyI6Ik1hbmFnZW1lbnRQb3J0YWwiLCJleHAiOjE1MTExODMyODksImlhdCI6MTUxMTE4MTQ4OSwianRpIjoiZWNkMTAzOTktZjM5YS00YjVhLTliZDUtYWViMjQ5MzBiMjYwIiwiY2xpZW50X2lkIjoicmFkYXJfcmVzdGFwaSJ9.mf9V8eHRRBrcoquEYpHL-mY7EICg2cWjYxK-_zaPiqFC38FSHFEouPWqP5dLpLyfjdVSxbdXw8JzSuUlpKif346Qmgq_HpI3hdiurqAiomjjrTiY4MWI6ukeGqAXvBFIo4aHjcUCh1EmUwXkGKRG6DDLK63nK98jyhAJxudW-j-eCBhw02QZUC47J53wCKkGamn9YaSMT2EDajM3YxpVV9-HG-klV8rY9zLXwVbX-G-BYBTSqOdyWZdvDJ5UstqOjFqo7lEQVIDK3lxvzwVBshN599X1PYbENX3oiu36AWC85kwxE3LVunDb7SuTPg1zDU0i5HKyCJHPDxhfvVx9S3ItdAf64Ixv2ytA90isHuWpBcYtLA4YUTap58Jgk4vKfUWeaXXiuzxGCdaEd0GohvMKr7a9Wjjlk9i4h2rkRgwt5DWyyxZqefNvUZMrFw81nLIg8xKQeat6Moh4lnBTTRvbwT1Rt4EQlj-ASrhXjqU6yPC7pxunUHW8TKmoKfuwGne3zEGPBHqlA8Cubm7MZQ47G0EnfMY8sl3NOBmDXQmRZfQkmEg0-POnmOurP7y5ZRBeJJmNuye1c1gwQ8hmSBz8s0Nef7dVg-jBvVwQSr4mugKQM7DR9AuFWVO8_VL0XSoeTBmNnGxQCy-WuWeSkq7T-V7Ig6axF4IOdbwD-sE",
    "token_type": "bearer",
    "expires_in": 1799,
    "scope": "SUBJECT.READ PROJECT.READ SOURCE.READ DEVICETYPE.READ",
    "sub": "radar_restapi",
    "sources": [],
    "iss": "ManagementPortal",
    "iat": 1511181489,
    "jti": "ecd10399-f39a-4b5a-9bd5-aeb24930b260"
}
You can parse this JSON response to get the access token. Then use this token in the header with each request like -
Authorization: Bearer <your_access_token>
This access token will have the access to all the resources listed in the scope parameter. The scope for a client can be changed in the Management Portal configuration.
Note that you will need to get a new access token when the current one expires. The expire time is contained within the JSON response.
For registering your device as a source to a subject, you need to have the subject ID of that subject. When you get the access token by scanning the QR code, this id is supplied in the parameter sub. For example, in the above example, subject ID would be -
"sub" : "sub-1"
For the client_credentials grant type, the subject ID is not supplied with the token, so you will need to know the subject ID of the subject before you can register your device or app. Once you have the subject ID, You can easily make POST request as follows-
POST <management_portal_url>/api/subjects/<your_subject_ID>/sources
with Authorization Header as -
Authorization: Bearer <your_access_token>
And with Body as -
{
"deviceCatalogVersion": "<your_version>",
"deviceTypeModel": "<your_model>",
"deviceTypeProducer": "<your_producer>"
"metaData": [
{
"key": "string",
"value": "string"
}
]
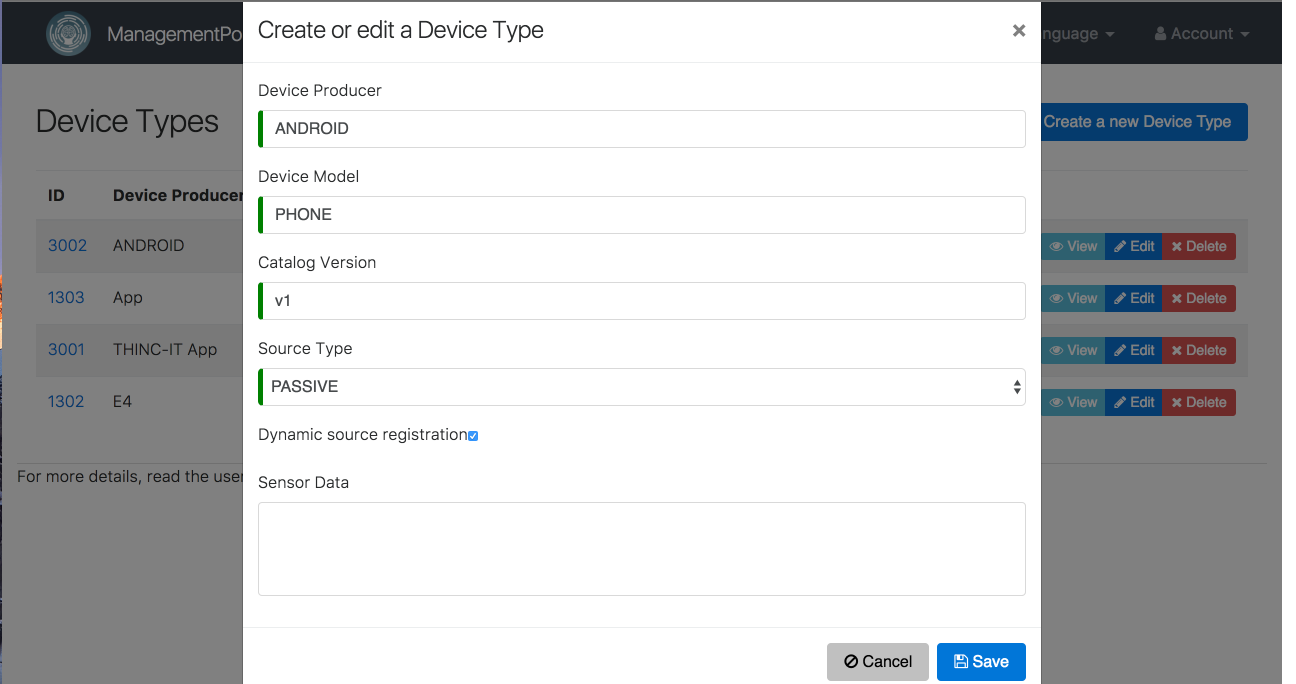
}To get these values, you will need to log into the Management Portal as a System Admin and create a new DeviceType for your device or App and take the values from there. The values should be identical. Meta-data is optional and can include any key and value pairs.
Note that the new Device Type you just created should also be added to the project in which the subject to be paired is enrolled. Also make sure to enable Dynamic source registration when creating a new device. This is shown below -
This request above will return a response with information on the created source, e.g.:
{
  "id" : 1051,
  "deviceTypeId" : 2,
  "deviceTypeProducer" : "THINC-IT App",
  "deviceTypeModel" : "App",
  "deviceTypeCatalogVersion" : "v1",
  "expectedSourceName" : null,
  "sourceId" : "b1296d84-b26b-47f3-be0b-60ebd3405a66",
  "sourceName" : "App-b1296d84",
  "assigned" : true,
  "attributes" : { }
}
The last step is to obtain a new access token that has the source information included since the old token does not contain the new source. This can be done easily by simply following the Step 1 again using the refresh token obtained from the previous access token + refresh token response.
Now you’re all set to start sending data!
Use OAuth client utils library. To see how it works see its implementation in Redcap Integration App ADD URL.