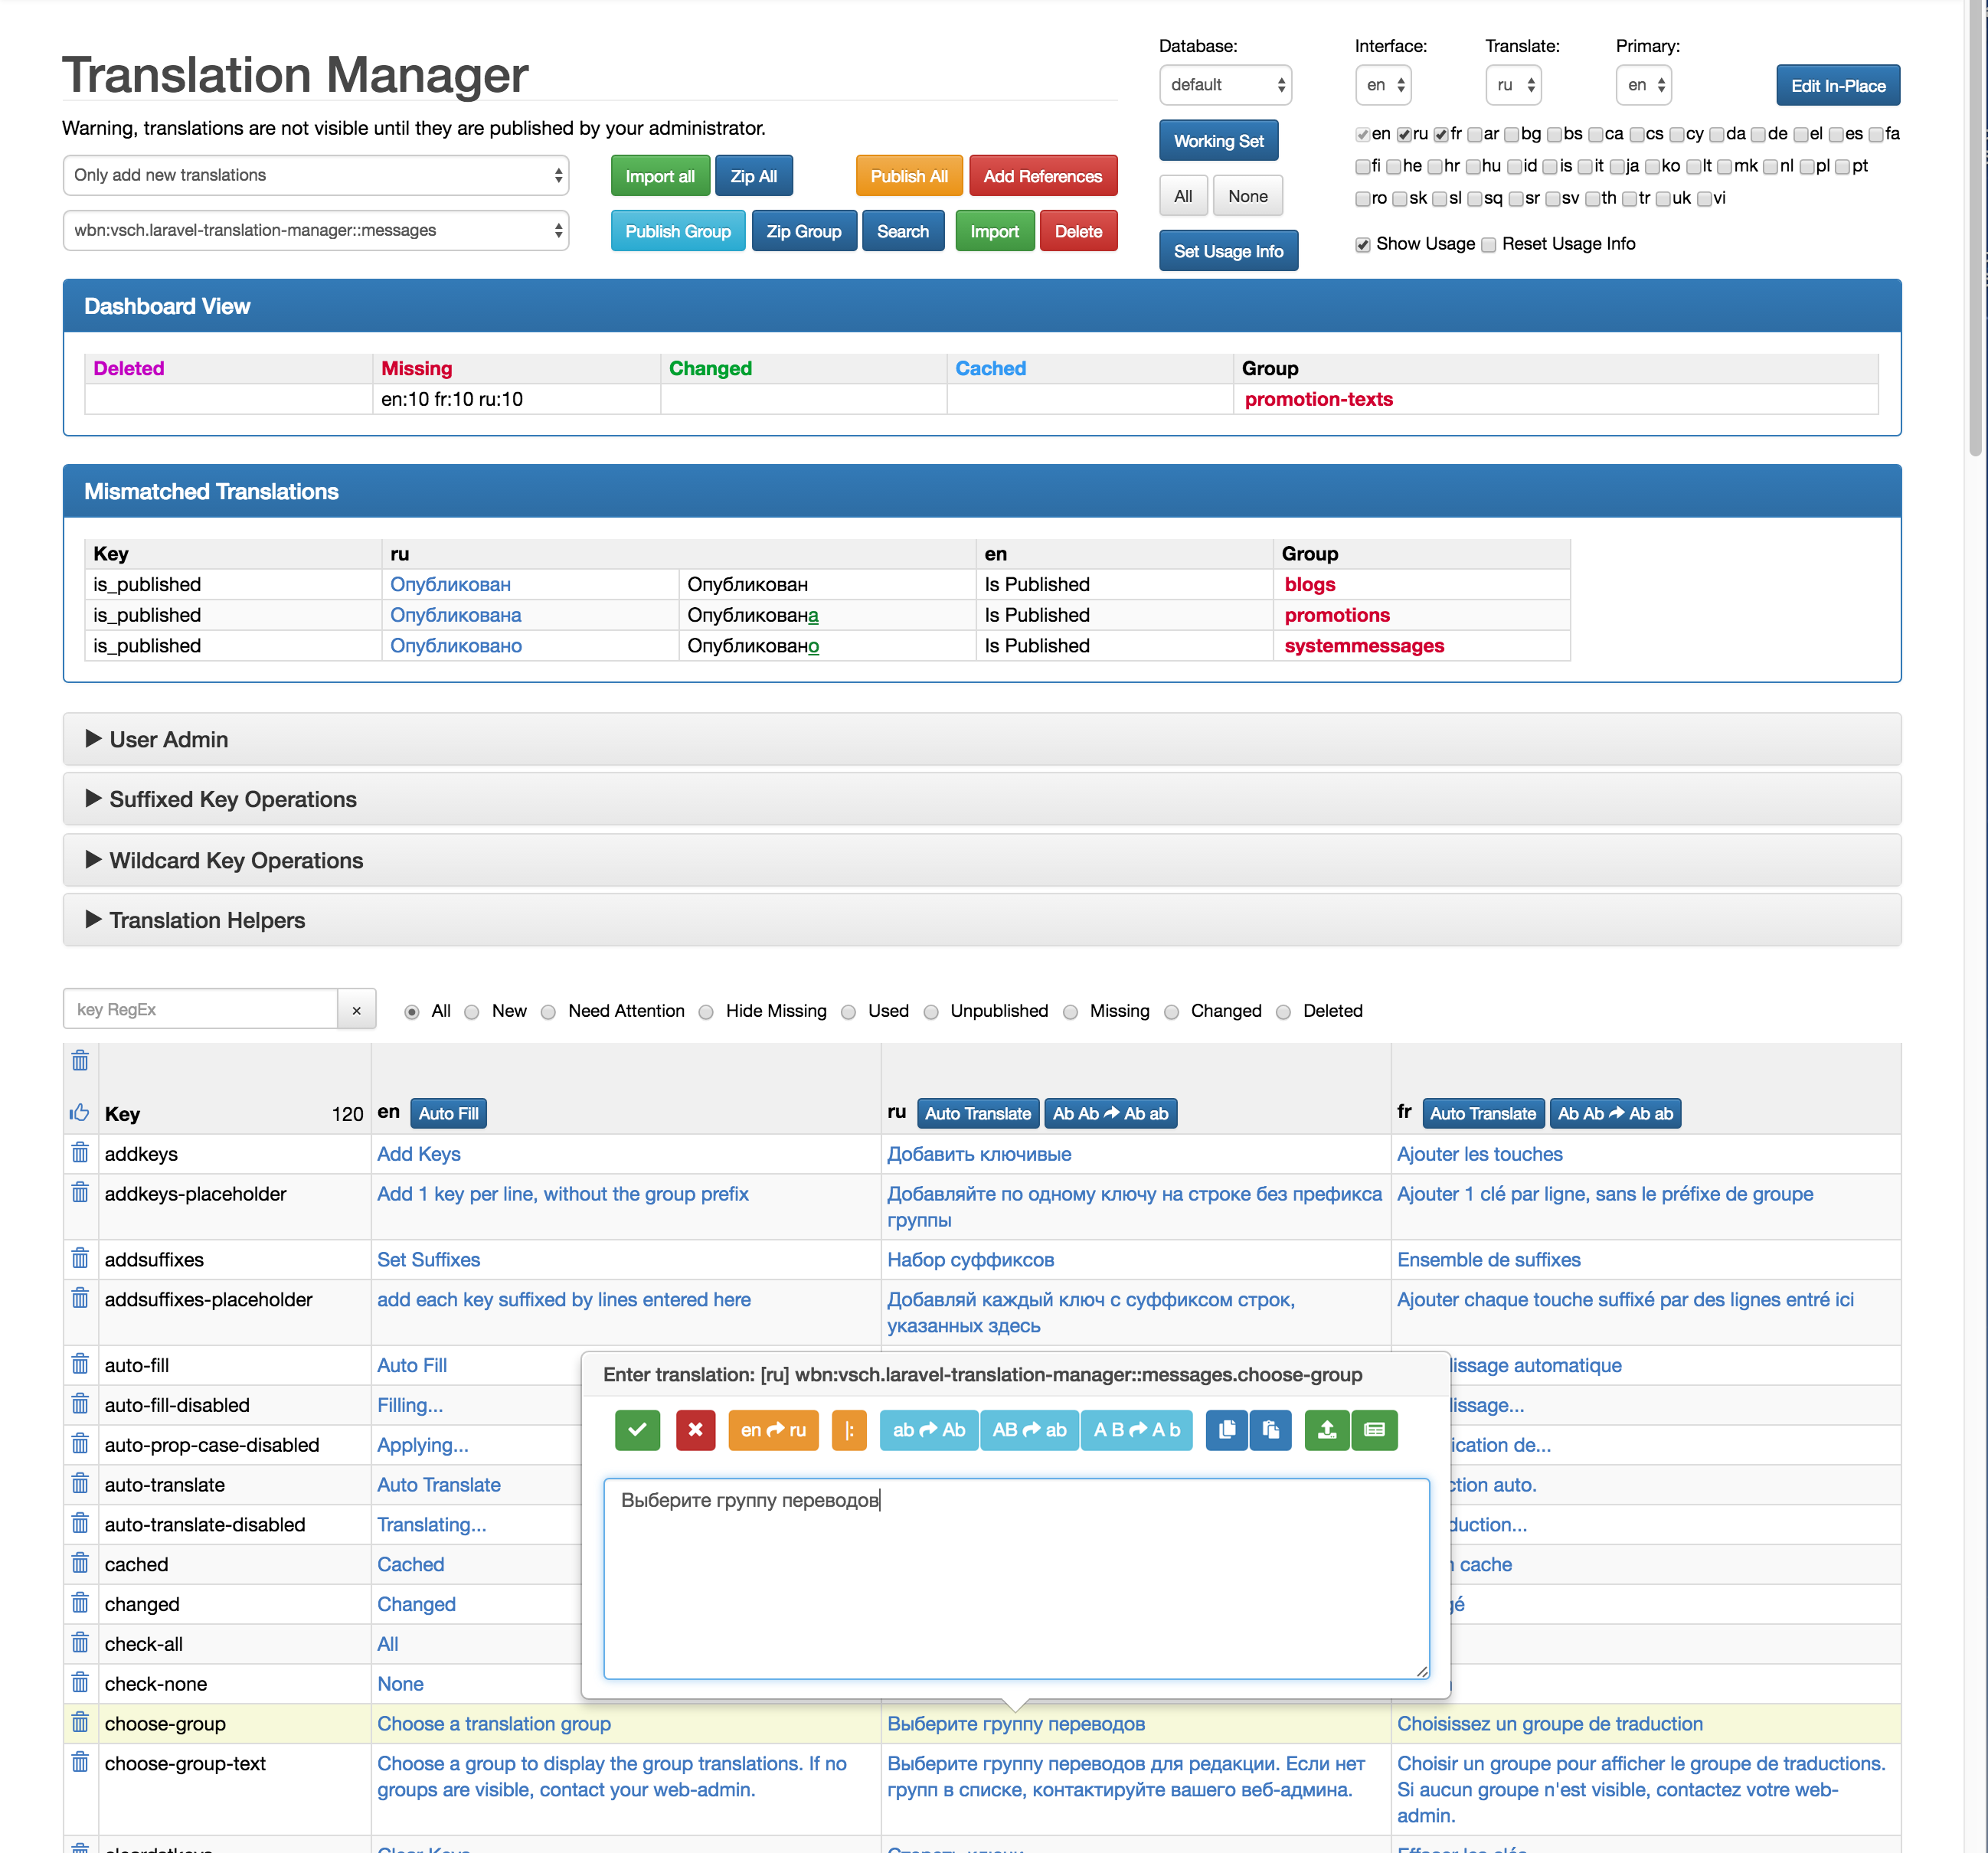
Web Interface
Once you have imported your translation (via buttons or command), you can view them in the web interface (on the url you defined the with the controller). You can click on a translation and an edit field will popup. All translations are saved when the edit dialog is closed unless it is closed with the cancel button. Clicking anywhere on the page outside the edit dialog will save the current changes. When a translation is not yet created in a different locale, you can also just edit it to create it.
Using the buttons on the web interface, you can import/export the translations. For publishing
translations, make sure your application can write to the language directory or optionally
configure it to do in-database publishing using the cache by seting the config file
indatabase_publish value to 1 or 2. See: Configuration
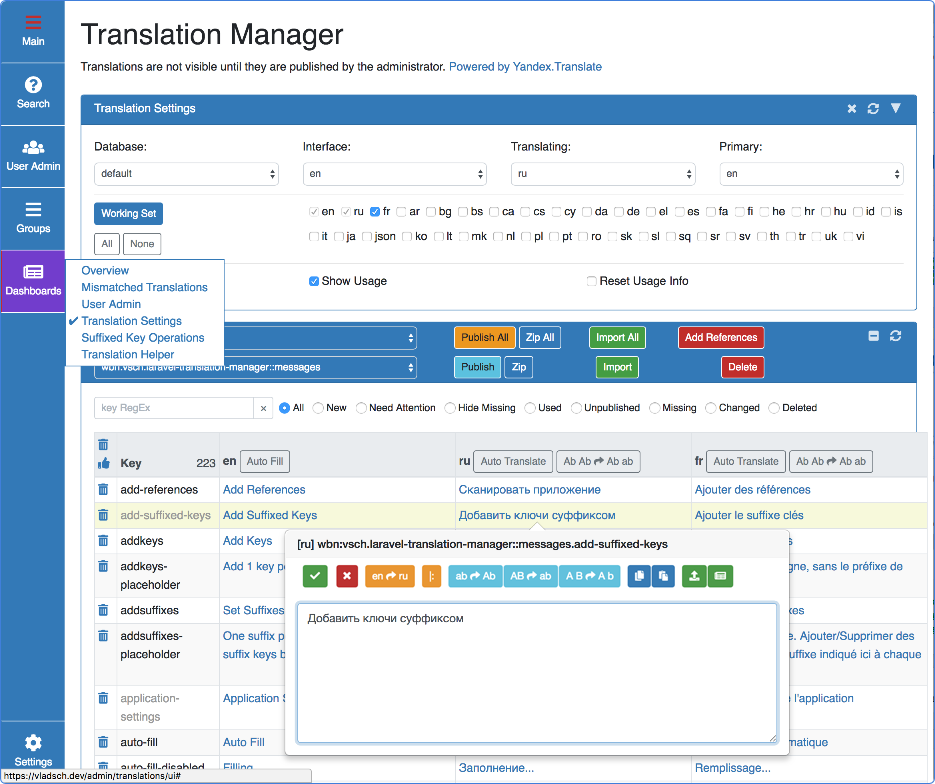
Or alternately you can use the React App UI, which is less cluttered, saves all working settings in the LTM database so you can continue where you left off and offers a better user experience.
Everything in the WebUI is available in the react app with the exception of wild card key operations. The two interfaces share persistence of locales: current, translation, primary, display locales and database connection settings so you can easily have switch between the two.
The accordion panels and non-collapsible dashboard view and mismatched translations are all available as user selectable, collapsible dashboards added to whatever main page you are on. Additionally, search now has its own page so you can switch groups while keeping the search results unchanged.

-
The web interface lets you select alternate database connection. To setup alternate connections see: Configuration. This element will only be displayed if at least one alternate connection is defined and the current user has the
admin_translationsability. See: Installation: step 8 -
The web interface lets you select the locales used in the interface.
- interface: locale used to display the translator web interface.
- translate: locale that you are currently translating, so it is moved to the second column in the translation table. You are free to edit any translation displayed on the page. Translation assistance is available to translate from the primary locale to the locale of the string you are editing.
- primary: the locale used to provide the source text and locale for translations. Also lists it as the first locale in the translation table.
-
toggle edit in place mode. The "Edit In Place" mode will allow you to edit all Translation Manager web interface translation strings right in the page.
-
You can select which additional locales to display on the page by checking the locales and clicking on the 'Working Set' button to apply your selection. For convenience you can clear all via the "None" or set all via the "All" buttons.
-
Usage info options. This is only displayed if you have enabled the
log_key_usage_infoin your config file. This collects keys which are requested from the translation service.- Set Usage Info, sets the currently selected options.
- Show Usage Info, will gray out key names that have not been marked as used by the translation service since the last reset usage info was done.
- Reset Usage Info, select this option and press the
Set Usage Infobutton to reset all usage information. This step was deliberately made unusual and requiring two steps so that you don't accidentally erase the usage information.
It is recommended that you don't make the decision solely on this mechanism to delete keys. It is simply a guidance not a definitive statement that the translation key is not used. It may only be used in some rare condition that no one encountered. However, it is a good start to investigate whether some cleanup is needed.
-
Show Unpublished Site/Show Published Sitebutton toggles showing published or unpublished translations for the current user. Use this to preview the site with changed translations before publishing them. Until this setting is changed in LTM WebUI or programmatically by callingTranslator::setShowUnpublished()the site will show unpublished translations.
The "Edit In Place" button will allow you to edit all Translation Manager web interface translation strings right in the page. If you want to try this mode you will need to publish the Translation Manager language files to your project so you can view and edit them in the web interface, as described in Installation: step 10.
You can also add this ability to your web pages but it will take a few modifications to the
views. The instructions on how to do this are not yet complete but you can also see how the
index.blade.php file generates buttons from a links and in forms. The future location of these
instructions will be at Enabling Edit In Place On Site Pages
Here you can see a summary by group what was deleted, changed or is missing in the translation files. The group is a link that will display its translations for editing.

These will let you filter the translation rows so you can quickly locate specific translations. By default all translations are shown.
The key RegEx text box will filter out any translations whose key does not match the regular
expression pattern in the text box. Blank will match all keys.

All changes to translations are done via this pop-up. It has convenience buttons to help with frequent operations.
-
Save changes. Additionally you can click anywhere on the page to have your changes saved.
-
Cancel. No changes are saved.
-
Convert translation key to text. The resulting text will be the text of the translation key with . - _ changed to spaces and all words capitalized. Useful for generating text from keys quickly.
This button appears when editing the primary locale. For all others it is replaced by image
13.In this case it replaces the translation text with the translated text of the primary locale.If the primary locale is a
choice()format text then will attempt to create translated version of the same. For Russian it will generate 3 forms: singular, count of 2 and count of 5. For all other languages just two: singular and plural for count of 2.:countprefix will be removed from the primary locale text before sending for translation and restored after translation to eliminate translation algorithm from being confused by the place holder text. -
Generate plural forms for use in
\Lang::choice(). When editing the primary locale will convert the translation key text tosingular|:count plural. When editing any other locales will simply duplicate the entered text separated by|for manual editing with:countadded as a prefix to plural form.Once the entry has
|in the text, will toggle the presence of:countprefix in cycle: plurals prefixed, all prefixed, none prefixed. -
Capitalize every word
-
Lowercase all text
-
Copy text (simulated clipboard copy, value preserved as long as the page is not replaced).
-
Paste text that was copied with 7.
-
Restore text to what it was when the pop-up was opened.
-
Restore text to last published or last imported value.
-
Title shows:
[locale] group.keythat is being edited. Useful in 'in place edit' mode to find the translation id of some text on the page. -
Text editing area.
-
Translate primary text to locale currently being edited. The button text shows {primary locale}->{editing locale}. The locale being edited can be any locale displayed on the page, does not have to be the one selected in the Translate locale selection. See 3. for details.
{!! getWebUITranslations() !!} is inserted before translation.js script is included in the layout
master for your project.
Click on the panel to expand it.

Enter keys you want to create/delete from the current group in the left text area, and optionally any suffixes you want to permute with the keys on the left. For example, keys: abc, def, ghi; with suffixes: 1,2,3 will create/delete: abc1, abc2, abc3, def1, def2, def3, ghi1, ghi2, ghi3.
The search button displays the search dialog which will display translation strings and keys that contain the text being searched. You can use the '%' wildcard character in the search text to give you finer control, if you don't provide one the text you enter will be surrounded by '%'.
You can edit the resulting translations directly in the search dialog results table or follow the group link to display the group's translation page.

Click on the panel to expand it.
Here you can copy/delete/move keys with an optional wildcard character *, but only as a suffix or a prefix. The corresponding source and destination strings must have the * use: as suffix, prefix or not used.
The preview button will let you see what the patterns match and what the resulting operation will affect. Copy or Move will delete destination keys that already exist and replace them with the new copied/moved keys.
You can specify a key with a group, if no group given then the current group will be used. This way you can copy/move keys between groups.
Example of preview/delete:

Example of preview/copy/move:

Click on the panel to expand it.
Here you can translate between the primary locale and the translating locale.

In this area you can manage the per locale user access. Per locale access is disabled by default. You will need to configure this option before it becomes available in the web UI. See Enabling per locale user access control

Clicking on the link in the User Modifiable Locales column will open a check box list popup.
Disabling all locale checkboxes for a user will allow the user to edit any locale.
The locales displayed in the pop up will be a union of all locales you have checked in your working set and all the locales enabled in any user. That way you can limit the list of the locales to contain only the relevant locales.
NOTE currently the checkbox list is displayed in a single column. I have not figured out how to customize the x-edit control to allow more than one checkbox per line. Therefore if you have a lot of locales you may reach a condition where only the last 20 or so are visible. Please use a smaller working set of locales.
To cancel any modifications hit the ESCAPE key. To commit changes click outside the popup or hit ENTER.

Source references are stored in the database for translation keys if they are found using the
"Add References" button or the translations:find command.
Artisan Commands: Find Translations In Source
This will attempt to find all source and view references to translation keys. The search is done
using regular expressions and some found keys may contain dynamic expressions. Keys that contain
quotes, -> or $ if inside a double quoted string will be ignored because they are assumed to
be expressions computing the translation keys dynamically.
In the web interface any key that has source references will have an icon at the right edge:
 for keys that were imported or
added manually and
for keys that were imported or
added manually and  that
were automatically added from found references in the source. A translation key will loose its
auto-added status once it is published or imported from files.
that
were automatically added from found references in the source. A translation key will loose its
auto-added status once it is published or imported from files.

Clicking on this icon will open a modal dialog showing all files and lines where a reference to
this group.key was found in the source.

You may want to update all references if you find that the current snapshot no longer matches the source location.