Simple macOS StatusBar / menu bar app to perform automatic text detection on screenshots.
Install the app per instructions below. Then, take a screenshot of a region of the screen using ⌘ + ⇧ + 4 (Cmd + Shift + 4). The app will automatically detect any text in the screenshot and copy it to your clipboard.
Download and open the latest installer DMG from the release page then drag the Textinator icon to Applications and follow instructions below to grant Desktop access and optionally grant Full Disk Access.
To launch Textinator the first time you'll need to right-click on the app icon and select "Open" otherwise you may get a warning about unknown developer as the app is not signed with an Apple Developer ID.

Alternatively, to build from source:
- clone the repo
- cd into the repo directory
- create a virtual environment and activate it
- python3 -m pip install -r requirements.txt
- python3 setup.py py2app
- Copy dist/textinator.app to /Applications
- Follow instructions below to grant Desktop and optionally Full Disk Access
See also Developer Notes below.
Grant Desktop access:
Textinator works by monitoring the file system for new screenshots. The macOS security model prevents apps from accessing files and folders without the user's explicit permission. The first time you launch Textinator, you will be prompted to grant it access to your Desktop.

The default location for new screenshots on your Mac is the Desktop folder so Desktop access should be sufficient in most cases. If you want Textinator to detect screenshots in other locations or if you have changed the default location for new screenshots, you will need to grant Full Disk Access.
Grant Full Disk Access:
- Open System Preferences > Security & Privacy > Full Disk Access
- Click the padlock if locked to unlock it and add Textinator to the list of allowed apps

To upgrade to the latest version, download the latest installer DMG from releases and drag the Textinator icon to Applications. If you have previously granted Textinator Full Disk Access, you will need to remove Textinator from Full Disk Access and re-add it per the instructions above. (This is a limitation of the macOS security model and not something Textinator can control.)
- Launch Textinator from the Applications folder
- Grant Desktop access if prompted
- Click the menu bar icon to see preferences

-
Press ⌘ + ⇧ + 4 (
Cmd + Shift + 4) to take a screenshot then paste the detected text wherever you'd like it to be. -
Textinator can also monitor the clipboard for changes which means you can also copy an image from any app or press Control + ⌘ + ⇧ + 4 (
Ctrl + Cmd + Shift + 4) to take a screenshot and copy it to the clipboard without creating a screenshot file. Textinator will then detect any text in the image and copy it to the clipboard, overwriting the copied image. This feature can be disabled by unchecking the "Detect text in images on clipboard" checkbox in the menu. -
You can also use Textinator from the Services menu in Finder (and other apps). To use this feature, right click on an image file in Finder and select
Services > Detect Text With Textinatorfrom the context menu. Alternatively, you can selectFinder > Services > Detect text with Textinatorfrom the menu bar.
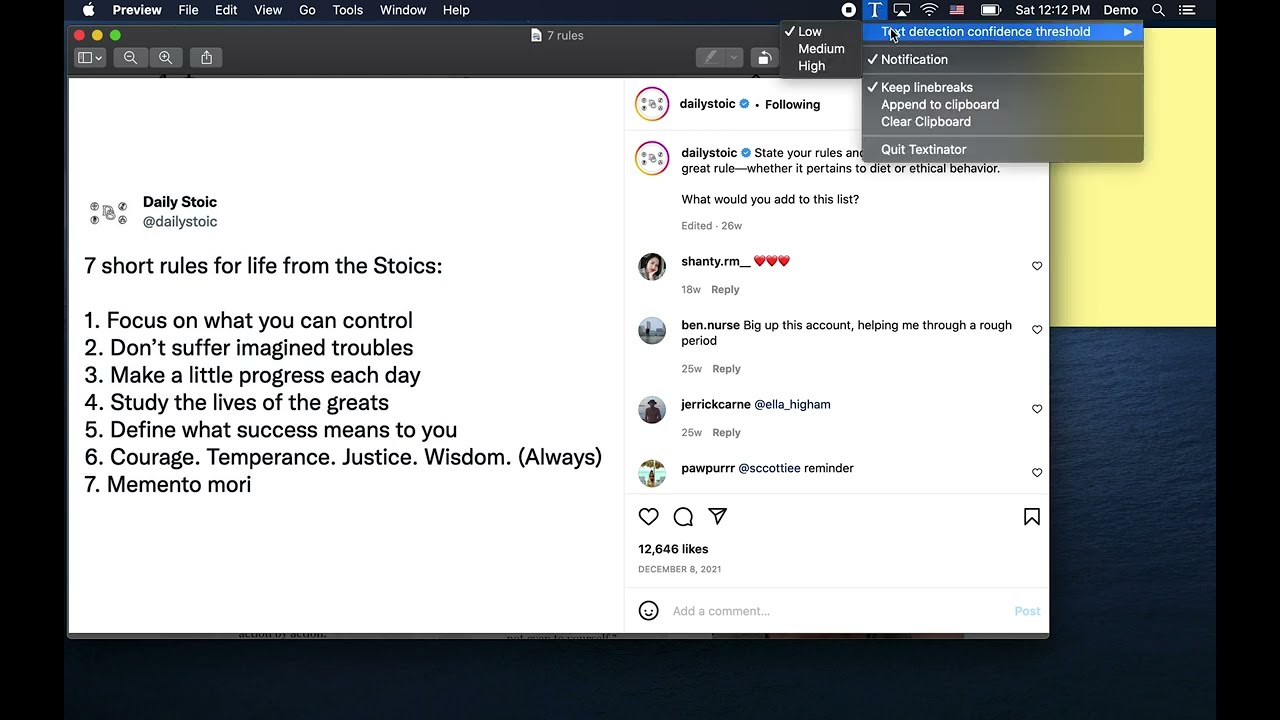
Text detection threshold confidence: The confidence threshold for text detection. The higher the value, the more accurate the text detection will be but a higher setting may result in some text not being detected (because the detected text was below the specified threshold). The default value is 'Low' which is equivalent to a VNRecognizeTextRequest confidence threshold of0.3(Medium =0.5, High =0.8).Text recognition language: Select language for text recognition (languages listed by ISO code and are limited to those which your version of macOS supports).Always detect English: If checked, always attempts to detect English text in addition to the primary language selected byText recognition languagesetting.Detect text in images on clipboard: If checked, Textinator will monitor the clipboard for changes and detect any text in any images copied to the clipboard. This feature can be disabled by unchecking the "Detect text in images on clipboard" checkbox in the menu.Pause text detection: If checked, Textinator will not detect text in screenshots or images copied to the clipboard. If paused, the menu bar icon will change and the menu will showResume text detectioninstead ofPause text detection.Detect QR Codes: In addition to detecting text, also detect QR codes and copy the decoded payload text to the clipboard.Notification: Whether or not to show a notification when text is detected.Keep linebreaks: Whether or not to keep linebreaks in the detected text; if not set, linebreaks will be stripped.Append to clipboard: Append to the clipboard instead of overwriting it.Clear clipboard: Clear the clipboard.Confirm clipboard changes: Show a confirmation dialog with detected text before copying to the clipboard.Start Textinator on login: Add Textinator to the Login Items list so it will launch automatically when you login. This will cause Textinator to prompt for permission to send AppleScript events to the System Events app (see screnshot below).About Textinator: Show the about dialog.Quit Textinator: Quit Textinator.
When you first select Start Textinator on login, you will be prompted to allow Textinator to send AppleScript events to the System Events app. This is required to add Textinator to the Login Items list. The screenshot below shows the prompt you will see.

I heard mikeckennedy mention Text Sniper on Python Bytes podcast #284 and thought "That's neat! I bet I could make a clone in Python!" and here it is. You should listen to Python Bytes if you don't already and you should go buy Text Sniper!
This project took a few hours and the whole thing is a few hundred lines of Python. It was fun to show that you can build a really useful macOS native app in just a little bit of Python.
Textinator was featured on Talk Python to Me! Thanks Michael Kennedy for hosting me!
Textinator is built with rumps (Ridiculously Uncomplicated macOS Python Statusbar apps) which is a python package for creating simple macOS Statusbar apps.
At startup, Textinator starts a persistent NSMetadataQuery Spotlight query (using the pyobjc Python-to-Objective-C bridge) to detect when a new screenshot is created.
When the user creates screenshot, the NSMetadataQuery query is fired and Textinator performs text detection using a Vision VNRecognizeTextRequest call.
Textinator can also monitor the clipboard and detect text in images copied to the clipboard.
- If building with pyenv installed python, you'll need to build the python with framework support:
env PYTHON_CONFIGURE_OPTS="--enable-framework" pyenv install -v 3.9.11
- Requires a minimum of macOS Catalina (10.15). Tested on macOS Catalina (10.15.7), Big Sur (11.6.4), Ventura (13.5.1); should work on Catalina or newer.
MIT License
Text Sniper which inspired this project.
Thanks goes to these wonderful people (emoji key):
 Bernhard Wagner 🤔 💻 |
This project follows the all-contributors specification. Contributions of any kind welcome!
If you want to work on Textinator yourself or contribute changes, here are some notes:
Clone the repo and cd into the repo directory.
git clone git@github.com:RhetTbull/textinator.git
cd textinator
If you want to contribute back to Textinator, fork the repo and clone your fork instead.
Install requirements and development requirements via pip:
python3 -m pip install -r requirements.txt -r dev_requirements.txt
pre-commit install
See also notes below about Testing.
Building the DMG for distribution requires create-dmg which can be installed with homebrew:
brew install create-dmg
To build Textinator, run the build.sh script:
./build.sh
This script cleans out old build files, builds the app with py2app, signs the app, and builds the DMG.
Textinator stores it's preferences in ~/Library/Application\ Support/Textinator/Textinator.plist. This is non-standard (by convention, apps store their preferences in ~/Library/Preferences/), but RUMPS doesn't provide a method to access the Preferences folder and it does provide a method to access the Application Support folder (rumps.App.open()), so I went with that.
The preferences can be read from the command line with:
defaults read ~/Library/Application\ Support/Textinator/Textinator.plist
For development and debugging it may be helpful to enable the debug log by setting debug=1 in Textinator.plist. You can do this from the command line with:
defaults write ~/Library/Application\ Support/Textinator/Textinator.plist debug -bool true
Similarly, you can disable the debug log with:
defaults write ~/Library/Application\ Support/Textinator/Textinator.plist debug -bool false
When debug is enabled, Textinator will log to ~/Library/Application\ Support/Textinator/Textinator.log. I find this more convenient than using the macOS Console app. Textinator will always log to the Console log as well so you can use Console if you prefer and filter on Textinator.
Most features of the app can be tested by simply running the textinator.py script: python3 src/textinator.py. The Services menu feature requires the app be built and installed because it needs runtime access to information in the app bundle's Info.plist which is built by py2app.
The version number is incremented by bump2version which is installed via python3 -m pip install -r dev_requirements.txt. To increment the version number, run bumpversion patch or bumpversion minor or bumpversion major as appropriate. See bumpversion --help for more information.
I've tried to document the code well so that you can use Textinator as a template for your own apps. Some of the features (such as creating a Services menu item) are not well documented (especially with respect to doing these things in python) and took me a lot of trial and error to figure out. I hope that this project will help others who want to build macOS native apps in python.
Textinator uses pytest to run unit tests. To run the tests, run pytest from the project root directory. Before running the tests, you'll need to install the development requirements via python3 -m pip install -r dev_requirements.txt. You will also need to enable your Terminal app to control your computer in System Preferences > Security & Privacy > Privacy > Accessibility. This is because the testing uses System Events scripting via applescript to simulate user actions such as clicking menu items. Your Terminal will also need to be granted Full Disk Access in System Preferences > Security & Privacy > Privacy > Full Disk Access.
The test suite requires the built app to be installed in /Applications/Textinator.app. Before running tests, uses ./build.sh to build the app then copy dist/Textinator.app to /Applications/Textinator.app.
The tests will modify the Textinator preferences but will backup your original preferences and restore them when testing is completed. The tests will also modify the clipboard and will create temporary files on the Desktop which will be cleaned up when testing is completed.
The test suite is slow due to required sleeps to allow the app to respond, Spotlight to index new files, etc. (Takes approximately 5 minutes to run on my MacBook Air). Because the test suite interacts with the user interface, it is best not to touch the keyboard or mouse while the tests are running.
The Services menu item is not tested by the test suite so this feature should be tested manually.