本文旨在记录、讲解开发一个 Widget(Today Extension)的全过程,包括一些基本流程和采坑记录,几乎都是干货。
目录:
- 最终效果
- 新建 Widget 项目
- Swift 纯代码布局
- 使用 Pod 引入第三方库
- 使用 Pod 的一个坑
- 跳转调起 host app
- 数据共享
- 代码共享
- 展开和收起
- 后台更新 UI 的问题

直接新建一个 Target 即可,File -> New -> Target。

新建 Target 之后,如果想用纯代码布局,设置 NSExtensionPrincipalClass 字段即可。设置之后可以删掉 storyboard 和 NSExtensionMainStoryboard。同时还顺带可以改一下 bundle display name

使用 pod 引入库需要总共两个步骤:
- 第一步:在 Project Configurations 中进行配置。如下如所示。一般来说,进行了这一步之后,在测试机上就可以正常运行使用第三方库了,但是如果想要真机运行、上架还需要第二步。
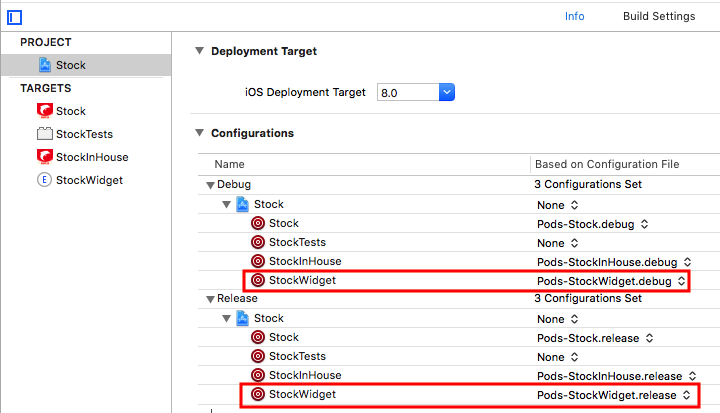
- 第二步:在 Podfile 中进行配置。在 Widget 中我是用了 SnapKit,ObjectMapper 两个库,只需要在 Podfile 中引入这两个库就行了,写好之后 pod update 就可以真机运行了。
def sharedPods
  pod_source 'ObjectMapper', '3.3.0', :modular_headers => true
  pod_source 'SnapKit', '4.0.1', :modular_headers => true
end

target 'Stock' do
    appPods
    sharedPods
end

target 'StockWidget' do
  sharedPods
end
4. 使用 Pod 的一个坑:'sharedApplication()' is unavailable: Use view controller based solutions where appropriate instead.
之前为了方便起见,最开始我引入了很多主 app 中的库,比如网络库之类的,测试机用得好好的,一真机运行就报错:
'sharedApplication()' is unavailable: Use view controller based solutions where appropriate instead.
Google 之后发现 Stack Overflow - DoertyDoerk 的回答说,只需要把 Require Only AppExtension-Safe API 设置为 No 就行。类似下图:

需要注意的是,需要全选所有的 Targets,并且统一将红色箭头设置的地方为 No。这样设置之后确实是可以真机运行了,但是有一个问题就是直接这样设置仿佛是非常有问题的。
在 apple 官方文档(App Extension Programming Guide - Handling Common Scenarios)中查到,App Store 会拒绝掉使用了 unavailable APIs 的应用。
The App Store rejects any app extension that links to such frameworks or that otherwise uses unavailable APIs.
也就是说,Require Only AppExtension-Safe API 设置为 No 是可以真机运行了,但是你想要上架的话,还是不让你用这些 API。
那么到底哪些是不让用的呢,进一步查阅官方文档(Some APIs Are Unavailable to App Extensions),里面有详细的说明。其中说到下面一点非常关键:
Access a sharedApplication object, and so cannot use any of the methods on that object
也就是说不能使用 .sharedApplication 单例,所以 AFNetworking 等网络库直接就用不了了,只能用 URLSession 等原生方法。不过 SnapKit、Objectmapper 还是可以正常使用的。
另外,Extension 还被限制了下面一些事情:
- Perform long-running background tasks 不能执行常驻后台程序
- Access the camera or microphone on an iOS device 使用相机或话筒
- Receive data using AirDrop 通过 AirDrop 获取数据
想要跳转到 host app,需要配置一下 URL Schemes:

配置好 URLSchemes 之后,在 Widget 里就直接通过 extensionContext 打开相应的 url,就可以调起 host app。
@objc private func launchApp() {
   if let url = URL(string: "snss-----://") {
       self.extensionContext?.open(url, completionHandler: nil)
   }
}
如果想要能够跳转到 host app 中指定的页面,那么需要通过 url 进行识别判断。这里和通过 scheme 打开 app、通过 push 打开 app 是同样的原理,就不在赘述了。
盗用官方文档(App Extension Programming Guide - Handling Common Scenarios)中一张图,说明一下主 app 和 extension 之间实际上是两个不同的进程,App's Container 也是不一样的。所以想要共享数据,必须要通过 shared container,也就是下面讲到的 App Groups。

顺便说一下,从图里可以看出,Extension 的 bundle 必须是 Containing App 的子集。也就是说加入主 app 的 bundle id 是 com.RickeyBoy.iphone.stock,那么 Widget 的 bundle id 必须是以 com.RickeyBoy.iphone.stock 为前缀的,比如 com.RickeyBoy.iphone.stock.StockWidget。
具体设置 App Groups 的步骤如下。我们都知道,想要使用 Capabilities 中的服务(比如 push notification 等),必须要申请证书,在这个过程中,Xcode 会自动帮我们创建相应的证书(必须要有开发者账号哈)。


设置好上述东西之后,就可以在代码里进行操作了。主要是两个部分:主 app 在相应的时机进行存储,Widget 在需要的时候进行获取。注意需要的是 suiteName 必须要相同。
host app 部分:
// 将 parameters 存入 UserDefaults 中
if let shared = UserDefaults.init(suiteName: "group.com.---------.StockWidgetShareDefaults") {
   shared.setValue(parameters, forKey: "StockWidget")
}
Widget 部分:
/// 从主 app 获取网络请求的基本 parameters
static func dataFromMainApp() -> [String: String]? {
    if let shared = UserDefaults.init(suiteName: "group.com.---------.StockWidgetShareDefaults"), let params = shared.value(forKey: "StockWidget") as? [String: String] {
        return params
    } else {
        return nil
    }
}代码共享实际上很见到,在下图所示的地方勾选一下就行,和普通 Target 之间共享代码没有任何区别。

展开和收起直接实现 widgetActiveDisplayModeDidChange 方法就行了。
func widgetActiveDisplayModeDidChange(_ activeDisplayMode: NCWidgetDisplayMode, withMaximumSize maxSize: CGSize) {
    preferredContentSize.height = min(tableView.totalHeight, maxSize.height)
}
需要注意的是,网络请求后更新 UI 要在主线程进行,否则会报下面的错误。
This application is modifying the autolayout engine from a background thread after the engine was accessed from the main thread. This can lead to engine corruption and weird crashes
