| name | category | bzurl | oldwikiname | prodimagename | surveyurl | sku | tags |
|---|---|---|---|---|---|---|---|
Wio W600 |
Platform |
102991214 |

Wio W600 is a WiFi development board based on W600 WiFi Module. Seeed W600 Module is based on the W600 chip which features ARM Cortex-M3 with 1MB on-chip flash and freeRTOS kernel.
The breakout board of W600 aims at making it easier for you to use this wonderful WiFi module. With the help of 6 onboard Grove connectors, it can easily work with over 200 Grove modules by simply plugging. We provided 4 digital Grove connectors and 1 Grove UART, 1 Grove I2C.
You can use 5V USB Type C to charge and transmit data for Wio W600, also, you can power this board with the JST 2.0 li-po battery.
We provide full library for Wio W600, it is esp32 Arduino Library compatible, so you can build the esp32 Arduino demos in the Arduino IDE, and run it in the Wio W600.
• 2.4GHz WiFi support 802.11 b/g/n
• ARM Cortex-M3 core with 1MB on-chip flash
• 6 Grove Connectors
• Support for user‐programmable GPIO control
Interface
• Integrated GPIO device controller
• Integrated 2 UART interface, support RTS/CTS, baud rate: 1200bps~2Mbps
• Integrated one high speed SPI controller, operating frequency: 0~50MHz;
Wireless
• Support IEEE802.11 b/g/n
• Support 2.4~2.4835 GHz
• Support Wi-Fi WMM/WMM-PS/WPA/WPA2/WPS
• Support Wi-Fi Direct
• STBC、GreenField、Short-GI
• Support multiple network protocols: TCP/UDP/ICMP/DHCP/DNS/HTTP
| Category | Item | Parameter |
|---|---|---|
| Wireless | Support Wi‐Fi Mode | IEEE802.11b/g/n |
| RF system impedance | 50Ω | |
| Frequency Range | 2.4~2.4835 GHz | |
| Receiving sensitivity | 20MHz MCS7@‐71dBm; 40MHz MCS7@‐68dBm; 54Mbps@‐73dBm; 11Mbps@‐86dBm; 1Mbps@‐95dBm; |
|
| Physical layer data rate | 802.11n MCS 0~7 150Mbps | |
| Modulation | DSSS、OFDM、DBPSK、DQPSK、CCK、QAM16/64 | |
| Output Power | IEEE802.11b, DSSS 1Mbps, POUT = +17dBm; IEEE802.11g, OFDM 54Mbps, POUT = +10dBm; IEEE802.11n, OFDM MCS7, POUT = +10dBm |
|
| Hardware | Interface Type | UART/SPI/GPIO |
| Interface rate | 2Mbps@UART (Max) 50Mbps@SPI (Max) |
|
| Software | Network Type | STA/AP/AP+STA/Wi‐Fi Direct |
| Verification | WEP/WPA‐PSK/WPA2‐PSK | |
| Encryption | WEP64/WEP128/TKIP/CCMP(AES) | |
| WPS Function | WPS | |
| Network protocol | TCP/UDP/ARP/ICMP/DHCP/DNS/HTTP | |
| Interface Protocol | AT+ instruction set |
!!!Note For more detail about specifications, please check the W600 Specification V1.0.0_EN.pdf and W600 HardwareDesignGuide_v1.0.1.pdf
- intelligent home appliances
- smart home
- wireless audio and video
- smart toys
- medical monitoring
- industrial control
- other Internet of Things applications
Materials required
- Seeeduino Nano x1
- Computer x1
- USB typc cable x1
!!!Tip Some USB cables can only supply power and cannot transfer data. If you don't have a usb cable or don't know if your usb cable can transmit data, you can check Seeed USB type C support USB 3.1.
Connect the Seeeduino Nano to your computer via the USB cable.
- Step 1. You need to Install an Arduino Software.

Launch the Arduino application
Double-click the Arduino application (arduino.exe) you have previously downloaded.
!!!Note If the Arduino Software loads in a different language, you can change it in the preferences dialog. See the Arduino Software (IDE) page for details.
- Step 2. Add the Wio W600 Board into Arduino IDE
Open your Arudino IDE, click on File > Preferences, and copy the following url to Additional Boards Manager URLs
http://arduino.winnermicro.com/arduino/package_wmcom_index.json

Click on Toos > Board > Board Manager.

Now you can search the board by name, just search the Wio W600 and install the corresponding board.

When the installation finished, you can find demos for Wio W600 at the your PC, the location is C:\Users\XXXXXX\AppData\Local\Arduino15\packages\w600\hardware\w600\0.2.7-rc1\libraries. XXXXX is the name of your computer user. For instance, mine is
C:\Users\seeed\AppData\Local\Arduino15\packages\w600\hardware\w600\0.2.7-rc1\libraries

In this wiki we will take WiFi demo for instance.
- Step 3. Open the WiFi demo
Turn to the folder W600WiFi\examples\AP-Sta, doulbel click to open the AP-Sta.ino demo. In this demo, Wio W600 will connect to a WiFi access point to connect to the Internet and then provide WiFi for other device.

As the picture shown above, you should config this part yourself.
-
1-is the WiFi access point you want to join
-
2 is the access point generated by Wio W600.
-
Step 4. Select your board and port
You'll need to select the entry in the Tools > Board menu that corresponds to your Arduino. Selecting a Wio W600.

Select the serial device of the Arduino board from the Tools | Serial Port menu. This is likely to be COM3 or higher (COM1 and COM2 are usually reserved for hardware serial ports). To find out, you can disconnect your Arduino board and re-open the menu; the entry that disappears should be the Arduino board. Reconnect the board and select that serial port.
- Step 5.Upload the program
Now, simply click the "Upload" button in the environment. Wait a few seconds and if the upload is successful, the message "Done uploading." will appear in the status bar.
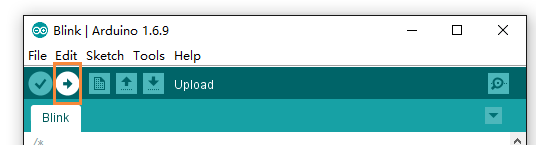 Figure 13. Upload the code
Then, when you use other device to connect to the Wio W600 AP, you serial moniter of Arduino IDE will output:

-
- WiFi.begin
WiFi.begin(ssid, password);
Wio W600 work as the station to access the AP.
-
- WiFi.softAP
WiFi.softAP(ssid, password);
Wio W600 work as the AP.
-
- WiFi.status
WiFi.status()
Check current wifi status.
-
- client.connect
client.connect(host, httpPort);
Connection target, incoming ip address, target port
-
- WiFi.setAutoReconnect
WiFi.setAutoReconnect(false);
Set up automatic connection last wifi
-
- WiFi.mode
WiFi.mode(WIFI_AP_STA);
Set the wifi mode, optional parameters: sta, ap, sta+ap
-
- dns.getHostByName
dns.getHostByName("www.google.com", resolve))
Dns analysis.
Only some common interfaces are listed here, and other interfaces can view example.
Please do not hesitate to submit the issue into our forum
