| category | bzurl | oldwikiname | prodimagename | surveyurl | sku |
|---|---|---|---|---|---|
Sensor |
101020580 |
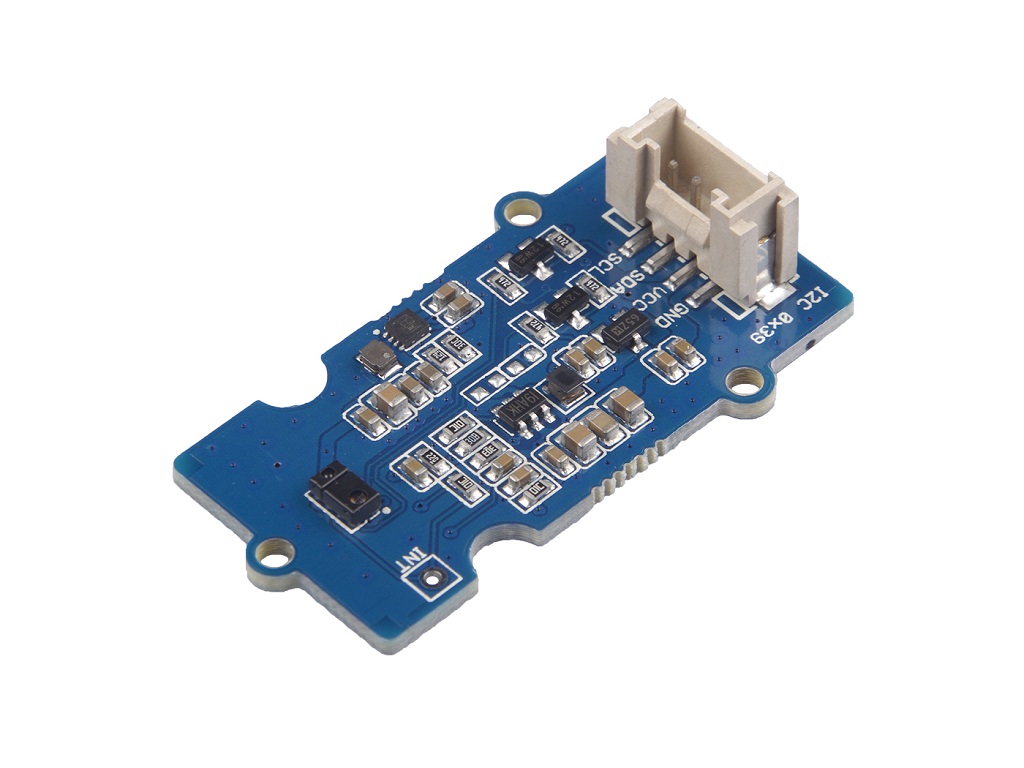
The Grove - Light & Gesture & Color & proximity sensor is TMG39931 based product, which features advanced Gesture detection, Proximity detection, Digital Ambient Light Sense(ALS), Color Sense(RGBC), and optical pattern generation/transmission for broadcast. This four-in-one sensor allows you to collect the data from ambient environment and transfers over the I2C bus.

- Single device integrated optical solution
- Ambient light sensing
- UV and IR blocking filters
- Complex gesture sensing
- Ideal for operation behind dark glass - High sensitivity
- Proximity detection
- Barcode pattern generation and transmission
- Dual use of a single internal LED
- Trimmed to provide consistent reading
##Specification
| Item | Value |
|---|---|
| Supply Voltage | 3.3V / 5V |
| Operating temperature | -30~85℃ |
| Storage temperature | -40~85℃ |
| Max. Lux [klx] | 60 |
| Interface | I2C |
| I2C address | 0x39 |
- Gesture Detection
- Color Sense
- Ambient Light Sensing
- Cell Phone Touch Screen Disable
- Mechanical Switch Replacement
- Printed Bar Code Emulation
Gesture Detection
Gesture detection utilizes four directional photodiodes to sense reflected IR energy (sourced by the integrated LED) to convert physical motion information to a digital information.
Proximity Detection
The proximity detection features provides object detection by photodiode detection of reflected IR energy(Sourced by the integrated LED).
Digital Ambient Light Sense & Color Sense
The Color and ALS detection feature provides red, green, blue and clear light intensity data. Each of the R, G, B, C channels have a UV and IR blocking filter and a dedicated data converter producing16-bit data simultaneously. This architecture allows applications to accurately measure ambient light and sense color which enables devices to calculate illuminance and color temperature, control display backlight, and chromaticity.
| Arduino | Raspberry Pi | BeagleBone | Wio | LinkIt ONE |
|---|---|---|---|---|
Materials required
| Seeeduino V4.2 | Base Shield | Grove - Light&Gesture&Color&Proximity Sensor(TMG39931) |
|---|---|---|
 |
 |
 |
| Get ONE Now | Get ONE Now | Get ONE Now |
!!!note 1 Please plug the USB cable gently, otherwise you may damage the port. Please use the USB cable with 4 wires inside, the 2 wires cable can't transfer data. If you are not sure about the wire you have, you can click here to buy
**2** Each Grove module comes with a Grove cable when you buy. In case you lose the Grove cable, you can click [here](https://www.seeedstudio.com/Grove-Universal-4-Pin-Buckled-20cm-Cable-%285-PCs-pack%29-p-936.html) to buy.
-
Step 1. Connect the Grove - Light&Gesture&Color&Proximity Sensor(TMG39931) to port I^2^C of Grove-Base Shield.
-
Step 2. Plug Grove - Base Shield into Seeeduino.
-
Step 3. Connect Seeeduino to PC via a USB cable.

!!!Attention If this is the first time you work with Arduino, we strongly recommend you to see Getting Started with Arduino before the start.
!!!Tips The gesture functionality is not supported yet, since this functionality needs algorithms provided by AMS. We will update this library as soon as we get the support from AMS.
Example 1
-
Step 1. Download the Seeed_TMG3993 Library from Github.
-
Step 2. Refer to How to install library to install library for Arduino.
-
Step 3. Restart the Arduino IDE. Open the example, you can open it in the following three ways:
- Open it directly in the Arduino IDE via the path: File --> Examples -->Seeed TMG3993(Grove - Light&Gesture&Color&Proximity Sensor)-->Example1-ProximityPullRaw.
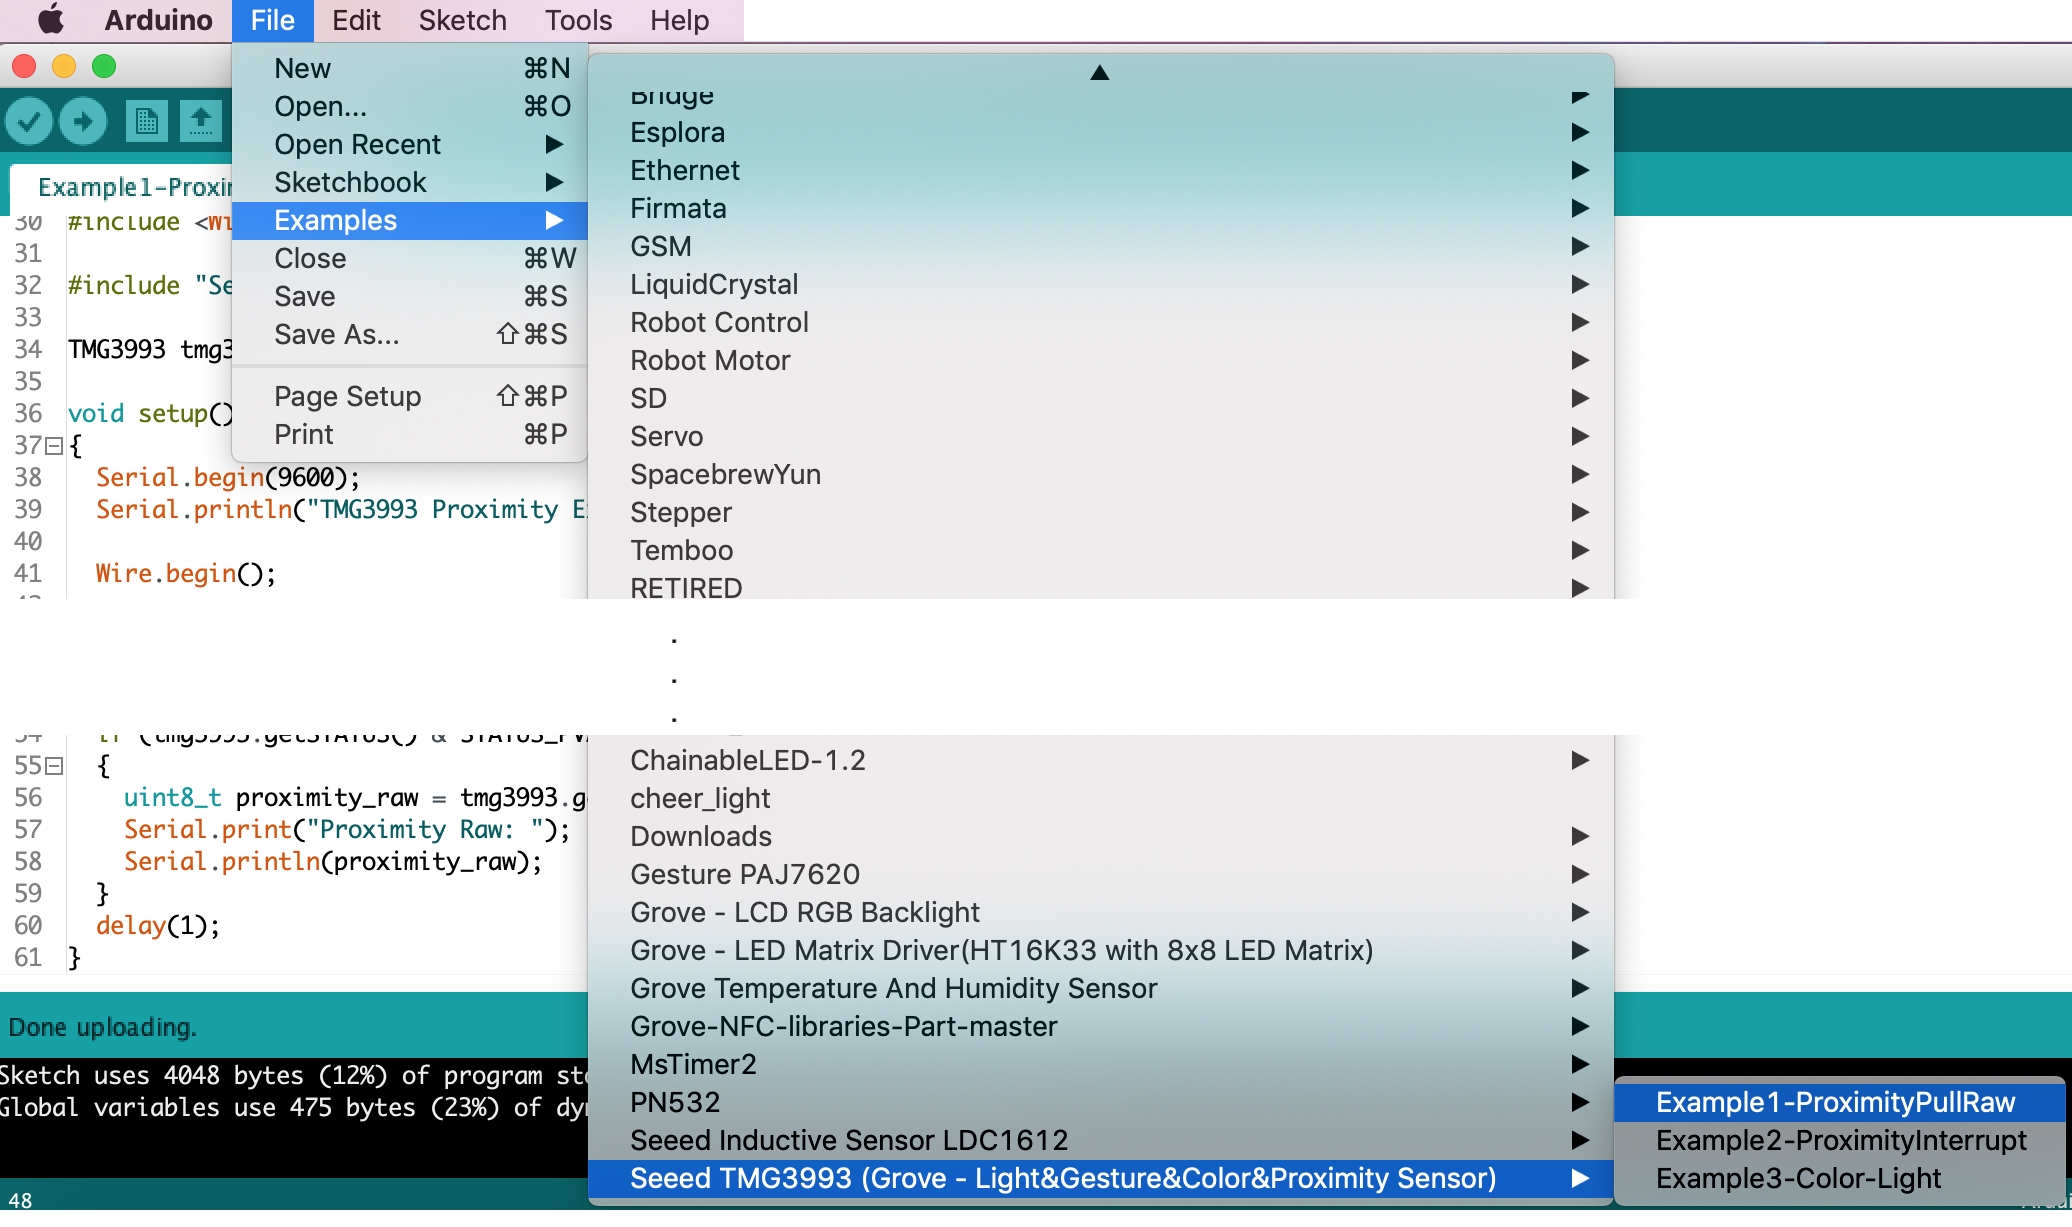
- Open it in your computer by click the basic_demo.ino which you can find in the folder XXXX\Arduino\libraries\Seeed_TMG3993-master\examples\Example1-ProximityPullRaw\Example1-ProximityPullRaw.ino, XXXX is the location you installed the Arduino IDE.

- Or, you can just click the icon
 in upper right corner of the code block to copy the following code into a new sketch in the Arduino IDE.
#include <Wire.h>

#include "Seeed_TMG3993.h"

TMG3993 tmg3993;

void setup()
{
  Serial.begin(9600);
  Serial.println("TMG3993 Proximity Example");

  Wire.begin();

  if (tmg3993.initialize() == false)
  {
    Serial.println("Device not found. Check wiring.");
    while (1);
  }
  tmg3993.setupRecommendedConfigForProximity();
  tmg3993.enableEngines(ENABLE_PON | ENABLE_PEN | ENABLE_PIEN);
}

void loop()
{
  if (tmg3993.getSTATUS() & STATUS_PVALID)
  {
    uint8_t proximity_raw = tmg3993.getProximityRaw();  //read the Proximity data will clear the status bit
    Serial.print("Proximity Raw: ");
    Serial.println(proximity_raw);
  }
  delay(1);
}
!!!Attention The library file may be updated. This code may not be applicable to the updated library file, so we recommend that you use the first two methods.
!!!Success If everything goes well, the raw (uint16_t) data of the proximity sensor should be able to read from Serial Monitor.

If you would like to run other examples, you may do similar processes.
Example 2
This example is also used to detect proximity, but in interrupt way.
Two thresholds need to be configured - low and high. Any proximity value which is inside this range will trigger nothing, but the value outside this range will trigger events. In detail, when the proximity sensor values are below the low threshold over 10 times, a proximity removed event will be emitted, when the proximity sensor values are higher than the high threshold over 10 times, a proximity detected event will be emitted. The 10 times here can be configured via setInterruptPersistenceReg (see setupRecommendedConfigForProximity for an example).
-
Step 1. Download the Seeed_TMG3993 Library from Github.
-
Step 2. Refer to How to install library to install library for Arduino.
-
Step 3. Restart the Arduino IDE. Open the example, the same way as in Example 1, but this time choose "Example2-ProximityInterrupt" instead of "Example1". Or copy the following code into Arduino IDE:
#include <Wire.h>

#include "Seeed_TMG3993.h"

TMG3993 tmg3993;
int last_interrupt_state = -1;

void setup()
{
  Serial.begin(9600);
  Serial.println("TMG3993 Proximity Example");

  Wire.begin();

  if (tmg3993.initialize() == false)
  {
    Serial.println("Device not found. Check wiring.");
    while (1);
  }
  tmg3993.setupRecommendedConfigForProximity();
  tmg3993.setProximityInterruptThreshold(25, 150);  //less than 5cm will trigger the proximity event
  tmg3993.enableEngines(ENABLE_PON | ENABLE_PEN | ENABLE_PIEN);
}

void loop()
{
  if (tmg3993.getSTATUS() & STATUS_PINT)
  {
    uint8_t proximity_raw = tmg3993.getProximityRaw();  //read the Proximity data will clear the status bit

    if (proximity_raw >= 150 && last_interrupt_state != 1) {
      Serial.println("Proximity detected!!!");
      Serial.print("Proximity Raw: ");
      Serial.println(proximity_raw);
      last_interrupt_state = 1;
    } else if (proximity_raw <= 25 && last_interrupt_state != 0) {
      Serial.println("Proximity removed!!!");
      Serial.print("Proximity Raw: ");
      Serial.println(proximity_raw);
      last_interrupt_state = 0;
    }

    // don't forget to clear the interrupt bits
    tmg3993.clearProximityInterrupts();
  }
  delay(10);
}
!!!Attention The library file may be updated. This code may not be applicable to the updated library file, so we recommend that you use the first two methods.
You should see something like this in Serial Monitor after you upload the code to Seeeduino.

Example 3
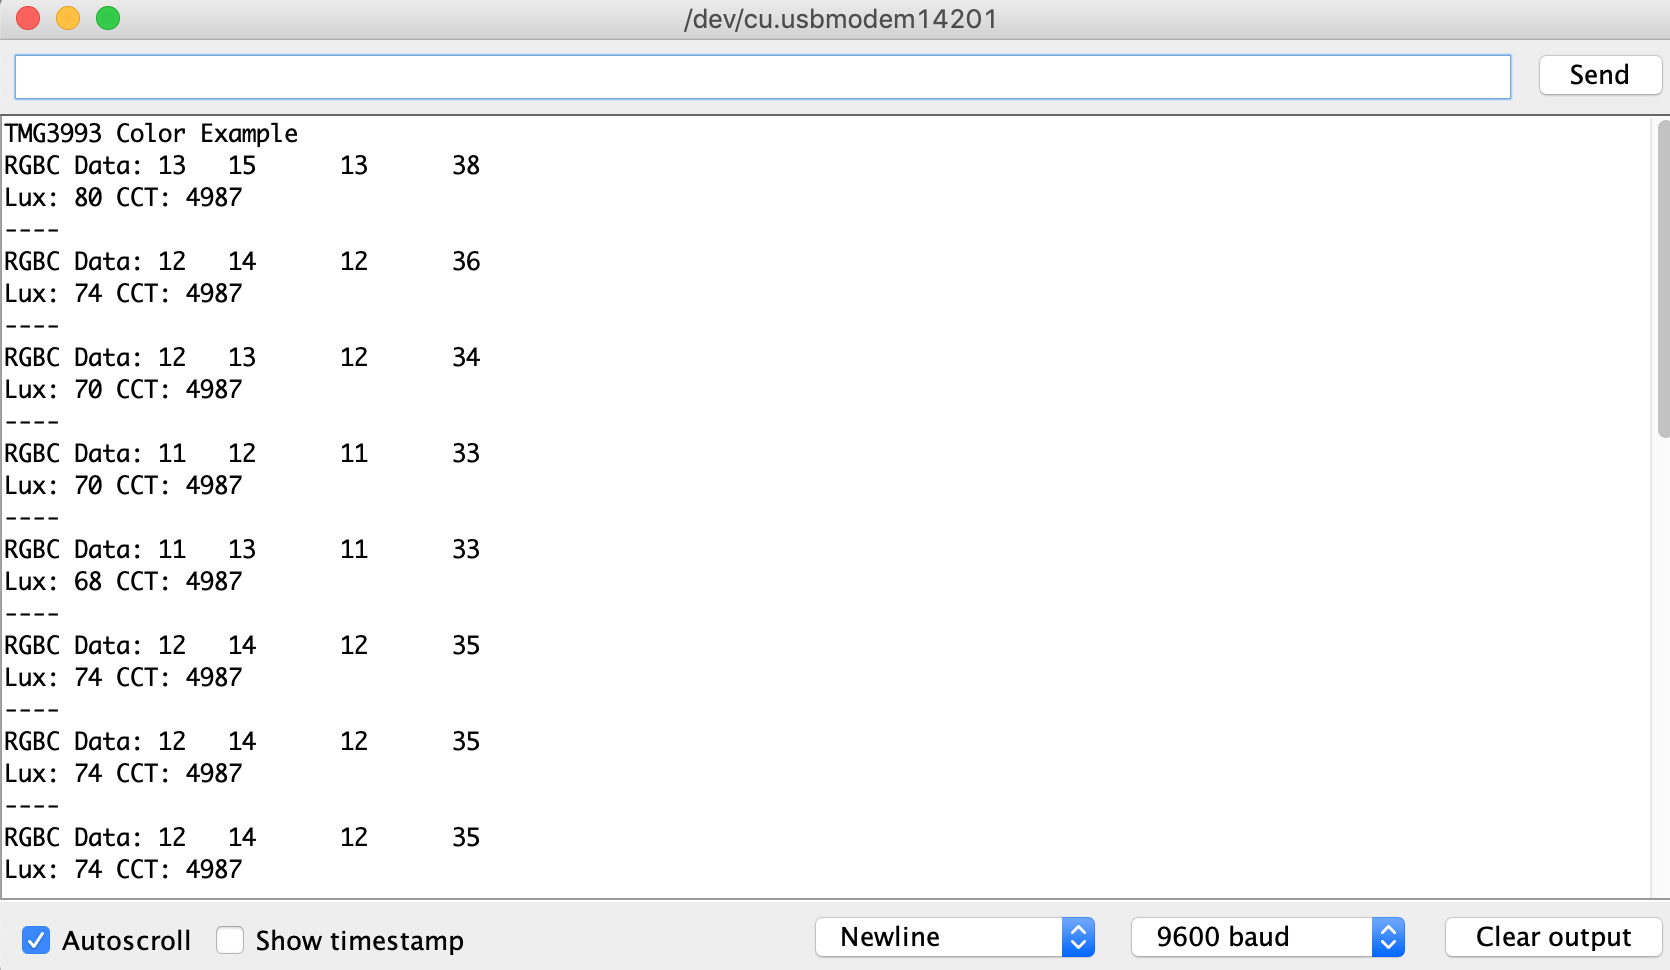
This example reads the R, G, B, C sensor values. C is defined as the non-color filtered clear channel in the chip's datasheet. This examples also calculates Lux value for the ambient light based on the equation in the Application Note of this sensor.
-
Step 1. Download the Seeed_TMG3993 Library from Github.
-
Step 2. Refer to How to install library to install library for Arduino.
-
Step 3. Restart the Arduino IDE. Open the example, the same way as in Example 1, but this time choose "Example3-Color-Light" instead of "Example1". Or copy the following code into Arduino IDE:
#include <Wire.h>

#include "Seeed_TMG3993.h"

TMG3993 tmg3993;

void setup()
{
  Serial.begin(9600);
  Serial.println("TMG3993 Color Example");

  Wire.begin();

  if (tmg3993.initialize() == false)
  {
    Serial.println("Device not found. Check wiring.");
    while (1);
  }
  tmg3993.setADCIntegrationTime(0xdb); // the integration time: 103ms
  tmg3993.enableEngines(ENABLE_PON | ENABLE_AEN | ENABLE_AIEN);
}

void loop()
{
  if (tmg3993.getSTATUS() & STATUS_AVALID)
  {
    uint16_t r,g,b,c;
    int32_t lux, cct;
    tmg3993.getRGBCRaw(&r, &g, &b, &c);
    lux = tmg3993.getLux(r, g, b, c);
    //the calculation of CCT is just from the `Application Note`,
    //from the result of our test, it might have error.
    cct = tmg3993.getCCT(r, g, b, c);

    Serial.print("RGBC Data: ");
    Serial.print(r);
    Serial.print("\t");
    Serial.print(g);
    Serial.print("\t");
    Serial.print(b);
    Serial.print("\t");
    Serial.println(c);

    Serial.print("Lux: ");
    Serial.print(lux);
    Serial.print("\tCCT: ");
    Serial.println(cct);
    Serial.println("----");

    // don't forget to clear the interrupt bits
    tmg3993.clearALSInterrupts();
  }
  delay(100);
}
!!!Attention The library file may be updated. This code may not be applicable to the updated library file, so we recommend that you use the first two methods.
You should see something like this in Serial Monitor after you upload the code to Seeeduino.
-
[Zip] Grove - Light&Gesture&Color&Proximity Sensor(TMG39931) Eagle Files
-
[Zip] Grove - Light&Gesture&Color&Proximity Sensor(TMG39931) Library
-
[PDF] Datasheet TMG39931
-
[PDF] PDF version WIKI
Please do not hesitate to submit the issue into our forum or drop mail to techsupport@seeed.cc.
