This readme details how to integrate DataMiner into business communication platforms with Automation scripts.
- Prerequisites
- Examples
- General
- Microsoft Teams
- Getting Started
- Creating a Team
- Fetching all Teams
- Creating a Channel
- Fetching all Channels of a Team
- Adding Team Members
- Adding Team Owners
- Sending a Channel Notification
- Sending a Channel Notification using an Adaptive Card
- Sending a Channel Notification using an Adaptive Card with buttons
- Creating a Private Chat
- Fetching a Private Chat
- Sending a Chat Notification
- Sending a Chat Notification using an Adaptive Card
- Sending a Chat Notification using an Adaptive Card with buttons
- Help
- Contact
- Version History
- License
The Skyline.DataMiner.DcpChatIntegrationHelper NuGet package can be found on nuget.org. This NuGet package allows easy integration with business communication platforms from a DataMiner Automation script.
ℹ️ We recommend that you always use the latest version of the Skyline.DataMiner.DcpChatIntegrationHelper NuGet package.
The DataMiner Integration Studio Visual Studio extension (also referred to as DIS) is required for development of Automation scripts using the Skyline.DataMiner.DcpChatIntegrationHelper NuGet package. You can also use DIS to deploy Automation scripts directly from your development environment to your DataMiner Systems.
See Installing DataMiner Integration Studio.
ℹ️ We recommend that you always use the latest version of the DataMiner Integration Studio Visual Studio extension.
-
The DataMiner System must be cloud-connected. See Connecting your DataMiner System to the cloud.
-
The CloudGateway module must be updated to at least version 2.9.0. See Upgrading nodes to the latest DxM versions.
-
The DataMiner bot must be allowed in your Microsoft Teams.
- The code for these Automation scripts can be found in the ChatIntegrationExamples folder.
-
Deploy the latest version of the ChatIntegration Examples package via the Catalog or download the package as a ZIP, unzip it, and deploy it to your DataMiner System locally. Installing this package will add the example Automation scripts for Microsoft Teams in the Automation module along with some memory files that will be used by the Automation scripts to save the IDs of the created and fetched resources.
⚠️ Installing this DMAPP will overwrite any Automation scripts and memory files with identical names. -
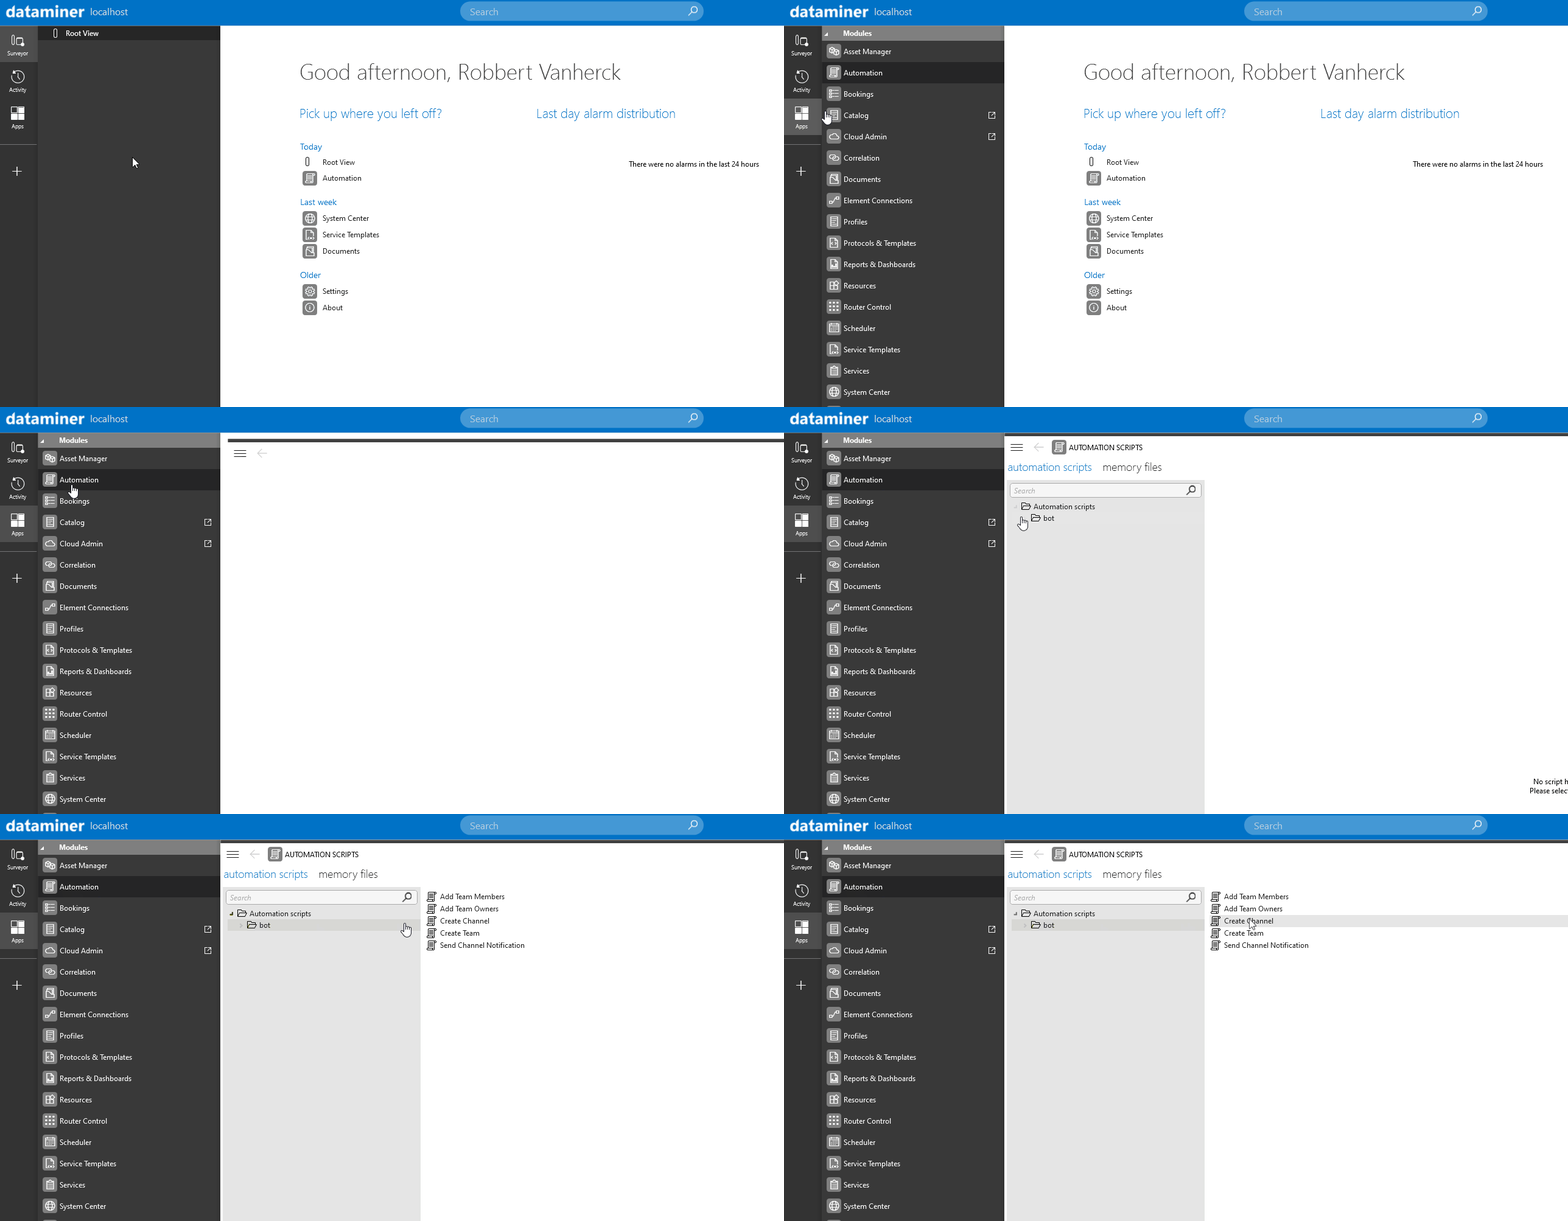
Open DataMiner Cube and open the Automation module (via apps > Automation). The added Automation scripts will be shown there.
-
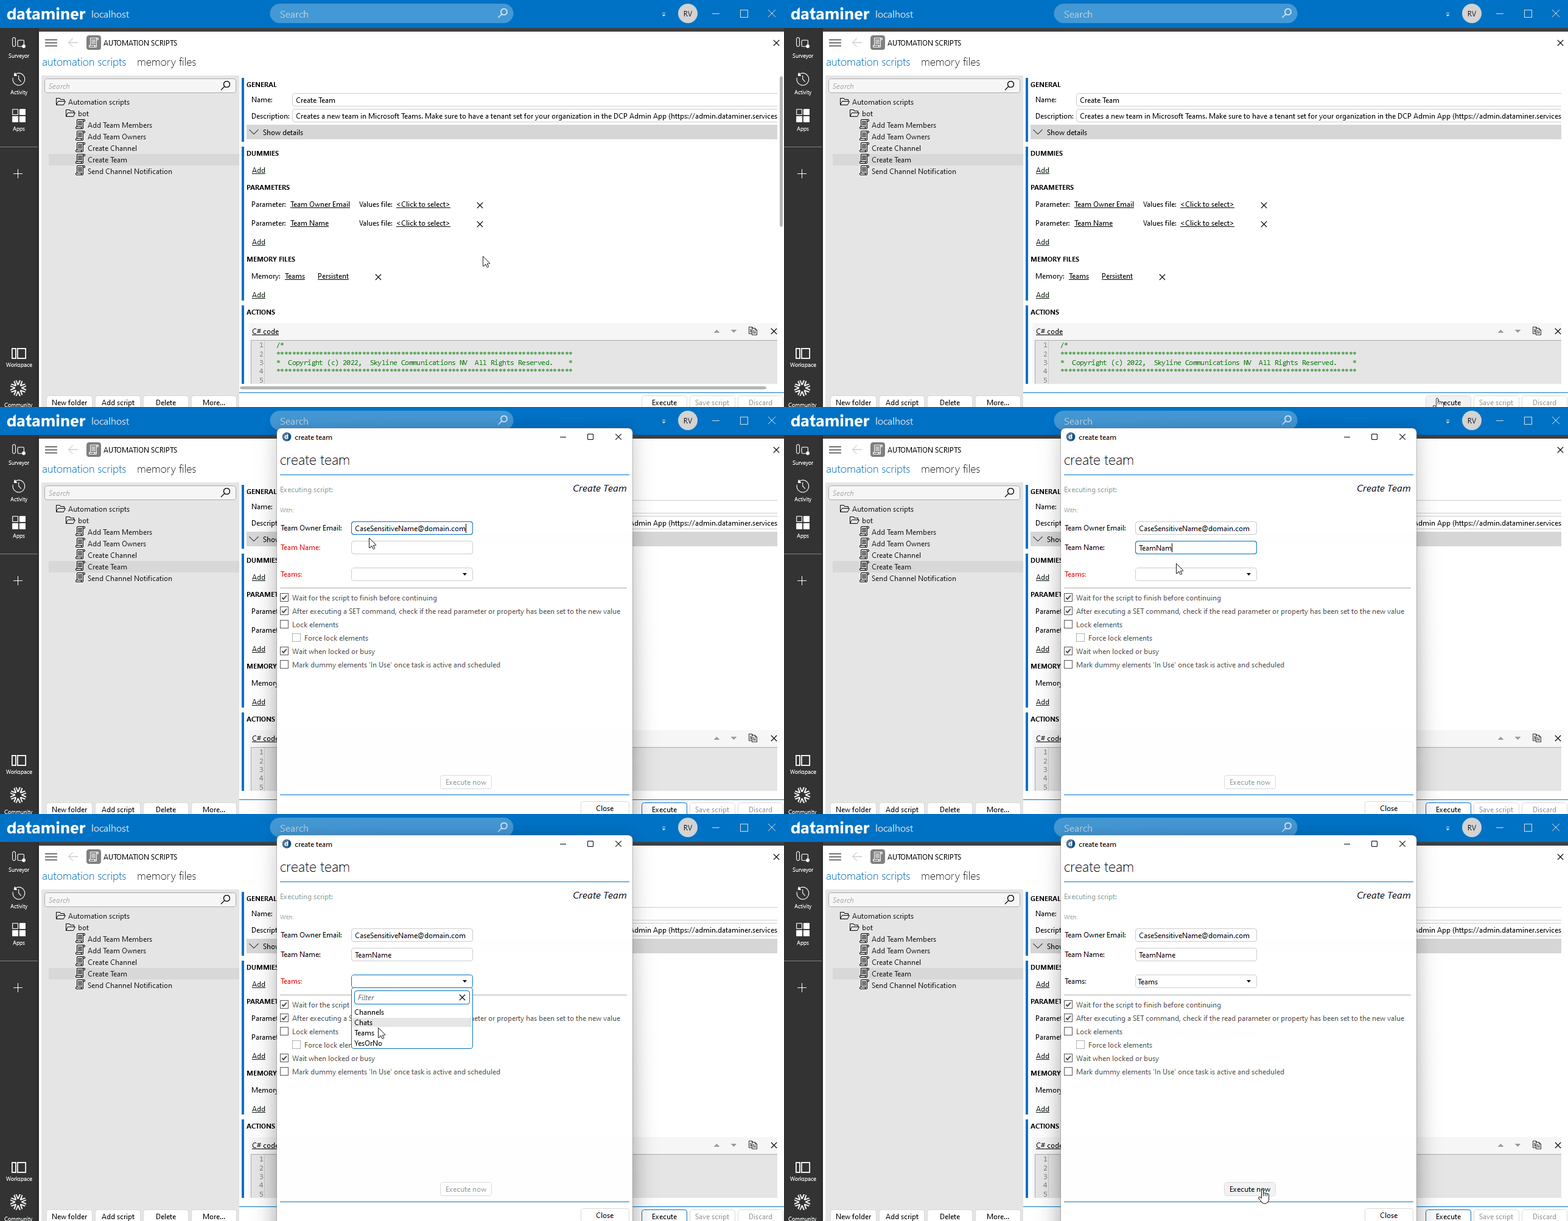
In the Automation module in DataMiner Cube, select the 'Create Team Example' Automation script and click the 'Execute' button.
-
Fill in the necessary information. Note that the fields are case sensitive.
- Team Owner Email: The email address of the owner of the team you are creating.
- Team Name: The name of the team you are creating.
- Teams: Select the memory file the script should use to save the ID of the team you are creating.
-
Click the 'Execute now' button. A team (with a General channel) will be created in Microsoft Teams and a reference will be saved in the Teams memory file. The DataMiner bot will also be installed.
-
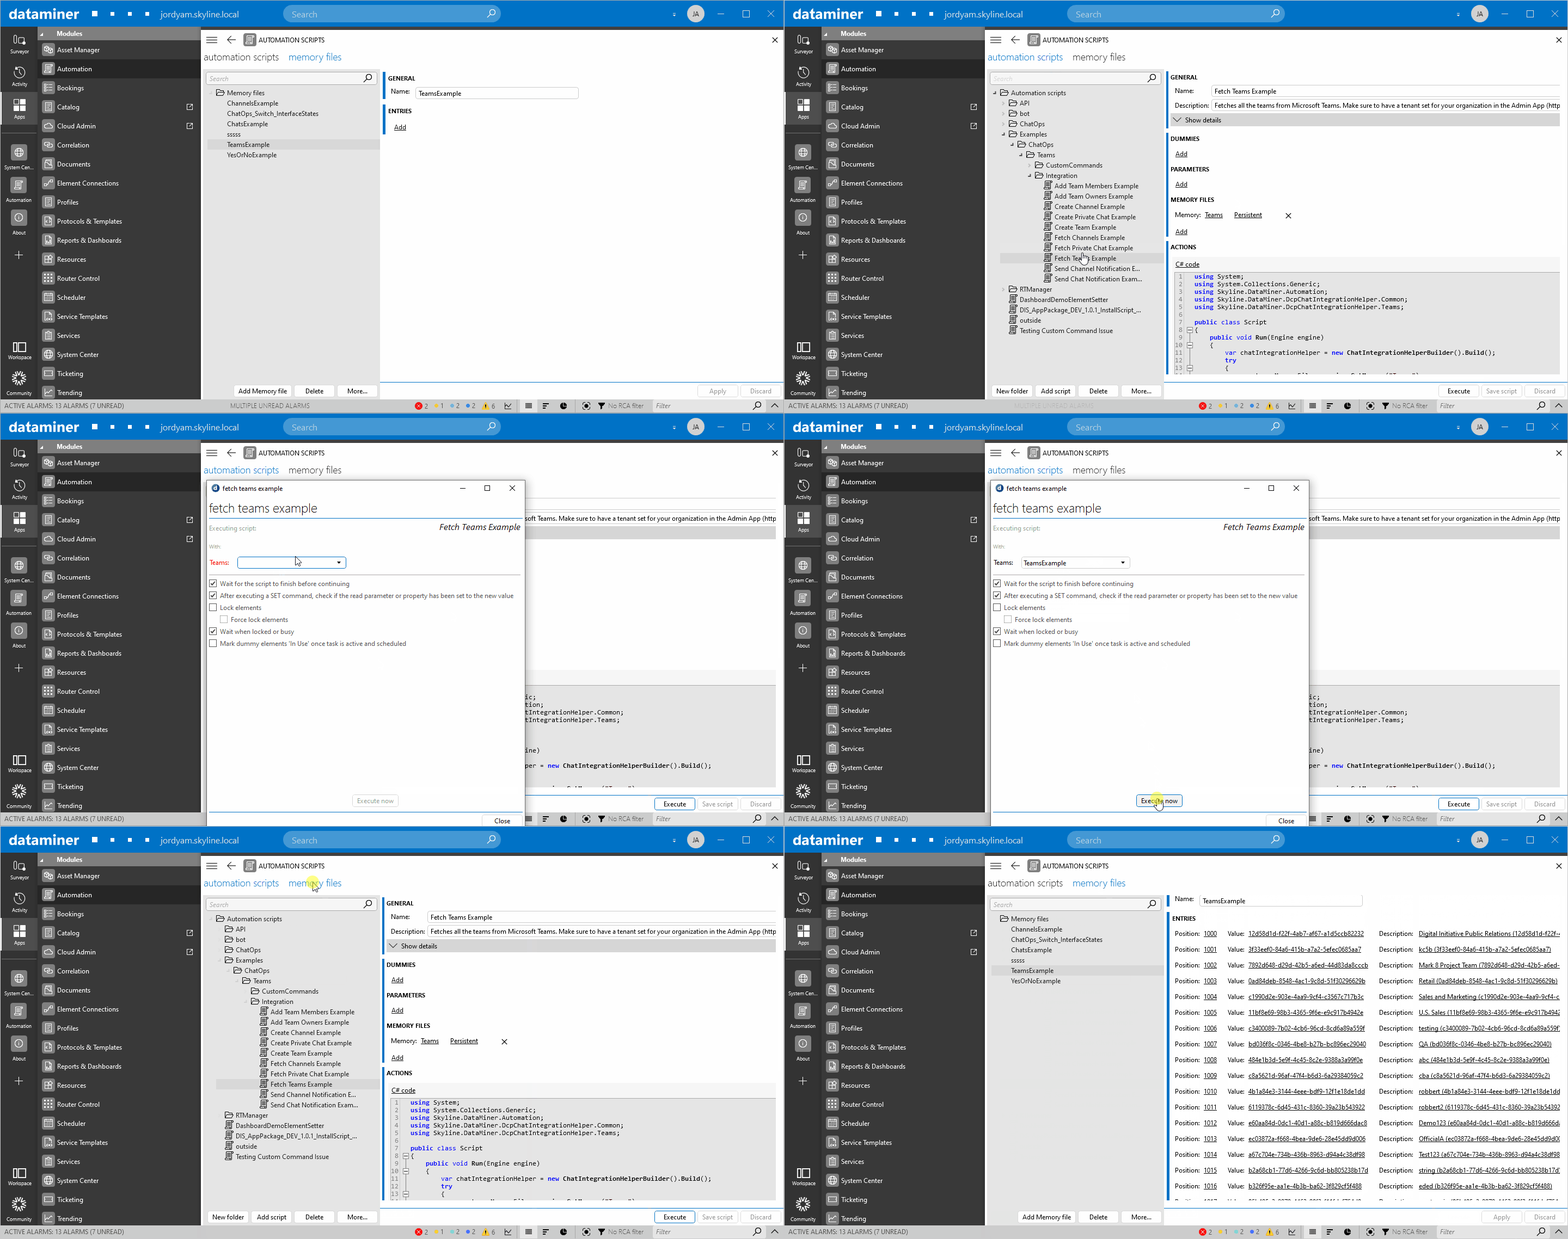
In the Automation module in DataMiner Cube, select the 'Fetch Teams Example' Automation script and click the 'Execute' button.
-
Fill in the necessary information.
- Teams: Select the memory file the script should use to save the IDs of the teams you are fetching.
-
Click the 'Execute now' button. All the teams will be fetched from Microsoft Teams and their reference will be saved in the Teams memory file.
-
First make sure a team is created as detailed above, as a channel can only exist within a team.
-
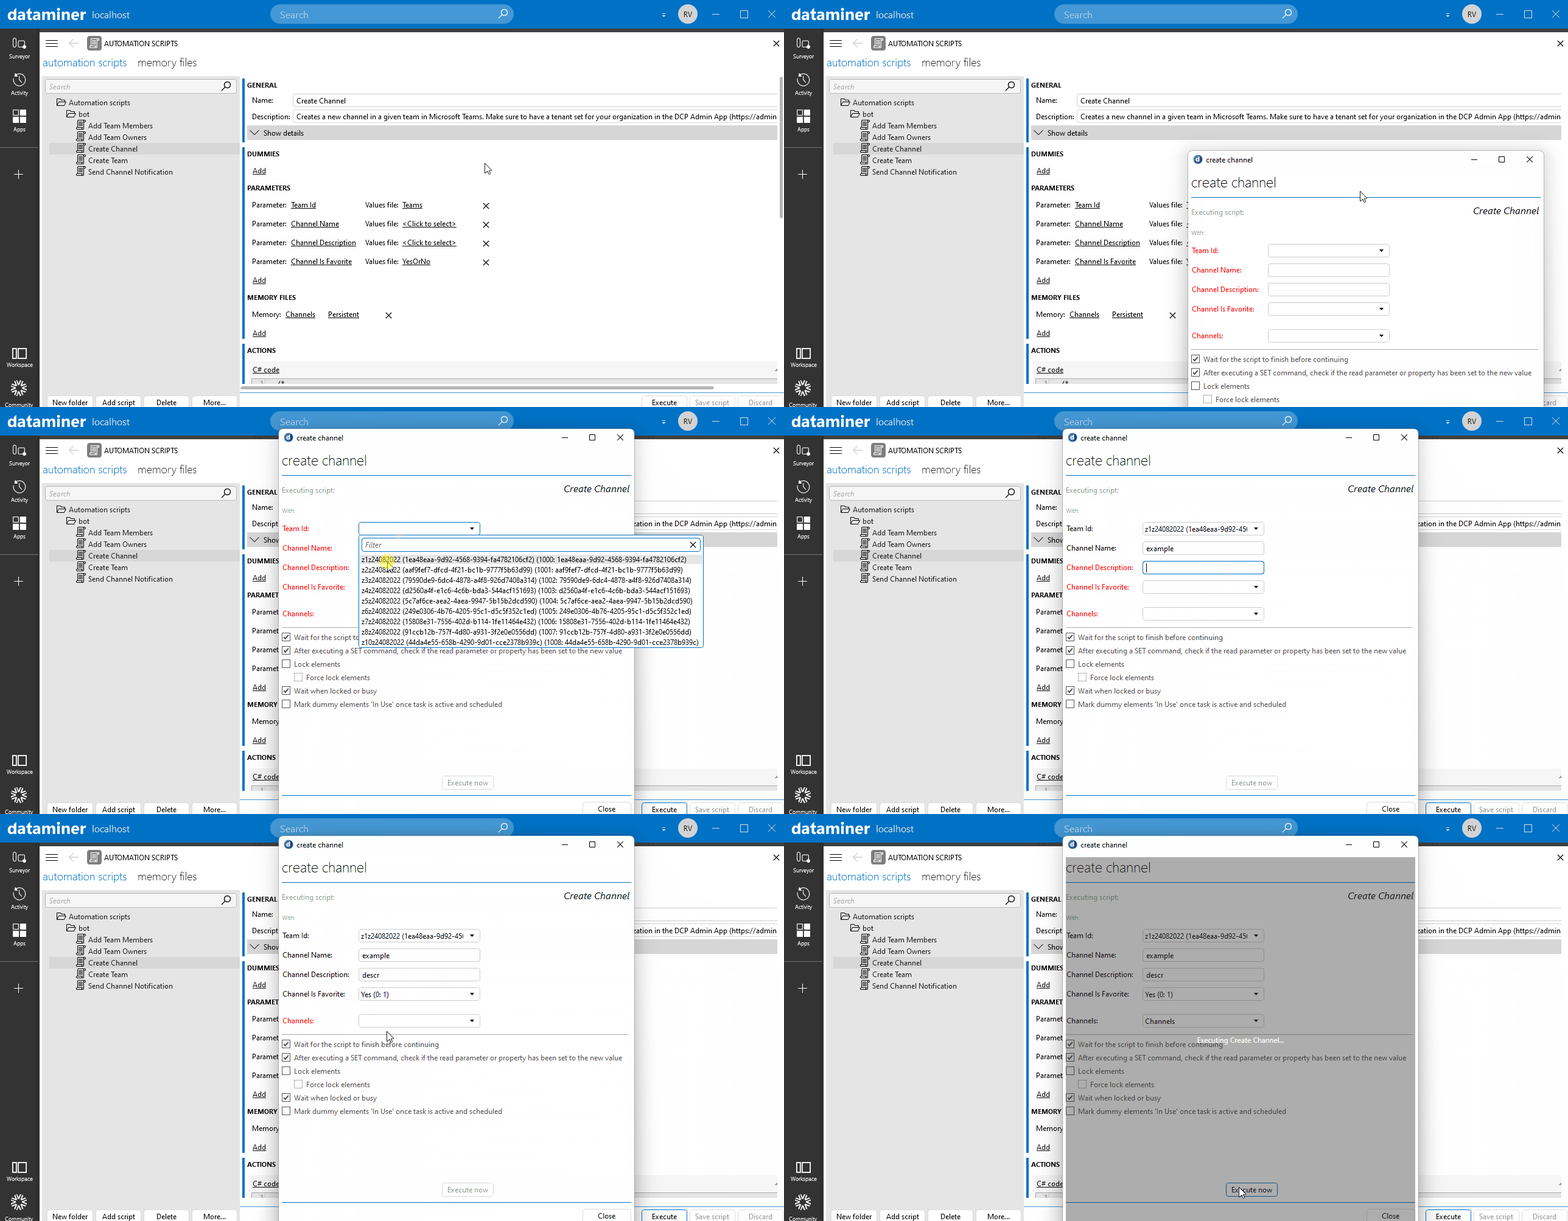
In the Automation module in DataMiner Cube, select the 'Create Channel Example' Automation script and click the 'Execute' button.
-
Fill in the necessary information. Note that the fields are case sensitive.
- Team ID: The ID of the team that should contain the channel.
- Channel Name: The name of the channel you are creating.
- Channel Description: The description of the channel you are creating.
- Channels: Select the memory file the script should use to save the ID of the channel you are creating.
-
Click the 'Execute now' button. A channel will be created in Microsoft Teams and a reference will be saved in the Channels memory file.
-
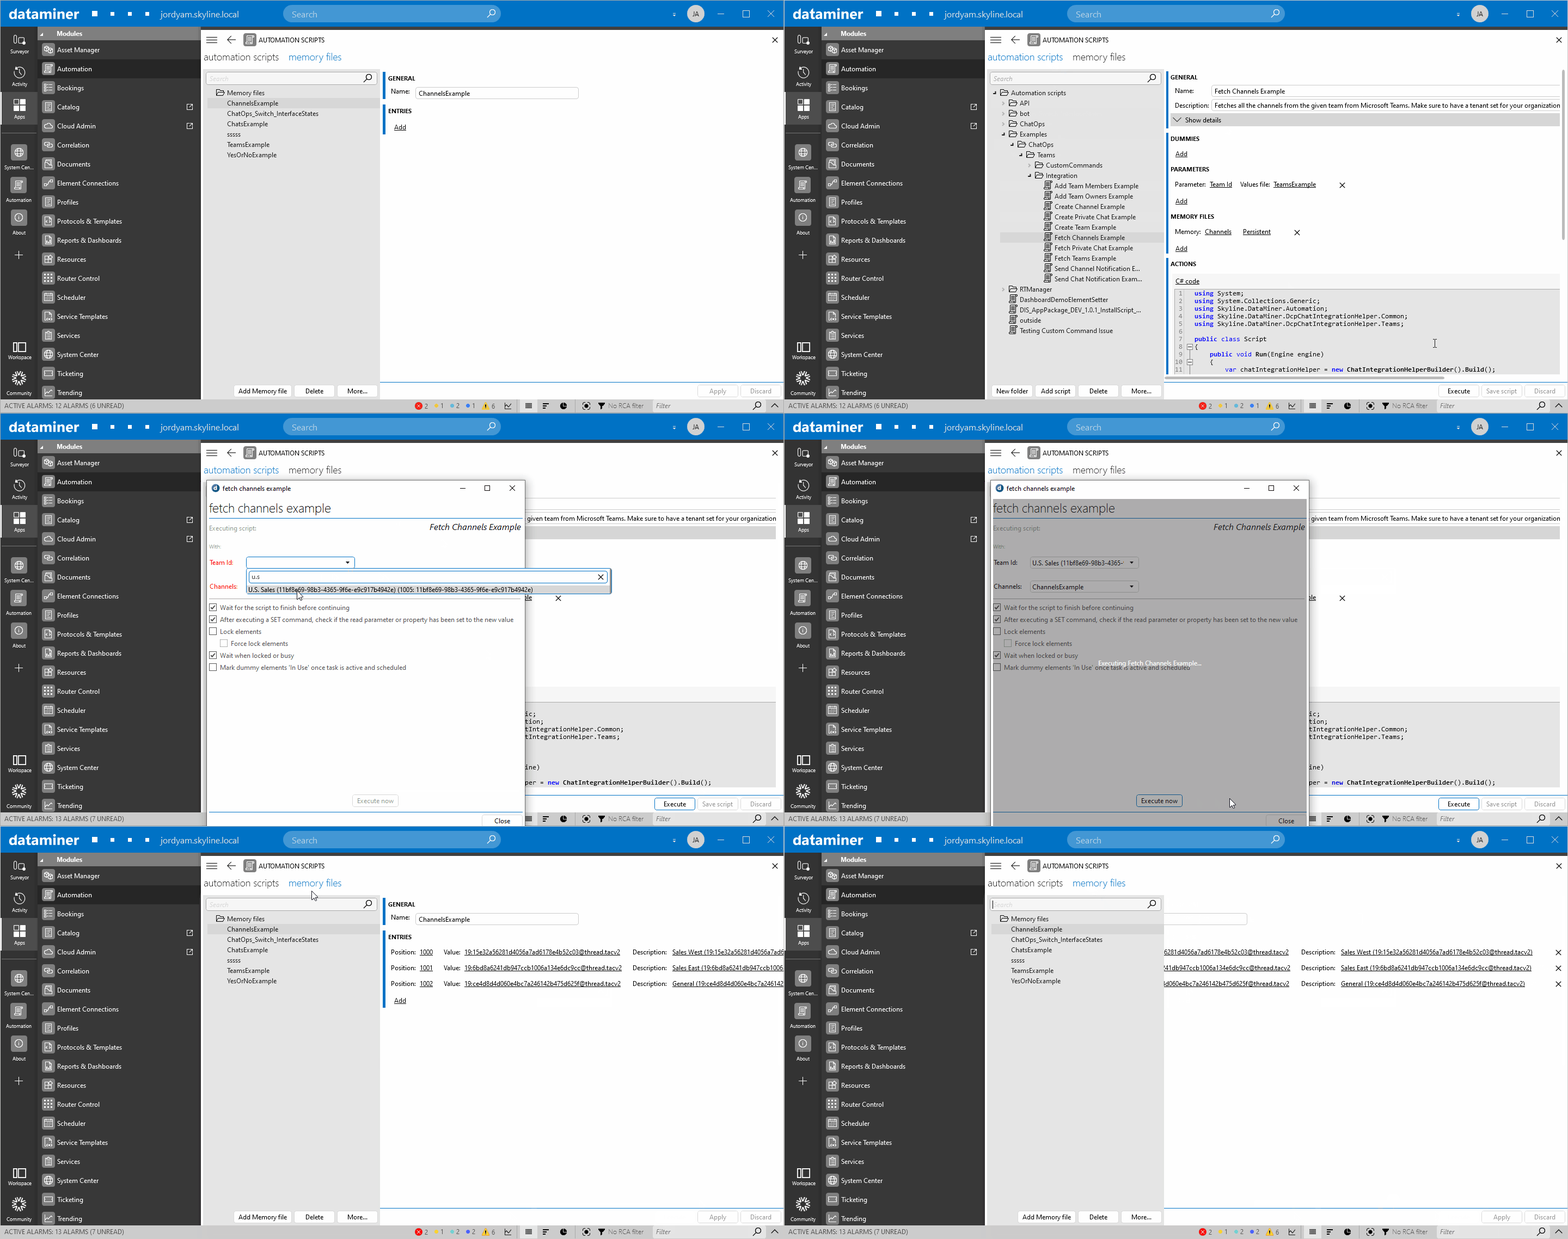
In the Automation module in DataMiner Cube, select the 'Fetch Channels Example' Automation script and click the 'Execute' button.
-
Fill in the necessary information.
- Team ID: The ID of the team that you want to fetch the channels from.
- Channels: Select the memory file the script should use to save the IDs of the channels you are fetching.
-
Click the 'Execute now' button. All the channels of the given team will be fetched from Microsoft Teams and their reference will be saved in the Channels memory file.
To add a new member or members to a team:
-
First make sure a team is created as detailed above, as members can only exist within a team.
-
In the Automation module in DataMiner Cube, select the 'Add Team Members Example' Automation script and click the 'Execute' button.
-
Fill in the necessary information. Note that the fields are case sensitive.
- Team ID: The ID of the team where you want to add one or more new members.
- Team Members to Add: The email addresses of the members, separated by semicolons (";").
-
Click the 'Execute now' button. The members will be added to the team in Microsoft Teams.
To add a new owner or owners to a team:
-
First make sure a team is created as detailed above, as owners can only exist within a team.
-
In the Automation module in DataMiner Cube, select the 'Add Team Owners Example' Automation script and click the 'Execute' button.
-
Fill in the necessary information. Note that the fields are case sensitive.
- Team ID: The ID of the team where you want to add one or more new owners.
- Team Owners to Add: The email addresses of the new owners, separated by semicolons (";").
-
Click the 'Execute now' button. An owner will be added to the team in Microsoft Teams.
To send a notification in a channel:
-
First make sure a channel is created as detailed above.
-
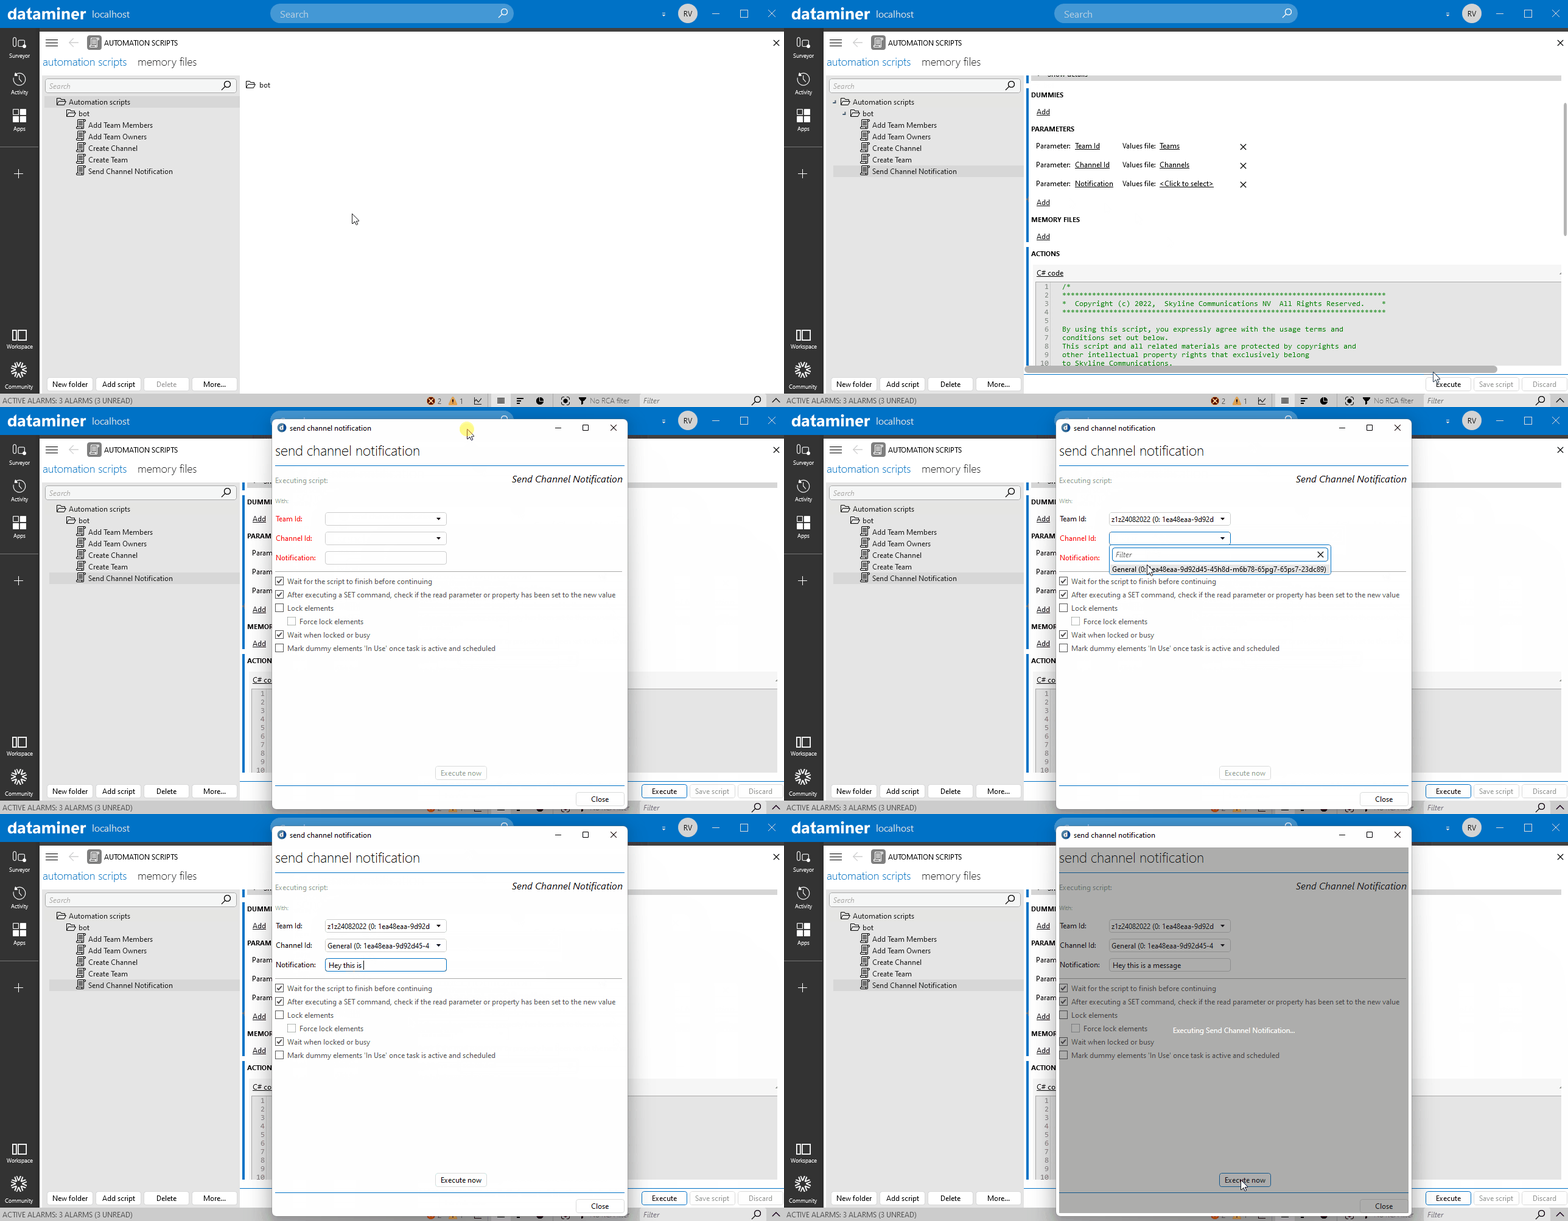
In the Automation module in DataMiner Cube, select the 'Send Channel Notification Example' Automation script and click the 'Execute' button.
-
Fill in the necessary information. Note that the fields are case sensitive.
- Team ID: The ID of the team where you want to send a notification.
- Channel ID: The ID of the channel where you want to send a notification. Note that this must be a channel of the specified team.
- Notification: The text of the notification.
-
Click the 'Execute now' button. A notification will be sent in the channel in Microsoft Teams.
To send a notification using an Adaptive Card in a channel:
-
First make sure a channel is created as detailed above.
-
In the Automation module in DataMiner Cube, select the 'Send Channel Notification Card Example' Automation script and click the 'Execute' button.
-
Fill in the necessary information. Note that the fields are case sensitive.
- Team ID: The ID of the team where you want to send a notification.
- Channel ID: The ID of the channel where you want to send a notification. Note that this must be a channel of the specified team.
- Notification: The text of the notification.
-
Click the 'Execute now' button. An Adaptive Card notification will be sent in the channel in Microsoft Teams.
To send a notification using an Adaptive Card with buttons in a channel:
-
First make sure that you fill in the organization ID and DMS ID in the Automation script named 'Send Channel Notification Card With Buttons Example'. You can find these IDs in the URL by opening the DMS overview in the Admin app. An example is provided in the Automation script.
-
Make sure a channel is created as detailed above.
-
In the Automation module in DataMiner Cube, select the 'Send Channel Notification Card With Buttons Example' Automation script and click the 'Execute' button.
-
Fill in the necessary information. Note that the fields are case sensitive.
- Team ID: The ID of the team where you want to send a notification.
- Channel ID: The ID of the channel where you want to send a notification. Note that this must be a channel of the specified team.
-
Click the 'Execute now' button. An Adaptive Card notification with buttons will be sent in the channel in Microsoft Teams.
-
In the Automation module in DataMiner Cube, select the 'Create Private Chat Example' Automation script and click the 'Execute' button.
-
Fill in the necessary information.
- User Email: The email address of the user of the private chat you are creating.
-
Click the 'Execute now' button. A private chat between the given user and the DataMiner Teams Bot will be created in Microsoft Teams.
-
First make sure a private chat is created as detailed above.
-
In the Automation module in DataMiner Cube, select the 'Fetch Private Chat Example' Automation script and click the 'Execute' button.
-
Fill in the necessary information.
- Chats: Select the memory file the script should use to save the ID of the private chat you are fetching.
- User Email: The email address of the user of the private chat you are fetching.
-
Click the 'Execute now' button. The private chat between the given user and the DataMiner Teams Bot will be fetched from Microsoft Teams and a reference will be saved in the Chats memory file.
To send a notification in a chat:
-
First make sure a private chat is fetched as detailed above.
-
In the Automation module in DataMiner Cube, select the 'Send Chat Notification Example' Automation script and click the 'Execute' button.
-
Fill in the necessary information. Note that the fields are case sensitive.
- Chat ID: The ID of the chat where you want to send a notification.
- Notification: The text of the notification.
-
Click the 'Execute now' button. A notification will be sent in the chat in Microsoft Teams.
To send a notification using an Adaptive Card in a chat:
-
First make sure a private chat is fetched as detailed above.
-
In the Automation module in DataMiner Cube, select the 'Send Chat Notification Card Example' Automation script and click the 'Execute' button.
-
Fill in the necessary information. Note that the fields are case sensitive.
- Chat ID: The ID of the chat where you want to send a notification.
- Notification: The text of the notification.
-
Click the 'Execute now' button. An Adaptive Card notification will be sent in the chat in Microsoft Teams.
To send a notification using an Adaptive Card with buttons in a chat:
-
First make sure that you fill in the organization ID and DMS ID in the Automation script named 'Send Chat Notification Card With Buttons Example'. You can find these IDs in the URL by opening the DMS overview in the Admin app. An example is provided in the Automation script.
-
Make sure a private chat is fetched as detailed above.
-
In the Automation module in DataMiner Cube, select the 'Send Chat Notification Card With Buttons Example' Automation script and click the 'Execute' button.
-
Fill in the necessary information. Note that the fields are case sensitive.
- Chat ID: The ID of the chat where you want to send a notification.
-
Click the 'Execute now' button. An Adaptive Card notification with buttons will be sent in the chat in Microsoft Teams.
Skyline Communications: Support
Skyline Communications: Contact
This project is licensed under the MIT License – see the file for details.
