

After you forked this project and adjusted it to your needs (configured with your data), you might want to deploy it in order to make it available to everyone.
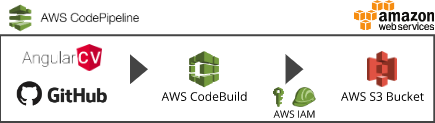
This is a little guide of how to deploy this Angular project to AWS using an AWS CodePipeline and a S3 Bucket. You still can deploy it in a different way. This is only a suggestion.
You will most likely want to access the Angular app through a proper domain (e.g. yourdomain.tld) or sub-domain (e.g. cv.yourdomain.tld) instead of the S3 url (e.g. http://yourbucketname.s3-website.eu-central-1.amazonaws.com/).
Please go to your favorite domain provider and request a new domain or sub-domain for this purpose.
You will adjust the CNAME of that domain later on.
You need a free account for Amazon Web Services (AWS).
❗ Please be aware, that the resources you are going to create in the upcoming guideline will cause some costs to your AWS account.
The S3 bucket will host your app.
- Open the Amazon S3 section and click on "Create"
- Name the bucket like the url through which it will be accessed later, e.g.
yourdomain.tldorcv.yourdomain.tld- This depends on what you did in step 0 (see above)
- Leave everything else to the prefilled values
- Go to the properties of the S3 bucket you just created and select "Static Website Hosting"
- Both, the index document and the error document should be set to
index.html
- Both, the index document and the error document should be set to
- Attach a policy for external access (otherwise nobody would see your website)
- Go to permissions and click "Bucket Policy"
- Paste the following policy into the policy editor
{ "Version": "2012-10-17", "Statement": [ { "Sid": "2", "Effect": "Allow", "Principal": "*", "Action": "s3:GetObject", "Resource": "arn:aws:s3:::cv.yourdomain.tld/*" } ] }- Adjust the line
"Resource": "arn:aws:s3:::cv.yourdomain.tld/*"with your bucket name
This will create an automated pipeline, which will deploy any changes you do to your repository.
- Update the
buildspec.ymlin the repository with the name of the S3 bucket you previously created - In AWS, go to the "CodePipeline" section
- Click on "Create" and select a name for your pipeline, e.g.
AngularCVDeployPipeline - Select the source "GitHub" and the branch you want to deploy (e.g.
master)- You will have to allow AWS access to your GitHub now
- In the next step, choose "AWS CodeBuild" as build provider
- Select "create a new build project" and name it, e.g.
AngularCVBuild - For the environment image, we will use the default one (
Use an image managed by AWS CodeBuild) - Select an Operating System - currently, the only available option is
Ubuntu - Select
Standardas runtime (it contains everything we need) with imageaws/codebuild/standard:2.0and image version to use the latest - For the build specification, we want to use the afore mentioned
buildspec.yml - Create a service role for your account, e.g.
code-build-AngularCVBuild-service-role(you can leave the generated value) - Click "Save build project" and then "Next step"
- Add the permissions to that role to allow CodeBuild to push the build artifacts to the S3 bucket:
- Open the "IAM" section in a new tab and edit the role, that you just created above (
code-build-AngularCVBuild-service-role) - For convenience, I am going to add full S3 access to that role, but you should just allow access to that specific S3 bucket that you are using
- Go to Permissions and click "Attach Policy"
- Add
AmazonS3FullAccess
- Open the "IAM" section in a new tab and edit the role, that you just created above (
- Now, we can continue with the CodePipeline
- In the next step, we select
no deploymentas deployment provider- The artifacts are already deployed to S3 by the following line in the
buildspec.yml:- aws s3 cp dist s3://${S3_BUCKET} --recursive
- The artifacts are already deployed to S3 by the following line in the
- Finally, you will have to create a AWS Service Role
- Click "Create" and name it e.g.
AWS-CodePipeline-Service-AngularCV - Leave the default values for the other fields
- Click "Create" and name it e.g.
- In the next step you can review your settings
- After creating the Pipeline, it will start to run automatically and your AngularCV app will be deployed to your S3 bucket
For the domain, you created previously, adjust the settings in order point it to the S3 bucket
- Go to the DNS settings at your domain provider
- You can also use AWS Route53 as DNS, which is easy to use, but that's a different story
- Add a
CNAMErecord for the (sub-)domain you want to point to the AngularCV app pointing to the S3 url- e.g.
http://cv.yourdomain.tld.s3-website.eu-central-1.amazonaws.com
- e.g.
- The propagation of the DNS settings might take some minutes
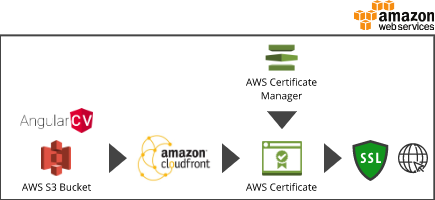
You can configure a AWS CloudFront distribution in order to offer your Angular website with HTTPS. During this, we will create a free SSL certificate in AWS. The latter will only work, if you have access to the mails sent to one of the addresses used by AWS. Remember, that this is just a basic guide. I recommend further reading for all AWS resources you are going to create in order to find the best suited configuration settings for your needs.
- Go to the "AWS Certificate Manager" section in the region
US East (N. Virginia)- The certificate will only be suitable for CloudFront, if it lies in the US East region!
- Click on "Get Started" or "Request a certificate" (depending if you already have one or not)
- Enter the domain name(s) you need, e.g.
yourdomain.tldandcv.yourdomain.tld - Click on "Review an Request"
- Accept the request from the email you just received
- Go to the "CloudFront" section in AWS
- Click on "Create Distribution" and select "Web" as distribution method
- Select the S3 bucket you previously created as "Origin Domain Name" from the displayed suggestions
- You can leave the generated "Origin ID"
- If you want to let your visitors only use the
cv.yourdomain.tldand not the Amazon S3 URL, you can set "Restrict Bucket Access" to Yes- After creating a new "Origin Access Identity", you will be asked, if you want to update the Bucket Policy. I recommend to choose yes
- Afterwards go to the corresponding S3 Bucket and remove the policy added in step 1a, but keep the one added by CloudFront
- I recommend choosing
Redirect HTTP to HTTPSin "Viewer Protocol Policy" - Scroll down to "Distribution Settings"
- Choose the price class for your needs (the more locations you enable, the higher the price)
- Set the "Alternative Domain Names (CNAMEs)" to your domain, e.g.
cv.yourdomain.tld - Select "Custom SSL Certificate" and choose the SSL Certificate you previously created
- Enter
index.htmlin "Default Root Object" - Leave the other settings as they are
- Click on "Create Distribution"
- it might take some minutes for it to be created
- Finally, you will need to adjust the
CNAMEof your domain to the CloudFront URL
If one of your visitors is e.g. on the "Contact" section of your AngularCV app and refreshes the page, he will get an error from CloudFront.
This is caused by the fact, that the browser now tries to access the path /contact, which is not existing.
In order ro make this work, follow these steps:
- Select the CloudFront distribution you just created and go to the "Error Pages" tab
- Click "Create Custom Error Response"
- Select HTTP Code
403: Forbiddenin "HTTP Error Code" - "Customize Error Response": yes
- Enter
/index.htmlin "Response Page Path" - HTTP Code
200: OKin "HTTP Response Code" - repeat this for the HTTP Code
404: Not Found
Now, also the deeplinks to the sections (/experience, /contact, etc.) should work like you expect them to.