AlienFX-GUI is AWCC in 500kb. Not 500Mb!
What it cannot do in compare to AWCC?
- No overclock (but can come soon...) and downvolt. Anyway, ThrottleStop or XTU do the job better.
- No audio control. Being honest, never use it into AWCC.
- No huge picture or animations, interface is as minimalistic as possible.
- No services and drivers which send you usage data in Dell, consume RAM and slow down system.
But what it can do, instead?
- Control AlienFX lights. Any way you can imagine:
- Set the chain of effects to every light, or
- Set the light to react any system event - CPU load, temperature, HDD access - name it.
- Group the lights any way you wish and control group not as one light only, but as a gauge of LEDs.
- Make lights react on screen colors (Ambient lights).
- Make lights react on sound around (Haptics).
- Grid light effects - make group of lights react for keyboard, event or just random using light position.
- Control system fans. Instead of AWCC, fan control is dynamic, so you can boost them any way you want. Or reset boost.
- Control system settings like boost, power mode (thermal profile).
- Can have a profile for any application you run, power source and even key pressed.
Please read How to start for more details about initial setup.
Top-left is profile selection drop down. It present currently active profile and you can change it to other any time. All changes made will be applied to it.
Top-right check box enables or disables software effects for active profile.
Effects in action will be defined by zones setting.
Enabling effects can stop hardware per-light effects - it's a hardware limitation.
"Refresh" button update all lights colors according to current profile settings (color sets, effects, etc).
"Save" button saves configuration, "Minimize" button hides application into tray.
Tray menu (right-click on tray icon) available for fast switch functions, application will hide into tray completely then minimized.
The rest of the window is control function tabs. There are 4 main control blocks available:
All lights functions of you system controlled from here. It have 5 sub-tabs, but 2 blocks are common for most of it:
-
Lights grid (down-right block). It present how lights located at you gear surface, as well as show light color prediction according to current light settings and effect mode.
-
"Zones" block. It used for group lights to light zone for control it as one light. Press "+" button to add new zone (or select one from other profiles), "-" to remove selected zone, select (left-click or click-and-drag) cells into grid to add/remove assigned lights into zone. Pressing "X" button near grid remove all grid lights from current zone. Press "Select from list" button to add lights to zone not from grid, but from global lights list.
-
"Gauge" block. It defines how zone will act inside it:
- Off - All zone lights will have the same color.
- Horizontal - fill zone from left to right.
- Vertical - fill zone from top to bottom.
- Diagonal (left) - fill zone from top-left point to bottom-right.
- Diagonal (right) - fill zone from top-right point to bottom-left.
- Radial - fill zone by ellipse from center to borders.
"Reverse" check box invert filling direction for the zone.
"Gradient" check box alter zone filling style. In case zone have 2 colors, it will filled as gradient then enabled. For any effect, it will filled by gradient color instead of peak indicator.
Rest of the screen is control block, it depends of function selected by tab:

"Colors" tab is set color and hardware effects for light. This setting will remain even if you exit application.
Each light zone (except Power Button) can have up to 9 different hardware effects ("Actions") assigned to it, but some modes require more, then one action (f.e. Morph – 2, Spectrum – 7) to work correctly.
Hardware button can only have exactly 2 actions (for AC and for battery).
Use "Actions" list to add/remove/select action. For each action, you can define its color, effect mode, speed (how fast to change the colour), and length (how long it plays).
Available effect modes are:
- Color - Stay at solid color defined.
- Pulse - Switch between defined color and next color(s).
- Morph - Morph light from previous color to current one.
- Breath - Morph light from black to current color. (For devices with APIv4)
- Spectrum - Like a morph, but up to 9 colors can be defined. (For devices with APIv4)
- Rainbow - Like a Colour, but can use up to 9 colors. (For devices with APIv4)
- Power - for hardware power button.
Please keep in mind, mixing different event modes for one light can provide unexpected results, as well as last 2 modes can be unsupported for some lights (will do morph). But you can experiment.

This tab designed to control "System Monitoring" software effect - it change zone colors based on system states and events - like power source changes, system load, temperatures.
For each zone, you can assign the chain of effects applied to it.
For each effect in chain, color from previous effect used as a source value, then re-calculated using effect settings. Resulted color after all chain calculated applied to the zone lights.
In case "Use default color" check box enabled, first color for chain will be taken from "Color" tab, otherwise it will be taken from the "From" value of the first effect in chain.
You can use "+" and "-" buttons to add/remove effect into the chain, and arrow buttons to move currently selected effect earlier or later.
For each effect, 2 different monitoring types available:
"Performance"
Effect will reflect selected performance indicator, available indicator sources are:
- CPU load - CPU load color mix from 0% ("Idle") to 100% ("Full load")
- RAM load - Reflect used RAM percentage
- GPU load - Current GPU utilization percentage (top one across all GPUs if more, then one present GPUs into the system).
- Storage load - It's not exactly a load, but IDLE time. If you HDD/SSD not load - it's "idle", 100% busy - full load, and mix between.
- Network load - Current network traffic value against maximal value detected (across all network adapters into the system).
- Max. temperature - Maximal temperature in Celsius degree across all temperature sensors detected into the system.
- Battery level - Battery charge level in percent - "From" color for full battery, "To" color for completely drained.
- Max. Fan RPM - Highest fan RPM (in percent of maximum) across all system fans. This indicator will only works if "Fan control" is enabled in "Settings".
- Power consumption - Current system power drain level. This indicator will only works if "BIOS sensors" enabled at "Settings".
- Power Mode - if fan control enabled, it will reflect current active Power Mode (thermal profile). First color is always manual mode, second is G-mode if present, or higher mode in list if not present.
You can use "Trigger level" slider to define value of no reaction - for example, for temperature it's nice to set it to the room temperature - only heat above it will change color.
For gauge-enabled zones, performance effect acts as a peak indicator - lights below current value marked as "To" color, lights above as "From", active lights (fits value) use mixed color in between.
"Indicator"
Effect color switches between "From" and "To" values in case system event occurs:
- Storage activity - Switch zone color every disk activity event (Storage IDLE above zero).
- Network activity - Switch zone color if any network traffic detected (across all adapters).
- System overheat - Switch zone color if system temperature above "Trigger level" value.
- Out of memory - Switch zone color if memory usage above "Trigger level" value.
- Low battery - Switch light if battery charged below "Trigger level" value.
- Language indicator - Light will have "From" color if first input language selected, and "To" color if any other selected.
- Power Mode - if fan control enabled, it will reflect current active Power Mode (thermal profile). Switch level defined by "Trigger level" slider.
- Power status - Software power button. First color for AC, second for DC, it can blink then charging or if battery level low.
"Blink" check box switch triggered value to blink between from-to colors about 2 times per second.

Ambient tab setting up "Ambient" (Ambient lights) software effect - zone colors will follow colors at you screen.
For gauge zones, zone will follow the difference between screen color and black.
You can select which display (primary or all secondary) to follow, as well as define dimming to make light brightness be balanced with screen brightness.
"Reset" button restart color capturing from screen, it's useful in some situations like DirectX 12 game quit.
"Calculation" block defines ambient color calculation algorithm:
- Medium - color will be calculated as an average value between all block colors. Can be not so precise if many different colors into block.
- Prevailing - detection of the color most present into the block. Precise and fast, but can provide incorrect result if no prevailing color.
"Screen zones" grid define which screen area current zone will follow. Click on corresponding are to add/remove it to zone reactions. In case of "Ambient" effect active, button colors will filled from the screen one. Sliders below and right to screen area grid used to change grid density, providing more or less areas screen will be divided. Default is 4x3.
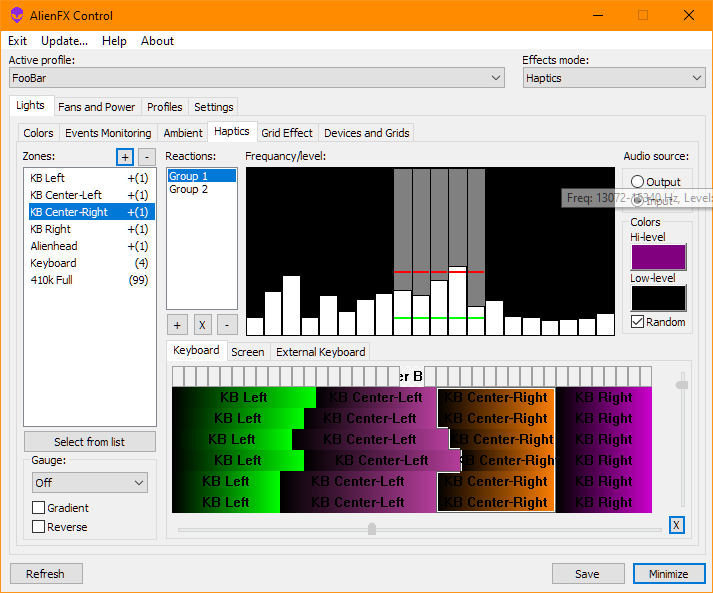
This effect control zone lights color depends of the sound played (haptic effect).
Use "Audio source" block to select between audio inputs ("Output" is for all sound from the system, "Input" is for incoming sounds - Line In or Microphone).
In case "Haptics" effect active, "Frequency/level" window reflect current sound spectrum divided by 20 frequency groups.
One or more Reactions Groups can be assigned to zone - each group define reaction for frequencies. It have two levels - high and low (red and green lines), final color for zone defined as "low-level" one if sound level below low, mix of the "low-level" and "high-level" if sound level between them and "high-level" if it's above high. Final zone color will be set as a mix of all group colors.
"Random" check box will randomly select new "High level" color value each time sound level reach it's peak.
Press "+" button to add Reaction group, "-" button to remove it, "X" button to reset it levels, colors and frequencies.
Click at desired frequency at "Frequency/level" window to add/remove it into group, click-and-drag the level mark to set it other value.
Click color buttons for change group hi/low level colors.

Grid effects is a group of software light effects, operating not with lights only, but also using it position on grid. It's like "Global effect" on some RGB keyboards, but have flexible controls and can have multiply trigger sources.
Each effect have trigger to initiate, position to start, type, and phase.
Then effect triggered, it's starting to change light colors from the trigger point according to direction, until it meet it's stop condition.
First, you should define trigger - the event which launch effect for selected zone. Currently, available triggers are:
- Off - grid effect disabled (default)
- Continues - grid effect always start at the beginning point of the zone (depend on its direction type), and continue to run until this setting or effect mode changed.
- Keyboard - grid effect start from the position of the light with the name same as pressed key, run one time then stop until key is pressed again.
- Event - grid effect start if one of monitoring event happened (see Event Monitoring tab) and continues until event off. Key codes for lights should be defined at "Devices" tab (pressing "Key" button for each light).
- Ambient - zone lights color follow screen color, like "Ambient" effect mode, other settings are ignored. It does not recommended to set it for more, then one zone.
Effect processing driven by phases, you can use "Global effect" slider to change phase length (default is 100ms, 10 changes per second).
Please keep in mind - the shorted length you set, the higher CPU load it will provide!
Effect types define how the zone should be changed (defined by point and width):
- Running light - Single color moving zone (Width define it's size).
- Wave - Color of moving zone fade to background on borders. Size is 2 x width.
- Gradient - Color from starting point to moving position is a gradient between active and background.
- Fill - Color from starting point to moving position is an active color.
- Star Field - Zone lights will emulate night sky view (blink randomly in and out).
- Fade - Color of moving zone fades between active and background (Width define how wide is the fade).
"Speed" slider is about how fast an effect runs (change it state). Possible value is from -80 (condition changed every 80 phases) to +80 (condition changed to 80 each phase).
"Width/Length" slider defines the width of the wave in lights, length of flat morph effect or how many star you see in sky for "Star filed" effect.
"Random position" check box select new random start point inside zone each time effect start/re-start.
"Circle" check box make effect round - effect reverse direction until initial state after reaching zone size limit.
"Colors" block into the middle define the color sequence used for zone grid effect.
First color are always default background color, the rest are used as a target points for the different effect phases.
Use "+" and "-" buttons to add/remove colors there.
Check boxes defines how colors will be used in phase sequence:
- "Per phase" - each new phase will use next color. If it off, effect will run full cycle with one color, then full cycle next one.
- "Keep background" - first color ("background") will be always used. Otherwise, previous color in sequence will be used as a background.
- "Random" - all colors will be randomized every new cycle.
If the zone Gauge settings have "Gradient" enabled, zone outside changed area will be filled with gradient color between background at borders and active color at changed area border.
If the zone Gauge type set to "Off", all zone lights will morph between background and active colors as phase changed ("width" slider defines how many grades it will have), otherwise gauge settings used for direction and style.

This tab dedicated to assign device lights and set it into grids, so it doesn't have Zones block.
Grids block is different, then other light tabs, it have some additional features:
- You can use sliders near grid to change it size.
- You can double-click grid name to edit it.
- You can use "+" and "-" tabs to add new grid/remove current one.
Top-left zone is about devices control - you can select device from list (double-click to change it's name).
You can see selected device parameters (IDs, number of assigned lights and API version - or "inactive" if device not connected now).
Pressing "Clear device" button removes all lights from current device, and, in case the device is in "inactive" status, remove it completely.
Press "Set white balance" button to change white color correction for selected device (useful for some old 4-bit-per-color devices). White balance will only works if "Gamma correction" setting is enabled.
Button block into the center is about settings management - press "Detect devices" to look for your devices into application database, use "Save Grids and Lights" and "Load Grids and Lights" to save/load current settings into .csv file (for backup or sharing).
Right zone controls assigned lights and currently selected light for selected device.
Rightmost is the list of all lights, defined for current device.
"Key" button provide dialog window to select current light name and key code by pressing any keyboard key. It's also will be done automatically in case per-key RGB device active. You can also set current light name typing it at name field.
4 buttons on top used for navigation between lights:
- "|<" (or press Shift+Home) - navigate to first assigned light of the current device.
- "<" (or Shift+Left) - select previous light (by ID).
- ">" (Shift+Right) - select next light (by ID).
- ">|" (and also Shift+End) - navigate to last assigned light of the current device.
Left from the lights list is selected light info and control:
- Physical light ID provided after "Selected Light:" mark
- "Reset" - Unassigns current light, delete it from all zones, clear it's name and parameters (forget light).
- Check boxes define light type - "Power button" marks light as a hardware power button (be careful, but app will provide you some hints about it), "Indicator" light set it as a status indicator (like Caps Lock, Wifi, HDD) - some systems use controlled lights for it.
Both Power button and indicators can be configured in settings to stay on then the rest of lights are off/dimmed. - "Highlight" button defines the color will be used for currently selected light - both for light grid and for physical light.
- "Key code" informs about keyboard button assigned to light - it will present button name or "Off" if not assigned. This key code used for grid effects trigger.
Other assigned lights will have random colors at grid and black color for physical lights.
Then you find light position at you physical device (it's highlighted), assign it to the grid - click or click-and drag at grid zone to do it.
Click again to remove grid sell from current light, right-click (or click-and-drag) to clear grid cell(s).
Left-click at already assigned cell to select corresponding light (and it's device).

Fan settings and BIOS power modes can be defined at this tab.
First, take a look at "Power mode" drop-down - it can control system predefined power modes. For manual fan control switch it to "Manual". You can edit mode name by selecting it and type new name.
First power mode always named "Manual", and the last power mode is a special one, named "G-mode" (if supported at you system). It's accelerate performance of the system, but set fans to maximal RPMs available.
Important: Fans can only be controlled if Power Mode set to "Manual", and will be defined by BIOS value at other modes!
"CPU mode" drop downs can be used to select active Windows Power Plan boost mode (separately for AC and battery power). This settings is extremely useful for Ryzen CPU, but even for Intel it provide a little performance boost (+3% at "Aggressive" for my gear).
"Temperature sensors" list present all hardware sensors found at your BIOS (some SSD sensors can absent into this list), and their current and maximal temperature values.
You can change sensor name by double-click on it. In case you remove sensor name (leaving it empty), it will be restored back to default BIOS one.
"Fans" list presents all fans found into the system and their current RPMs.
"Reset max." button above sensors list reset maximal temperature sensors value to current one.
"X" button above fans list REMOVE ALL CURVES (for all sensors) for currently selected fan.
"Check Max. boost" button will check possibility of currently selected fan to increase RPM even more, then 100% boost.
It will switch curve window to other mode - showing currently tested boost level and resulting RPM.
This process can take some minutes, window with final results will be shown after the process ends, and they be used lately for this fan.
You can press "Stop check" button at any time to stop max. boost check.
Press "Default boost" button at right to reset fan boost to BIOS default values.
There are "Fan curve" graph at the right. It shows currently selected fan temperature/boost curve, as well as current boost.
You will see current fan boost at the top if it, and the active fan control curve (green line). The rest of the sensors controlling the same fan marked as yellow dotted lines.
Big green and yellow dots present temperature and proposed boost set for every sensor controlling this fan, red one show current hardware boost settings an selected sensor temperature.
How to use it
First, select the Fan you want to control from left list.
Fan control is temperature sensor-driven, so select and check the sensors you want to use for fan control from sensors list.
After you doing this, currently selected fan settings will be shown at "Fan Curve" window - you will see current fan boost at the top, and the fan control curve for selected sensor (green line).
The rest of the sensors controlling the same fan marked as yellow dotted lines.
Big green and yellow dots present temperature and proposed boost set for every sensor controlling this fan, red one show current hardware boost settings an selected sensor temperature.
Now play with fan control curve - it defines fan boost by temperature level. X axle is temperature, Y axle is boost level.
You can left click (and drag until mouse button release) into the curve window to add point or select close point (if any) to move it.
You can click right mouse button at the graph point to remove it.
Please keep in mind:
- Fan control is indirect at modern systems. You can not set exact fan RPMs, but can modify it using "boost" curves.
- You can't remove first or last point of the curve.
- If you move first or last point, it will keep its temperature after button release - but you can set other boost level for it.
- Then fan controlled by multiply sensors, boost will be set to the maximal value across them.
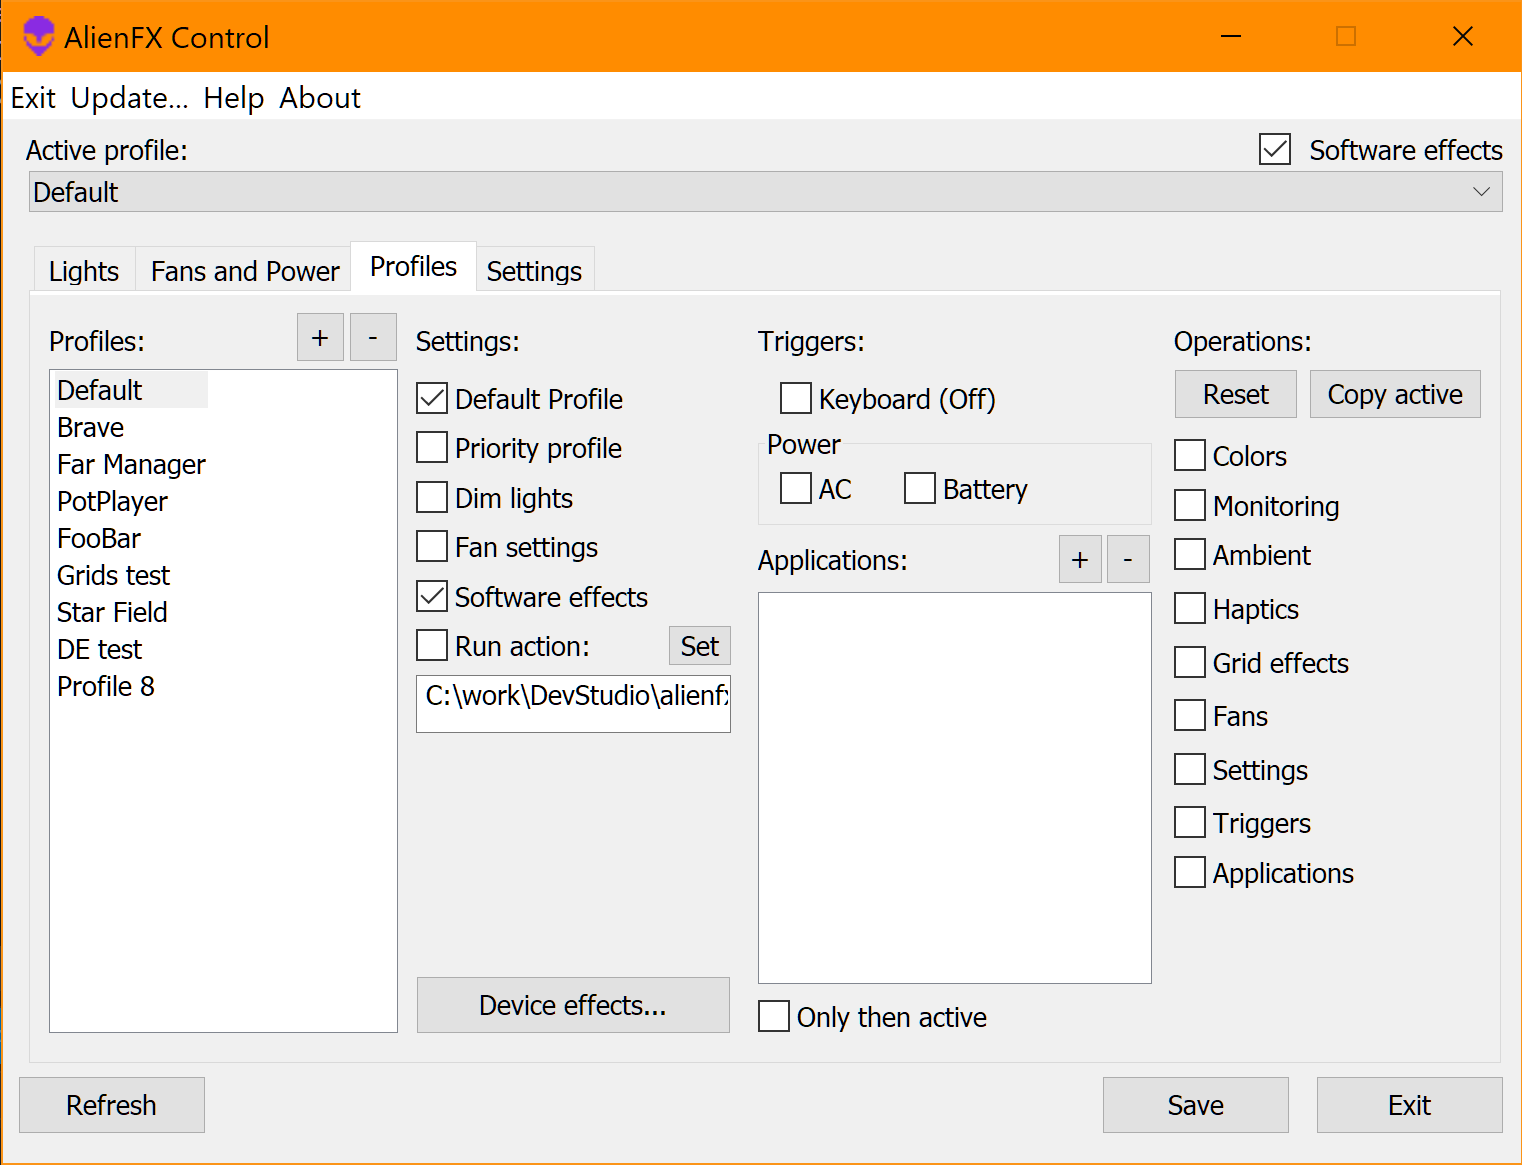
"Profiles" tab control profile settings, like selecting default profile, per-profile monitoring control and automatic switch to this profile then the defined application run.
Press "+" or "-" buttons to add or remove profile. New profile settings will be copied from currently selected profile.
You can double-click or press Enter on selected profile into the list to edit its name.
Each profile can have settings and triggers switching to it.
The settings are:
- "Default profile" - Default profile is the one used if "Profile auto switch" enabled, but running applications doesn't fit any other profile. There is can be only one Default profile, and it can't be deleted.
- "Priority profile" - If this flag enabled, this profile will be chosen upon others. Priority profile overrides "Only then active" setting of the other profiles.
- "Dim lights" - Then profile activated, all lights will be dimmed.
- "Fan settings" - If selected, profile also keep fan control settings and restore it then activated.
- "Software effects" - Enables or disables software effects for selected profile.
"Device effects" button open profile settings for device effect (supported for some devices like RGB keyboards):

At this dialog, you can select device supporting per-device effects and set it parameters - types, colors, tempo, color mode.
APIv5 (per-key RGB notebook keyboards) support hardware effect, APIv8 (external keyboards) support both hardware and key press effects.
The next block is "Triggers" - it define cases app should switch to this profile if "Profile auto switch" turned on at "Settings".
- "Keyboard" check box define this profile can be switched by pressing keyboard key. Upon selected, it will provide key selection dialog to choose the key.
- "Power" block - if checked, profile will be activated if power source changed to checked state.
- "Trigger applications" list define applications executable, which will activate selected profile. Press "+" button to select new application, or select one from the list and press "-" button to delete it.
- "Only then active" - profile will be activated in case of any application running and foreground (active) and have focus only.
The block operated by "Reset" and "Copy active" buttons used to clear or copy selected profile settings.
Check all types of information you need to operate (colors, effects or fan settings), then press "Reset" button to remove it from selected profile, or "Copy active" button to copy it from active (selected in top drop down box) profile.
In case "Profile auto switch" turned on at "Settings", active profile will be selected automatically according to this rules:
- If any "Trigger application" from any profile running - "Default" profile selected.
- If any "Trigger application" from profile with "Priority" setting running - this profile will be selected.
- If any "Trigger application" from profile running, and it doesn't have "Only when active" trigger, this profile selected (random one of them if more, then one application found in many).
- If foreground application is one of the "Trigger application" of the profile with "Only when active" flag, and no other application belongs to profile with "Priority" flag running, this profile will be selected.
- Pressing a key or changing power source will always select first profile with this triggers active. It will stay active until other profile switch happened (or the key released).

Global application and light system settings collected into this tab.
Application behavior control block at right:
- "Start with Windows" - Start application at Windows start. It will not work if application request run as admin level (see below) (default - off).
- "Check for update" - Enables online update check (default - on).
- "Start minimized" - Hide application window in system tray after start (default - off).
- "Keyboard shortcuts" - Enables global keyboard hotkeys (default - on).
- "Disable AWCC" - Application will check active Alienware Control Center service at the each start and will try to stop it (and start back upon exit). It will require "Run as administrator" privilege (default - off).
- "Use BIOS sensors" - Read additional hardware data from Windows WMI and Alienware BIOS (if fan control enabled). It will require "Run as administrator" privilege (default - off).
- "Enable fan control" - Enables fan and power control functionality, as well as some additional (Alienware BIOS) temperature sensors. It will require "Run as administrator" privilege (default - off).
- "Restore power mode" - System power mode will be stored at application start and restored at quit/sleep/hibernate/restart.
- "Light names on grid" - Shows/hide light names at grid buttons (default - off).
Light system control options at the left:
- "Turn on lights" - Global light control system switch. All lights will be off and black if disabled (default - on).
- "Keep Power/indicator on" - Power and Indicator lights stay on even if lights turned off (default - on).
- "Lights follow screen state" - Dim/Fade to black lights then system screen dimmed/off (default - off).
- "Colour Gamma correction" - Enables colour correction to make them looks close to screen one. It keeps original LED colours if disabled (default - on).
- "Enable software effects" - Global software effect switch. If it's off, effects always disabled, otherwise effect mode defined by current profile (default - on).
- "Profile auto switch" - Switch between profiles according of their trigger applications start and finish (default - off).
- "Do not switch for desktop" - Profile will not be changed in case start menu/tray/desktop activated by user (default - off).
Light dimming control at left-bottom:
- "Dim lights" - Dim system lights brightness to desired level (default - off). Slider at the right select desired dimming level (left - high dimming, right - low dimming).
- "Dim Power/Indicator lights" - Power Button and Indicator lights will be dimmed as well - and have full brightness otherwise (default - off).
Battery operations (power save options) at right-bottom:
- "Turn off lights" - Lights will turned off at battery power (default - off).
- "Dim lights" - Dim lights if system running at battery power (default - on).
- "Pause Fan control" - Fan control and monitoring will be stopped at battery power (default - off).
- "Pause Effects" - Software effects will be stopped at battery power (default - off).
Interface settings:
- "Light names on grid" - Shows/hide light names at grid buttons.
Global shortcuts (can be operated if application running):
- CTRL+SHIFT+F12 - enable/disable lights.
- CTRL+SHIFT+F11 - enable/disable light dimming.
- CTRL+SHIFT+F10 - enable/disable software effects.
- CTRL+SHIFT+F9 - enable/disable profile auto switch.
- CTRL+SHIFT+[+] - increase lights brigtness
- CTRL+SHIFT+[-] - decrease lights brightness
- CTRL+SHIFT+0..9 - switch active profile to profile #N (profile order is the same as at "Profiles" tab). "0" is switch to default profile.
- CTRL+ALT+0..9 - switch active power mode (in case fan control enabled). 0 is for Manual, 1..9 for system-defined modes.
- F18 (Fn+AlienFX) - cycle light mode (on-dim-off).
- F17 (Fn+G-key) - toggle G-Mode on and off ("Fan control" should be enabled).
Other shortcuts (operating then application active):
- ALT+r - refresh all light colors
- ALT+m - minimize app window
- ALT+s - save configuration
- ALT+? - open this help page
- ALT+/ - about application
- ALT+x - quit
- Application can freeze at first start for some seconds in case you have Intel CPU. It's normal situation, application trying to obtain Intel sensor names.
- Hardware light effects like breathing, spectrum, rainbow only supported for APIv4 (Tron) lights.
- Hardware light effects and global effect didn't work with software effects at the same time for APIv4-v5 (hardware design limitation). Disable software effects to use it.
- DirectX12 games didn't allow access to GPU or frame, so
Ambienteffect will not work, and GPU load will not be correct. - Setting a hardware power button light, especially for events, can provide hardware light system acting slow right after color update - next updates will be delayed.
- Fans can only be controlled in "Manual" mode (BIOS limitation), all other modes utilize BIOS-defined control values.
- Some BIOSes limit fan RPMs to lower values under heavy system load (Power subsystem have not enough reserves for fans).
- In case BIOS drives mode set to "Raid", SSD temperatures into fan control will be fake (always 60C) at some systems.
- It's strongly recommend stopping AWCCService if you plan to use application with "Power Button" related features. Keeping it working can provide unexpected results up to light system freeze.
- There is a well-known bug in DirectX at the Hybrid graphics (Intel+Nvidia) notebooks, preventing the
Ambienteffect from capturing the screen. If you have only one screen (notebook panel) connected but set Nvidia as a "Preferred GPU" in the Nvidia panel, please addalienfx-guiwith "integrated GPU" setting at "Program settings" for the same monitor. It will not work at the default setting in this case.