| id | title | description | keywords | |||||
|---|---|---|---|---|---|---|---|---|
xrc721-token-truffle |
XRC721 using Truffle |
Use Truffle to deploy an XRC721 Token. |
|
- 🧭 Table of contents
- 📰 Overview
- 🚀 Setting up the development environment
- 💵 Writing our first XRC721 Token
- 🔍 Veryfing Contracts on the Block Explorer
- 🔍 Interacting with your contract on the Block Explorer
Truffle is a blockchain development environment, which you can use to create and test smart contracts by levering an Ethereum Virtual Machine.
In this tutorial, you will learn how to set up Truffle and use it to build, test and deploy a XRC721 Token on both the XDC Network mainnet and XDC Apothem testnet.
- Install and setup Truffle
- Create an XRC721 token
- Compile the XRC721 token
- Deploy the XRC721 token
- Interact with the XRC721 token
- Check the deployment status on xinfin.network
XRC721 is a set of rules to standardize assets on the XinFin network. Every XRC721 Token must be able to execute the following methods:
safeTransferFrom(address from, address to, uint256 tokenId)transferFrom(address from, address to, uint256 tokenId)approve(address to, uint256 tokenId)getApproved(uint256 tokenId)setApprovalForAll(address operator, bool _approved)isApprovedForAll(address owner, address operator)
These are the minimum required methods that allow an asset on the XinFin network to be called an XRC721 token. Also, a XRC721 token must be able to emit the following Events on the blockchain:
Approval(address indexed owner, address indexed approved, uint256 indexed tokenId)Transfer(address indexed from, address indexed to, uint256 indexed tokenId)ApprovalForAll(address indexed owner, address indexed operator, bool approved)
Events are helpers that come in handy in the exhaustive labor of indexing state changes, and they are essential to off-chain applications to find relevant data on the blockchain. By mapping all Transfer events, for example, we can fetch all the historic data on token transfers more easily.
Last but not least, a few contract constants that are public that are also very important to have are:
namesymbol
Without these public constants, it would be impossible to label tokens on block explorers, for example. In this tutorial we will deploy a XRC721 token that have all the Methods, Events and Constants mentioned above.
There are a few technical requirements before we start. Please install the following:
- Node.js v8+ LTS and npm (comes with Node)
- Git
Once we have those installed, we only need one command to install Truffle:
npm install -g truffleTo verify that Truffle is installed properly, type truffle version on a terminal. You should see something like:
Truffle v5.5.27 (core: 5.5.27)
Ganache v7.4.0
Solidity v0.5.16 (solc-js)
Node v16.16.0
Web3.js v1.7.4
If you see an error instead, make sure that your npm modules are added to your path.
Lets start by setting up our folder, we are creating a project called XRC721, create a new XRC721 folder by running on terminal
mkdir XRC721 && cd XRC721And running truffle init. If truffle is correctly installed on your local environment, you should see the following message:
Starting init...
================

> Copying project files to /home/your/path/to/XRC721

Init successful, sweet!

Try our scaffold commands to get started:
  $ truffle create contract YourContractName # scaffold a contract
  $ truffle create test YourTestName         # scaffold a test

http://trufflesuite.com/docs
And your folder files will look like this:

In order to get started deploying new contracts on XDC Mainnet and/or Apothem, we need to install two new dependencies that will be used in the truffle-config.js file. These dependencies are @truffle/hdwallet-provider and dotenv. First choose your preferred package manager. In this example we are using yarn but you can also use npm.
If you never used yarn before, you might need to install it first.
npm install --global yarnInitialize your package manager on your folder and install the required dependencies:
yarn init -y
yarn add @truffle/hdwallet-provider dotenv
You will also need a 24-Word Mnemonic Phrase. To configure your wallet, create a new .env file and write your mnemonic by running:
touch .env
echo MNEMONIC=arm derive cupboard decade course garlic journey blast tribe describe curve obey >> .env
Remember to change the 24-Word Mnemonic above for your own mnemonic. The contents of your .env file should read as follow:
MNEMONIC=arm derive cupboard decade course garlic journey blast tribe describe curve obey🚨 Do not use the mnemonic in the example above in production or you can risk losing your assets and/or the ownership of your smart contracts! 🚨
And finally, we can configure the truffle-config.js file for both Apothem and XinFin Networks by writting:
require('dotenv').config();
const { MNEMONIC } = process.env;
const HDWalletProvider = require('@truffle/hdwallet-provider');

module.exports = {

  networks: {

    xinfin: {
      provider: () => new HDWalletProvider(
        MNEMONIC,
        'https://erpc.xinfin.network'),
      network_id: 50,
      gasLimit: 6721975,
      confirmation: 2,
    },

    apothem: {
      provider: () => new HDWalletProvider(
        MNEMONIC,
        'https://erpc.apothem.network'),
      network_id: 51,
      gasLimit: 6721975,
      confirmation: 2,
    }
  },

  mocha: {
  },

  compilers: {
    solc: {
      version: "0.8.16",
    }
  },
};It is possible to list all XDC addresses bound to your mnemonic on truffle by accessing the truffle console:
truffle console --network xinfinOnce the truffle console CLI opens, you can run:
truffle(xinfin)> accountsAnd the console should log all accounts bound to your mnemonic phrase as follow:
[
  '0xA4e66f4Cc17752f331eaC6A20C00756156719519',
  '0x0431d52FE37F3839895018272dfa3bA189fcE07E',
  '0x11A6D9727c16064950473a4c8A92dC294190f7fF',
  '0x4464DDF9969E9a8e5CfF02E3706AEB4ccA92A314',
  '0xFa73bE6AA126DEC47ce14a22B7BAaF8BAFaB59Fb',
  '0xEdFFc4e7476f05f43cA3e6f5784349dE6E6373D5',
  '0x07795c732Bb013165FADCE64B884bf9971Bf9636',
  '0x5dF551A53bEaAB8bb2307eF459aA5AAFbb5F73cc',
  '0x910435b01e6Aa66dE22769062998F6AE98566f23',
  '0x573b009b2dE9A95531f82DA10BB0D793050329d2'
]
These accounts are on the Ethereum standard format starting with 0x, but we can simply switch 0x for xdc. By default, the deployment account is the first account from the list above: xdcA4e66f4Cc17752f331eaC6A20C00756156719519.
With this account in hand, we can head to the Apothem Faucet and claim some TXDC for development purposes:

The source code for the XRC721 Token used in this tutorial is available here: XRC721 Contract Folder. But we will address all Events, Methods and Constants mentioned in the section 📰 About XRC721 Tokens.
Lets start by creating the XRC721.sol file:
touch ./contracts/XRC721.solAnd write the shell of our smart contract by writing:
// SPDX-License-Identifier: MIT
pragma solidity ^0.8.0;

contract XRC721 {

}Inside our contract, we would be importing the scripts from OpenZeppelin Github repository. These form the foundation for our contract which is having all the code of different functions which needs to be implemented in our contract. We are also importing the Counters from OpenZeppelin Github repository which is used to keep account of the counter of the current tokenId.
First we have to import OpenZeppelin using this command:
npm i @openzeppelin/contractsThen we have to import both ERC721 and Counters contract to our code:
// SPDX-License-Identifier: MIT
pragma solidity ^0.8.16;

import "@openzeppelin/contracts/token/ERC721/ERC721.sol";
import "@openzeppelin/contracts/utils/Counters.sol";

contract XRC721 is ERC721 {
    using Counters for Counters.Counter;
    Counters.Counter private _tokenIds;

}As mentioned in 📰 About XRC721 Tokens. Events are very important part of a Smart Contract logic. Events have indexed variables that are variables that can be filtered by off-chain interfaces. We might be tempted to index all the variables that are tied to an on-chain event, however we can't go crazy about it since Solidity has a maximum of 3 indexed variable limitation for Events. Lets see how Transfer, Approval and ApprovalForAll are written in OpenZeppelin in a simpler form.
contract IXRC721 {
  event Transfer(address indexed from, address indexed to, uint256 indexed tokenId);

  event Approval(address indexed owner, address indexed approved, uint256 indexed tokenId);

  event ApprovalForAll(address indexed owner, address indexed operator, bool approved);

  // Mapping from token ID to owner
  mapping(uint256 => address) private _tokenOwner;

  // Mapping from owner to number of owned token
  mapping(address => Counters.Counter) private _ownedTokensCount;

  // Mapping from token ID to approved address
  mapping(uint256 => address) private _tokenApprovals;

  // Mapping from owner to operator approvals
  mapping(address => mapping(address => bool)) private _operatorApprovals;

  /* @dev Returns the number of NFTs in `owner`'s account. */
  function balanceOf(address owner) public view returns (uint256) {
      require(owner != address(0), "XRC721: balance query for the zero address");
      return _ownedTokensCount[owner].current();
  }

  /* @dev Returns the owner of the NFT specified by `tokenId`.*/
  function ownerOf(uint256 tokenId) public view virtual returns (address) {
      address owner = _owners[tokenId];
      require(owner != address(0), "ERC721: owner query for nonexistent token");
      return owner;
  }

  * - If the caller is not `from`, it must be have been allowed to move this
  * NFT by either {approve} or {setApprovalForAll}.
  */
  function safeTransferFrom(address from, address to, uint256 tokenId, bytes memory _data) public {
      require(_isApprovedOrOwner(_msgSender(), tokenId), "XRC721: transfer caller is not owner nor approved");
      _safeTransferFrom(from, to, tokenId, _data);
  }

  function transferFrom(address from, address to, uint256 tokenId) public {
      //solhint-disable-next-line max-line-length
      require(_isApprovedOrOwner(_msgSender(), tokenId), "XRC721: transfer caller is not owner nor approved");
      _transferFrom(from, to, tokenId);
  }

  function _approve(address to, uint256 tokenId) internal virtual {
      _tokenApprovals[tokenId] = to;
      emit Approval(ownerOf(tokenId), to, tokenId);
  }

  function getApproved(uint256 tokenId) public view returns (address operator) {
      require(_exists(tokenId), "ERC721: approved query for nonexistent token");

      return _tokenApprovals[tokenId];
  }

  function setApprovalForAll(address to, bool approved) public {
      require(to != _msgSender(), "XRC721: approve to caller");
      _operatorApprovals[_msgSender()][to] = approved;
      emit ApprovalForAll(_msgSender(), to, approved);
  }

  function isApprovedForAll(address owner, address operator) public view virtual returns (bool) {
      return _operatorApprovals[owner][operator];
  }
}
We do not need to write this code in our contract. It is already implemented with the OpenZeppelin github repository.
We need to create the constructor that is a function called only once when the contract is deployed, where we can parse as arguments information such as the token name and symbol. We would also create another function createToken which will take an address and mint our created XRC721 NFT Token to that address:
// SPDX-License-Identifier: MIT
pragma solidity ^0.8.16;

import "@openzeppelin/contracts/token/ERC721/ERC721.sol";
import "@openzeppelin/contracts/utils/Counters.sol";

contract XRC721 is ERC721 {
    using Counters for Counters.Counter;
    Counters.Counter private _tokenIds;

    constructor(string memory _name, string memory _symbol) ERC721(_name, _symbol) {
    }

    function createToken(address tokenOwner) public returns (uint256) {
        _tokenIds.increment();
        uint256 newItemId = _tokenIds.current();
        _mint(tokenOwner, newItemId);
        return newItemId;
    }
}
And here we have implemented everything we needed to make our token compliant with the XRC721 Standard. Of course there are more features we can implement to this contract, such as the SafeMath library that replace naive mathematical operations for methods that will avoid underflows and overflows, and supply management methods such as mint and burn.
We can compile our XRC721.sol by running:
truffle compileIf everything is correctly configured and there is no errors, you should see the following message on your console:
Compiling your contracts...
===========================
> Compiling @openzeppelin\contracts\token\ERC721\ERC721.sol
> Compiling @openzeppelin\contracts\token\ERC721\IERC721.sol
> Compiling @openzeppelin\contracts\token\ERC721\IERC721Receiver.sol
> Compiling @openzeppelin\contracts\token\ERC721\extensions\IERC721Metadata.sol
> Compiling @openzeppelin\contracts\utils\Address.sol
> Compiling @openzeppelin\contracts\utils\Context.sol
> Compiling @openzeppelin\contracts\utils\Counters.sol
> Compiling @openzeppelin\contracts\utils\Strings.sol
> Compiling @openzeppelin\contracts\utils\introspection\ERC165.sol
> Compiling @openzeppelin\contracts\utils\introspection\IERC165.sol
> Compiling .\contracts\XRC721.sol
> Artifacts written to E:\XDC-Documentation\XRC721\Truffle\XRC721\build\contracts
> Compiled successfully using:
   - solc: 0.8.16+commit.07a7930e.Emscripten.clang
And your folder should look like this:
In order to deploy our newly compiled contract artifacts to the blockchain, we need to create a deployment script into the migrations folder:
touch ./migrations/1_token_migration.jsAnd write the following migration script to the 1_token_migration.js file:
const XRC721Token = artifacts.require("XRC721");

const NAME = "MyToken";
const SYMBOL = "MTK";

module.exports = function (deployer) {
    deployer.deploy(XRC721Token, NAME, SYMBOL);
}
If the migration script have no errors, we can go ahead and run the command:
truffle migrate --network xinfinFor deployment on XDC mainet, or:
truffle migrate --network apothemFor deployment on the XDC Apothem Testnet. In either case, you need to have enough funds to pay for gas fees on the address that is being used for development.
If the deployment is sucessful, the console should log the following message after migrations complete processing:
1_token_migration.js
====================

   Deploying 'XRC721Token'
   ----------------------
   > transaction hash:    0x5cc1de32af041ff64ec2a4cef503b31ac996ae56dc33338d473ba04775492136
   > Blocks: 2            Seconds: 5
   > contract address:    0x53bA8Cb12EaF09E6B0b671F39ac4798A6DA7d660
   > block number:        50472279
   > block timestamp:     1663446177
   > account:             0xA4e66f4Cc17752f331eaC6A20C00756156719519
   > balance:             24.511102145
   > gas used:            1121906 (0x111e72)
   > gas price:           0.25 gwei
   > value sent:          0 ETH
   > total cost:          0.0002804765 ETH

   > Saving artifacts
   -------------------------------------
   > Total cost:        0.0002804765 ETH

Summary
=======
> Total deployments:   1
> Final cost: 0.0002804765 ETHOnce you have successfully deployed your smart contract to the blockchain, it might be interesting to verify you contract on XinFin Block Explorer.
First lets check the address our contract is deployed to by running:
truffle networksIf you have a contract already deployed, the console should log something like this:
Network: apothem (id: 51)
  No contracts deployed.

Network: xinfin (id: 50)
  XRC721Token: 0x53bA8Cb12EaF09E6B0b671F39ac4798A6DA7d660
Here we have a XRC721 contract deployed on XDC Mainnet at the 0x53bA8Cb12EaF09E6B0b671F39ac4798A6DA7d660. This address is in the Ethereum standard but we can simply swap the 0x prefix for xdc and search for our newly deployed contract on XinFin Block Explorer:

And click in the Verify And Publish Option.
We will be redirected to the Contract verification page where we need to fill out:
- Contract Name: XRC721Token
- Compiler: Check your
truffle-config.jsfile for Compiler Version - Contract Code: Just paste everything from your
MyToken.solfile
Once everything is filled out, press Submit!

If everything is correctly filled out, your contract page on the block explorer should display a new tab called Contract:

We can check for the minted token by going to our XDCPay Wallet and clicking on the Tokens tab and click on the Add Token button.

Then we have to add the deployed contract address on the Token Address text field. This will automatically fetch the token symbol. Then click on the Add Token button.
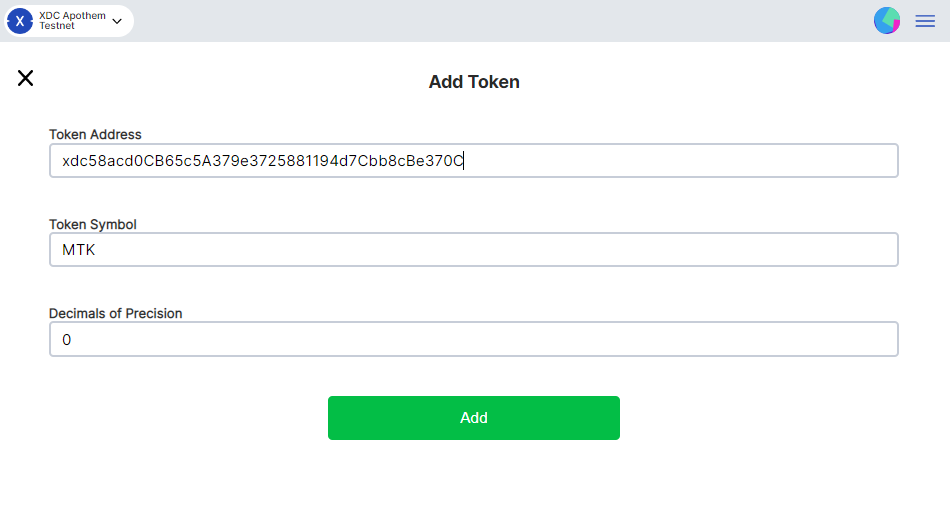
Add our newly minted token is available in our wallet.

And we can check our successful transaction on the Block Explorer!
For more information about Truffle Suite, Please Visit Truffle Suite Documentation.
For more information about XinFin Network, Please Visit XDC Network Documentation on GitBook.