
Whaler-api is a Go application backend serving up REST and GraphQL endpoints for the Whaler client app. WebSockets are used to power custom real-time collaborative note taking and real-time model updates.
Whaler is a platform consisting of a native Mac app (Whaler) and a heroku-hosted backend. The goal is to enable real time sales outreach collaboration right on top of the organization's Salesforce data. This is accomplished by allowing the user to sign in to their organization's Salesforce, importing subsets of their data into the frontend app, and enhancing that data with additional constructs that power our features.
These features include:
- Kanban-style progress tracking for accounts and contacts
- Assign accounts, contacts, and tasks to users within your organization
- Per-account tasks feature with ability to create, edit, set due date, and complete tasks
- Real time collaborative editor for account notes, communicating over websockets with operational transform conflict resolution
- Real time data model updates over websockets
Because a picture speaks a thousand words, here are a few key pages within the app:

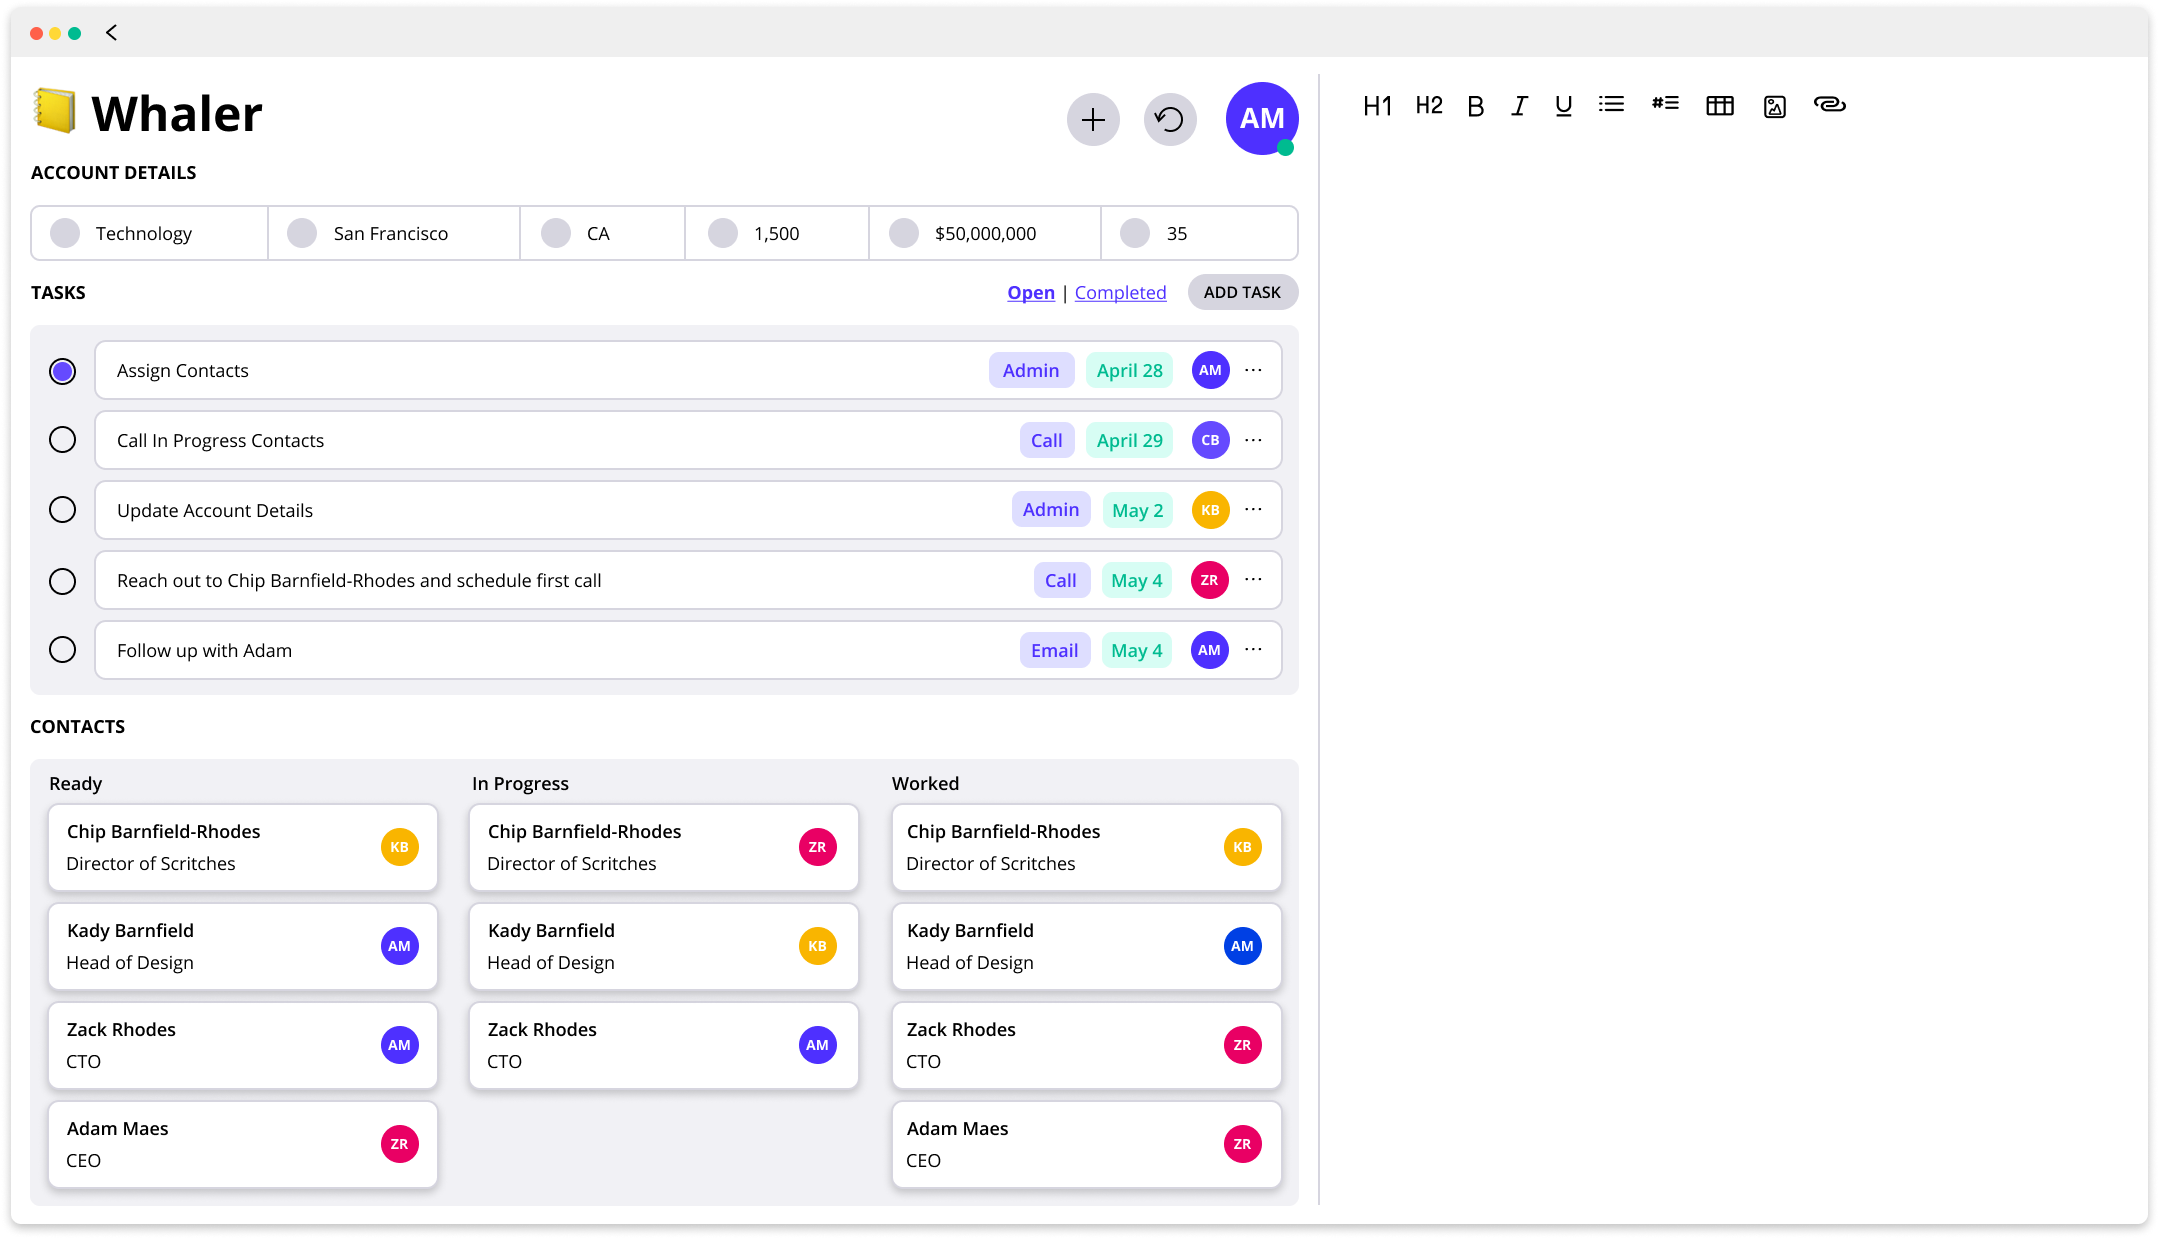
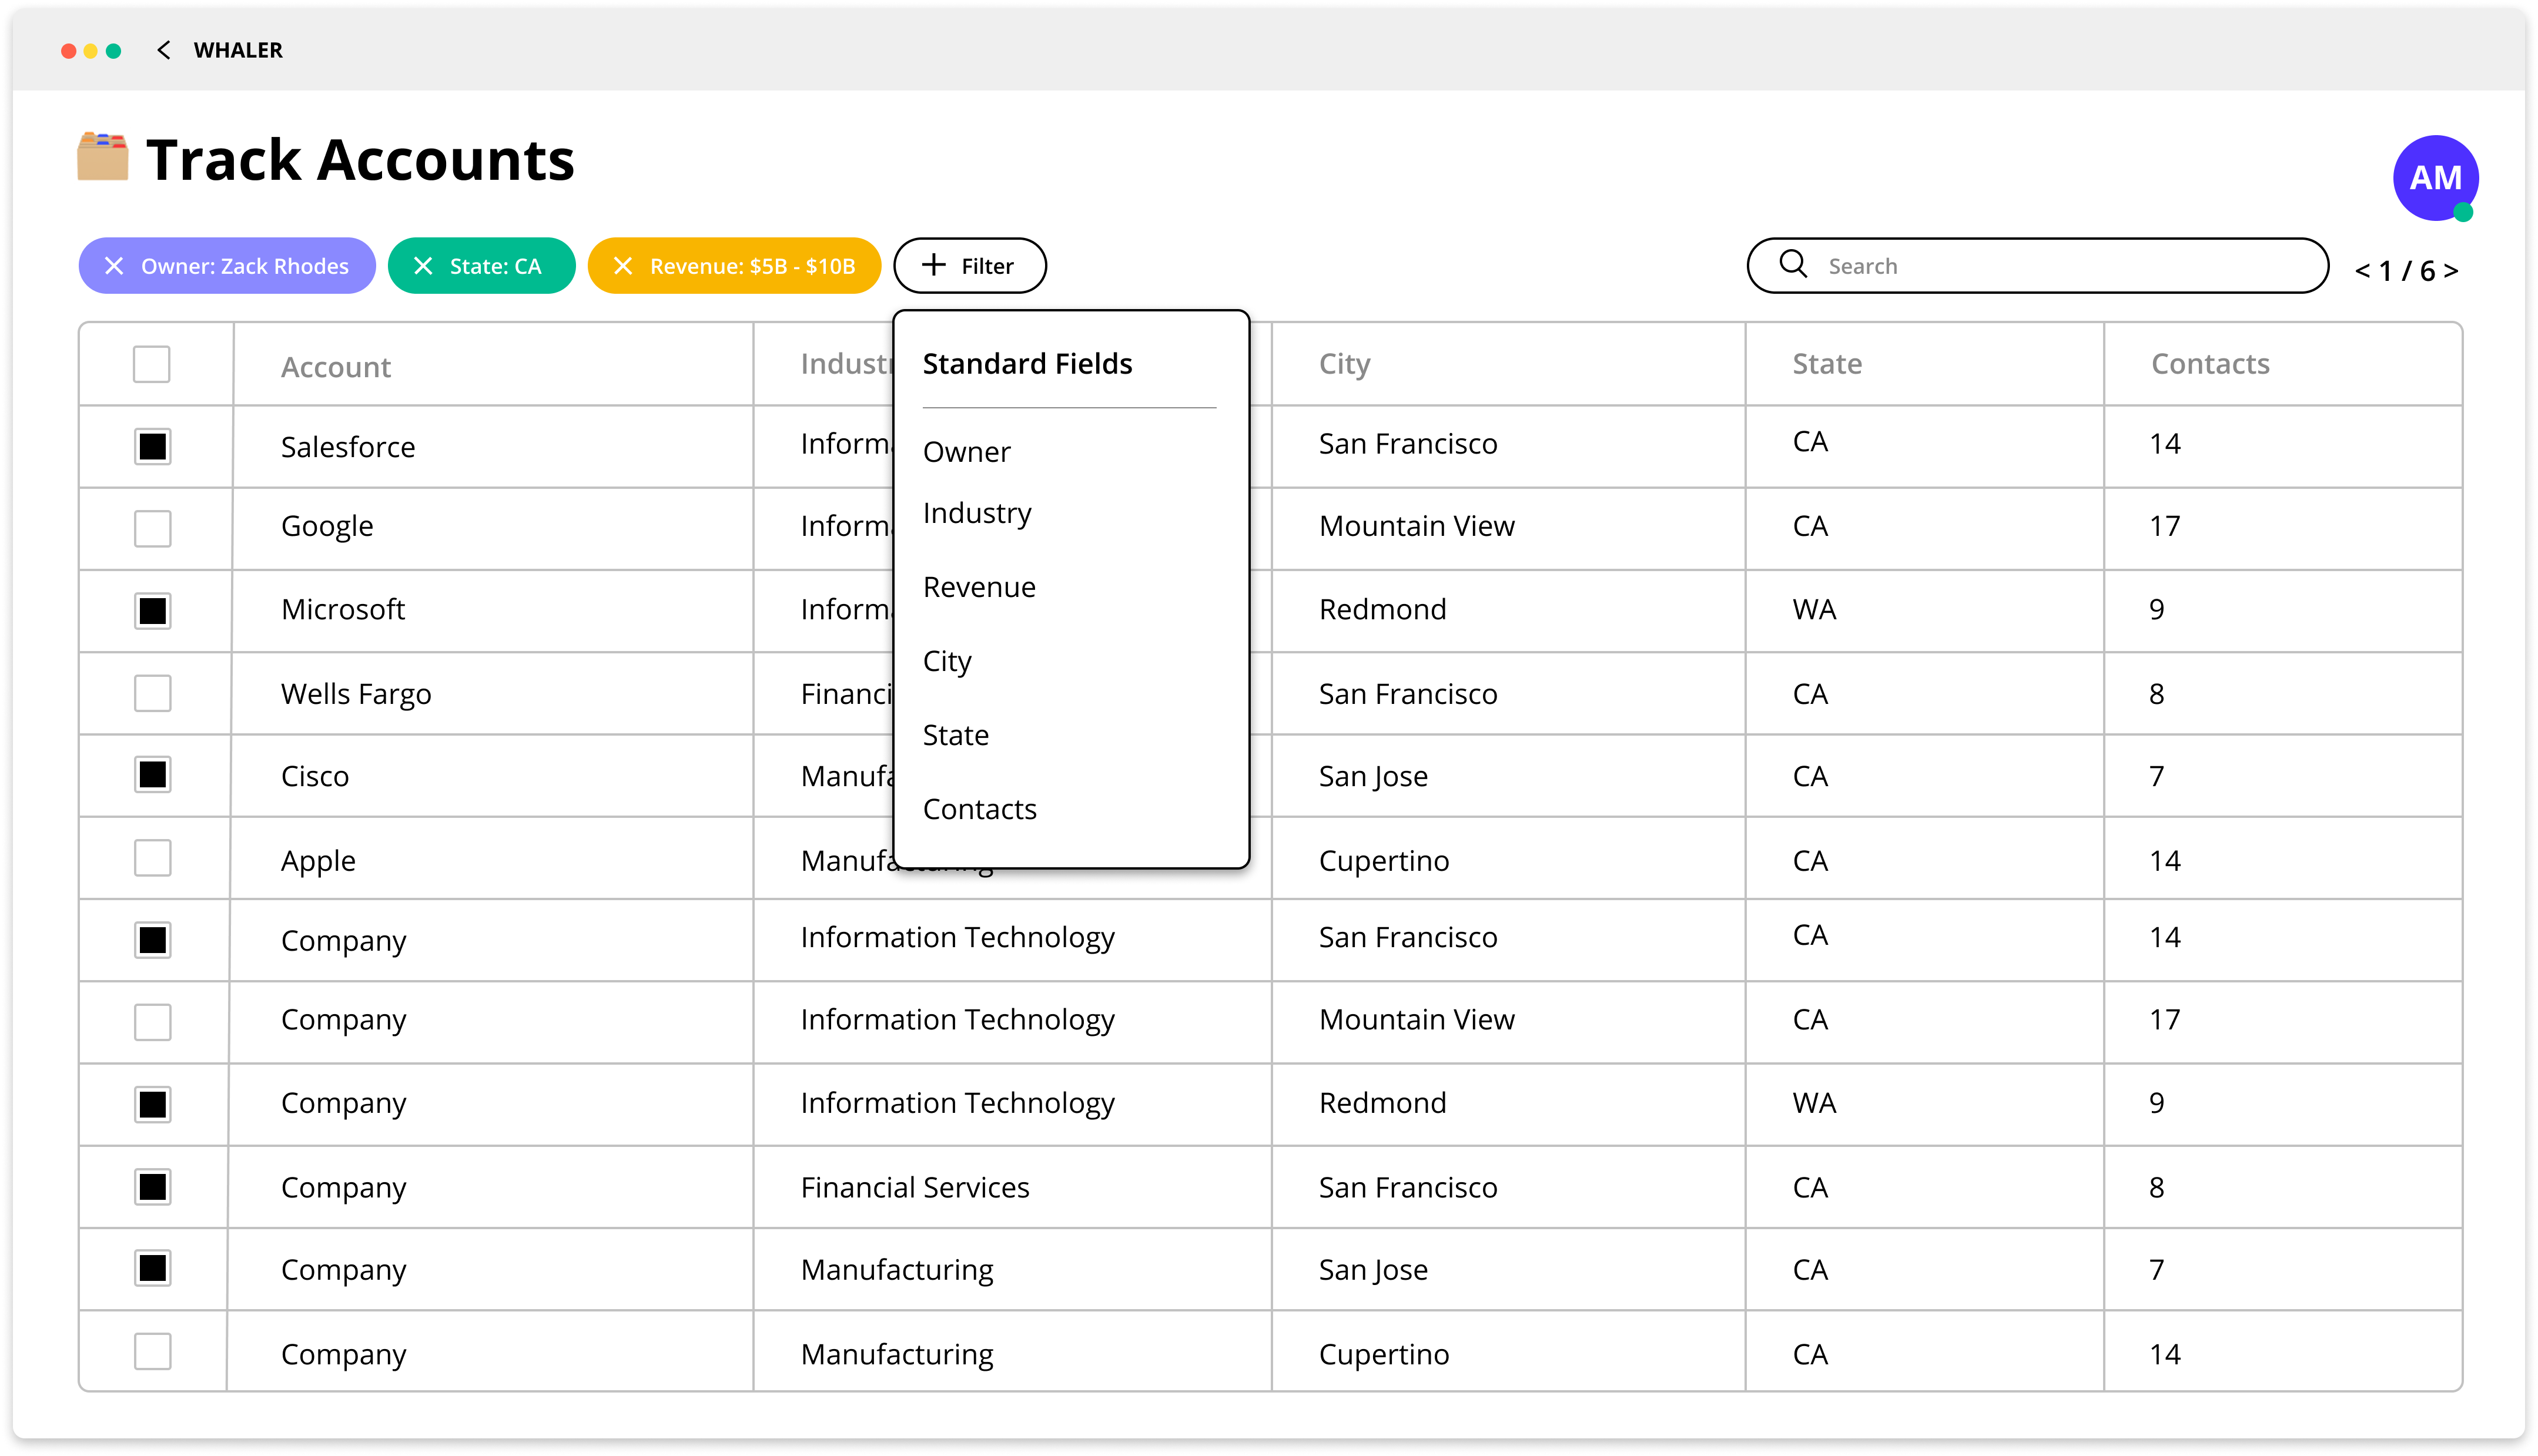
Looking at the whole picture, this repo consists of the left half of this diagram:
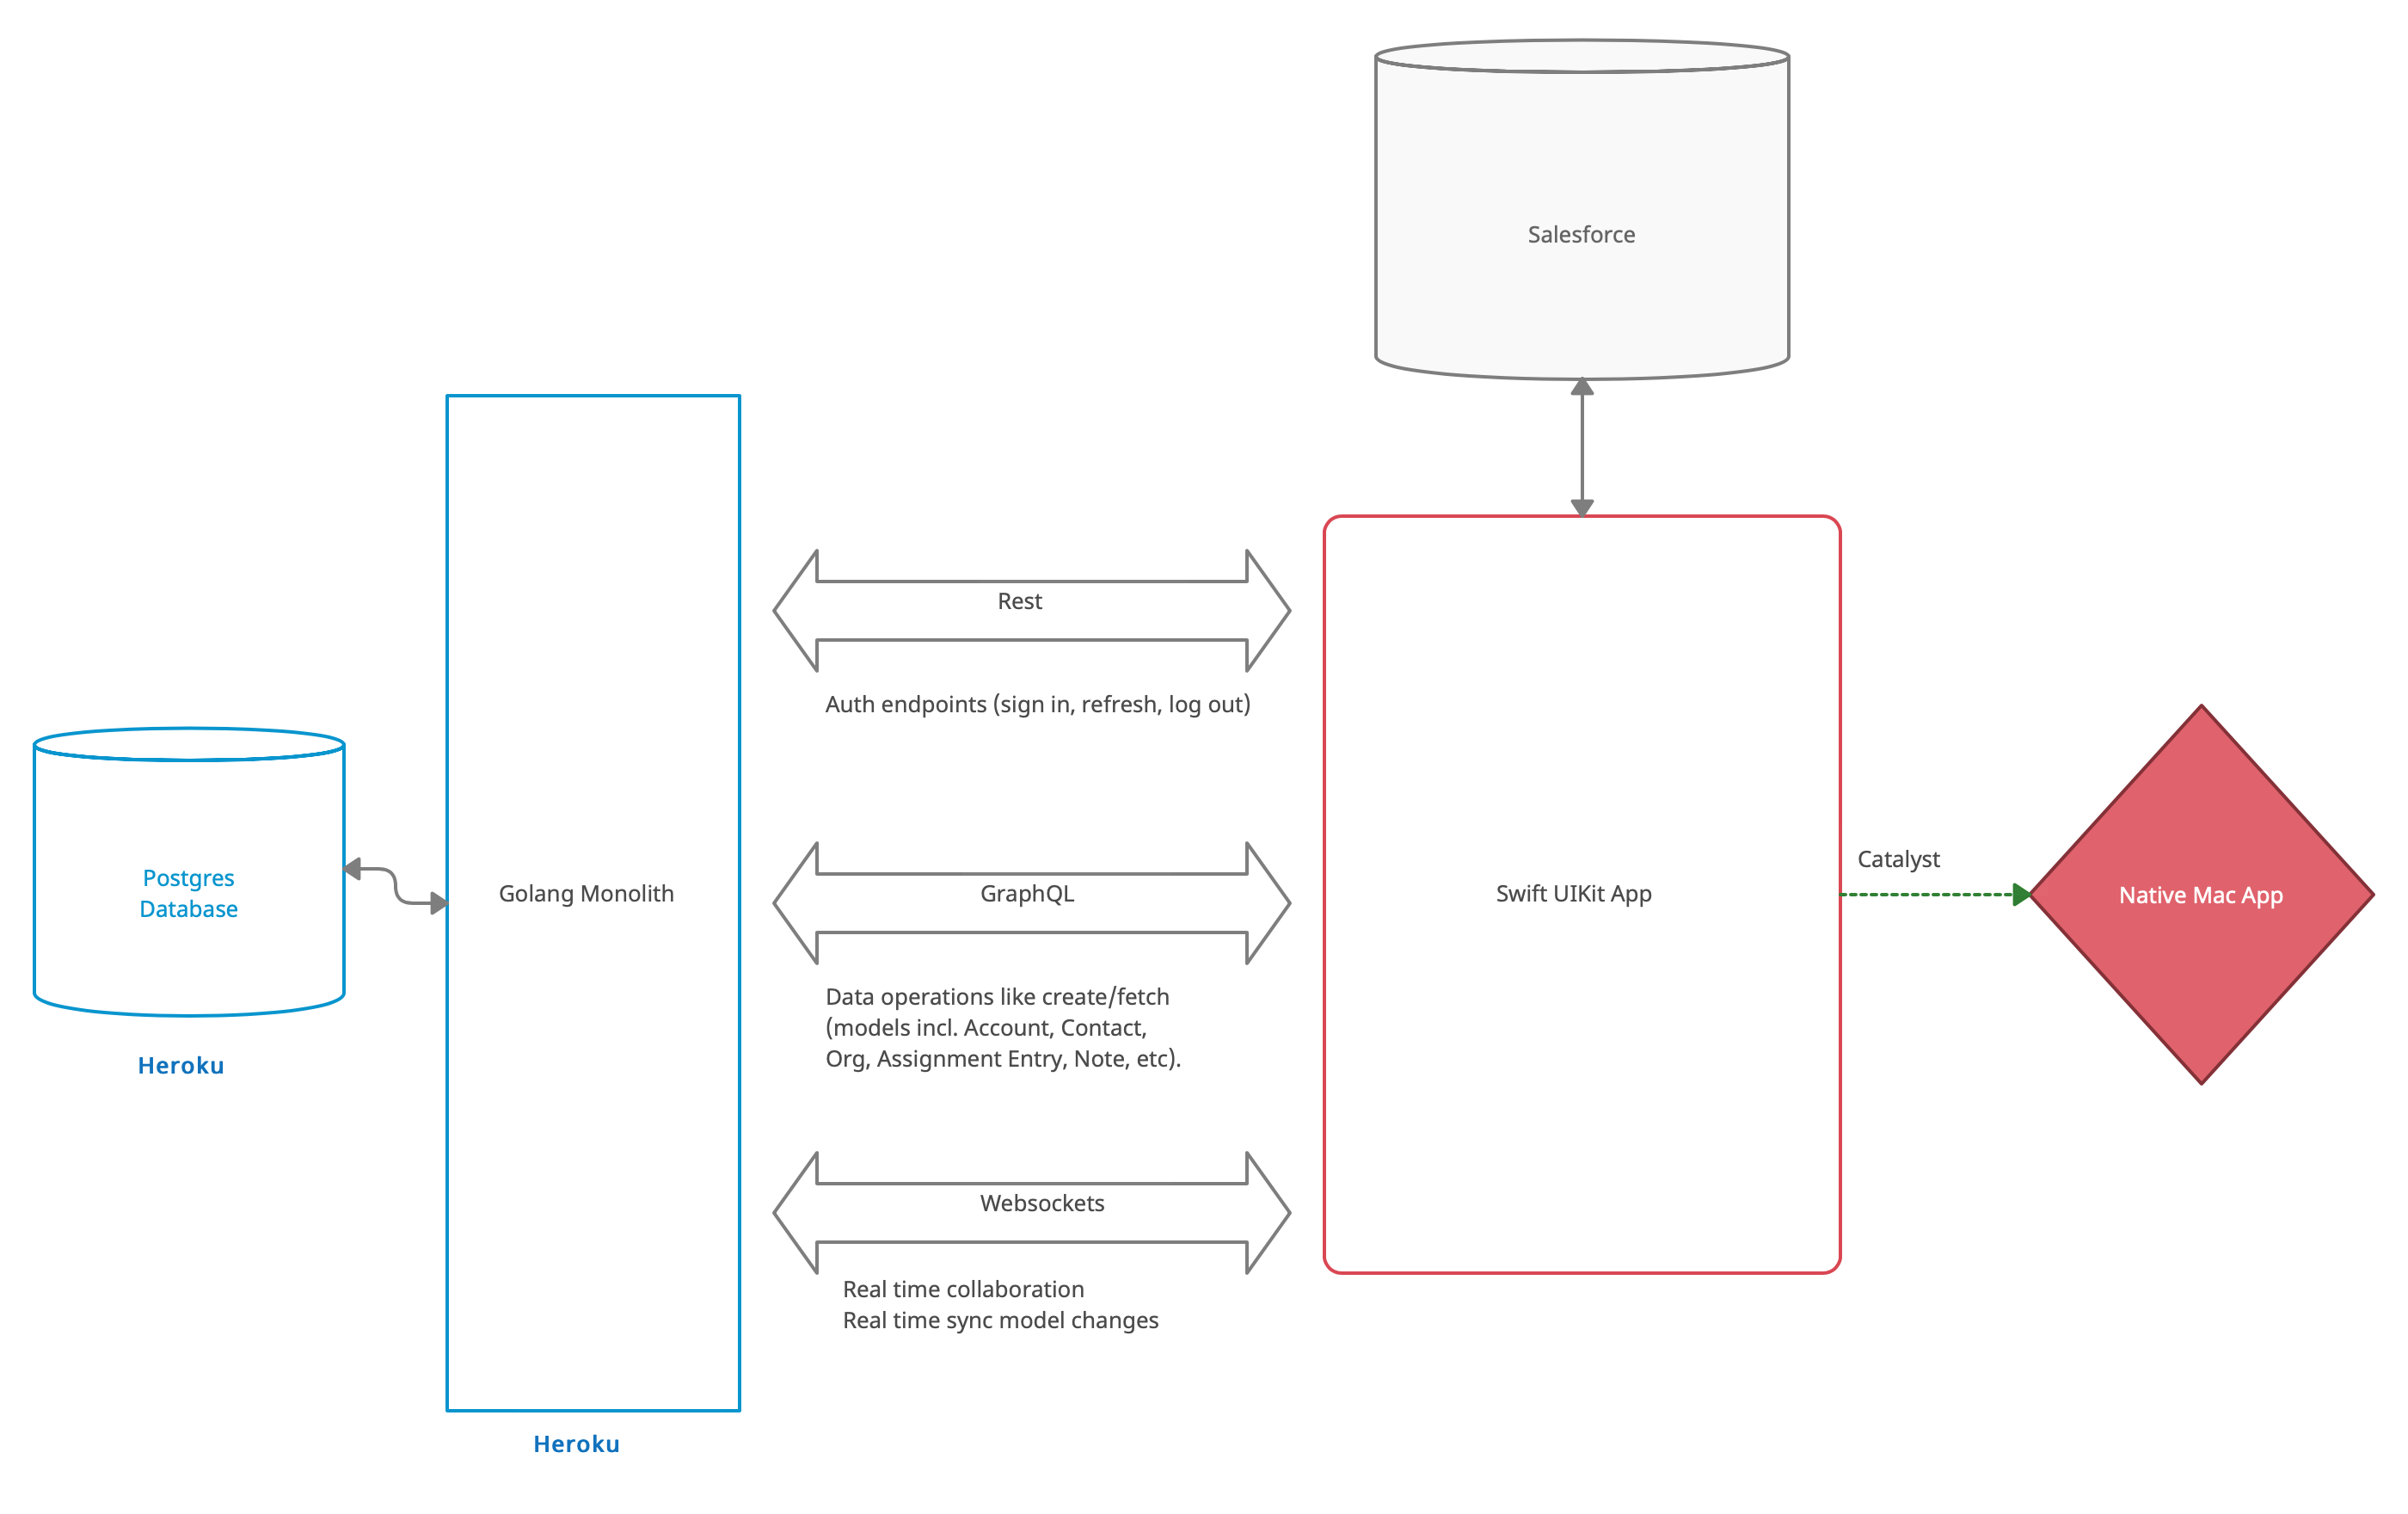
Whaler-api is currently hosted on Heroku. Here's a look at the high level project structure:
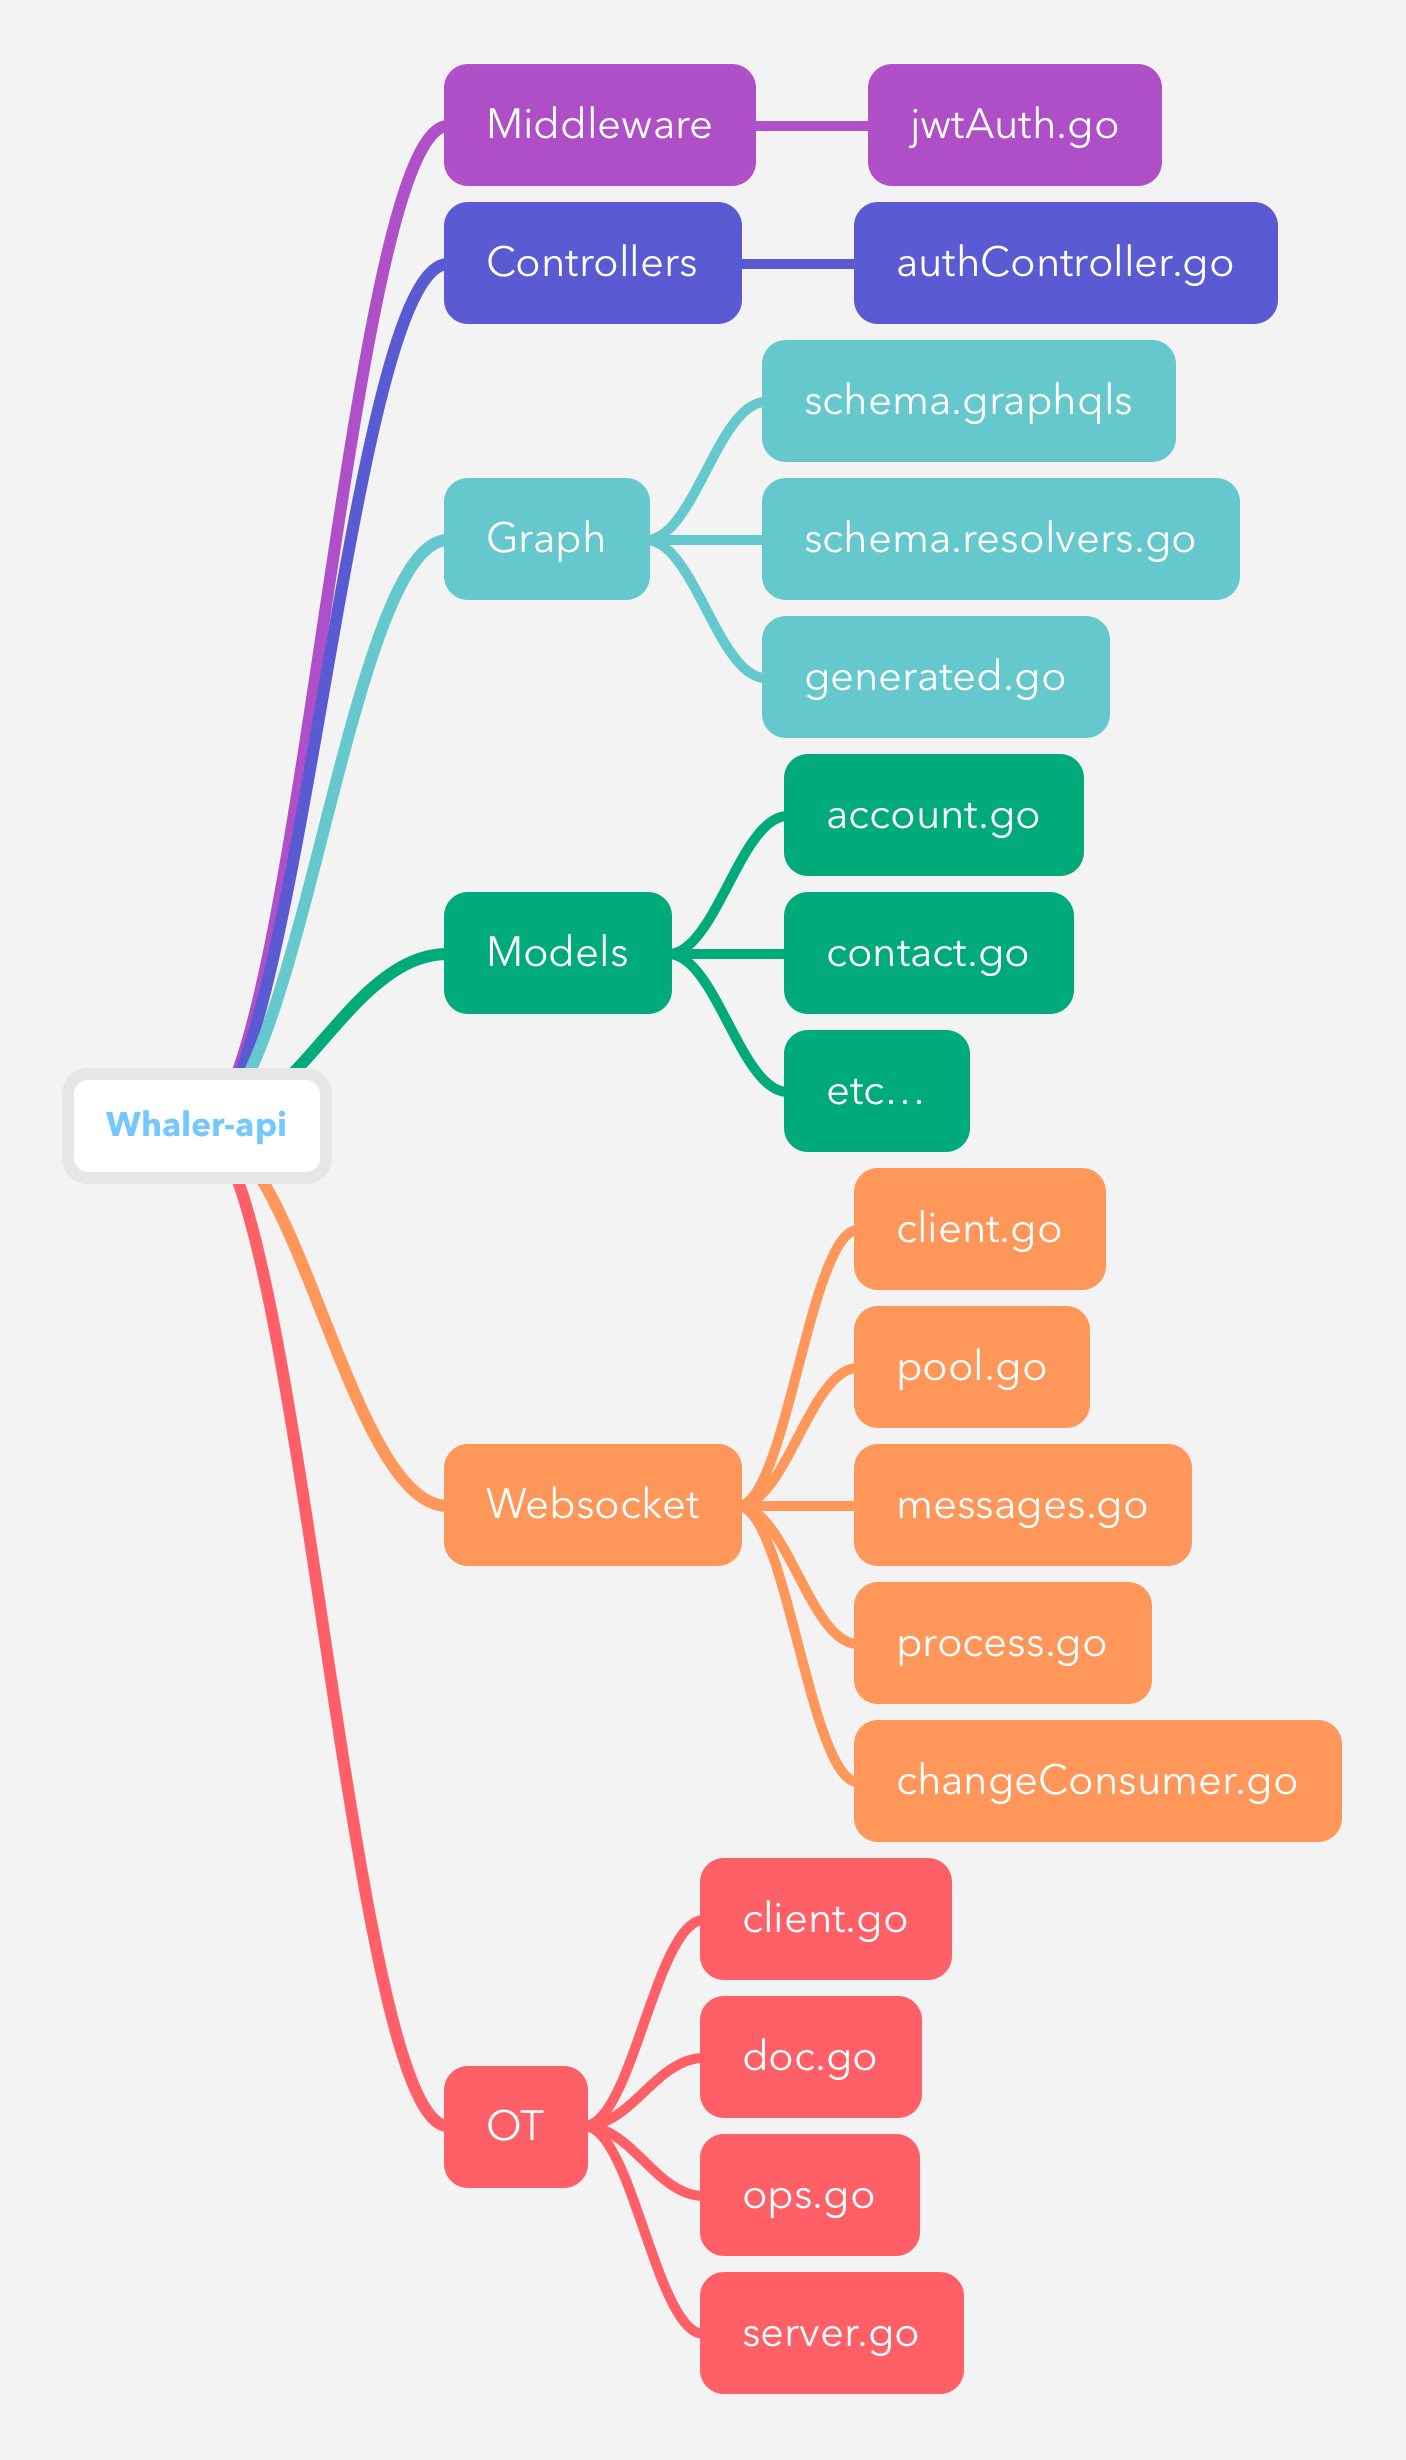
Let's step through each node to get an idea of how it all works.
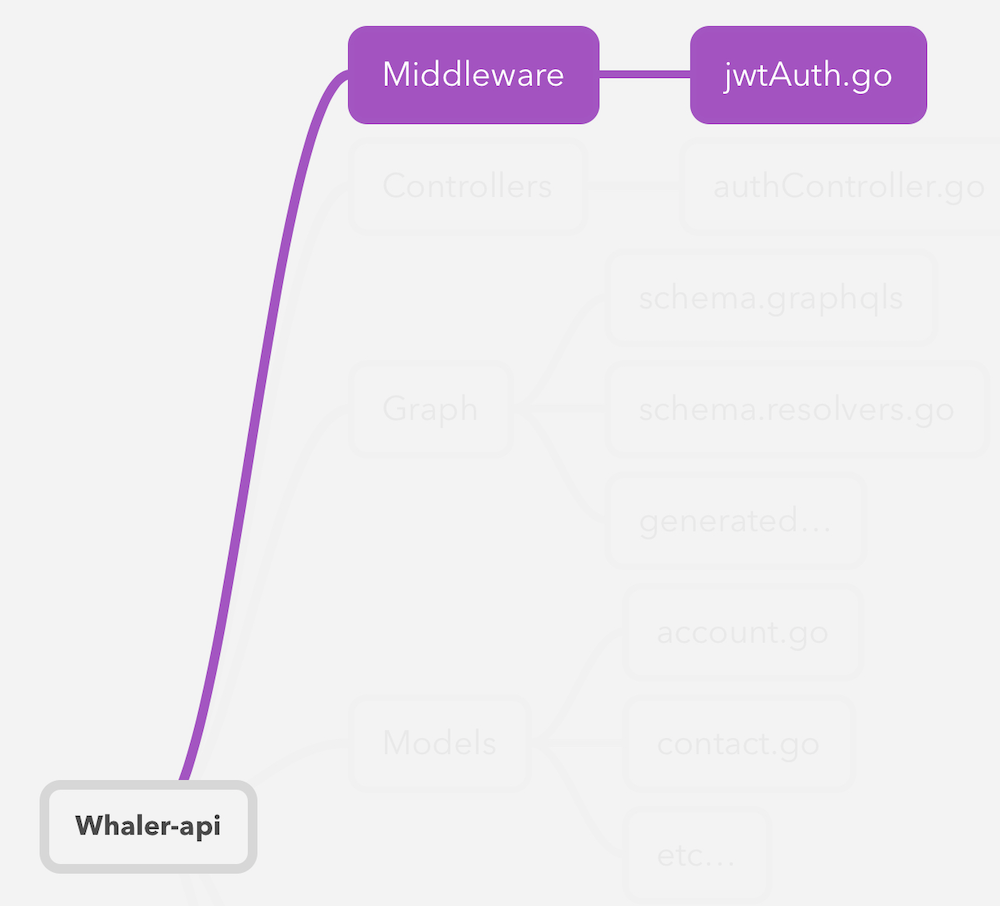
In jwtAuth.go, a simple bit of middleware authenticates the jwt token attached to incoming requests. If the token is valid, then the userId will be extracted from the token and added to the request context. This middleware is added to the responder chain during the initialization of the router in main.go.
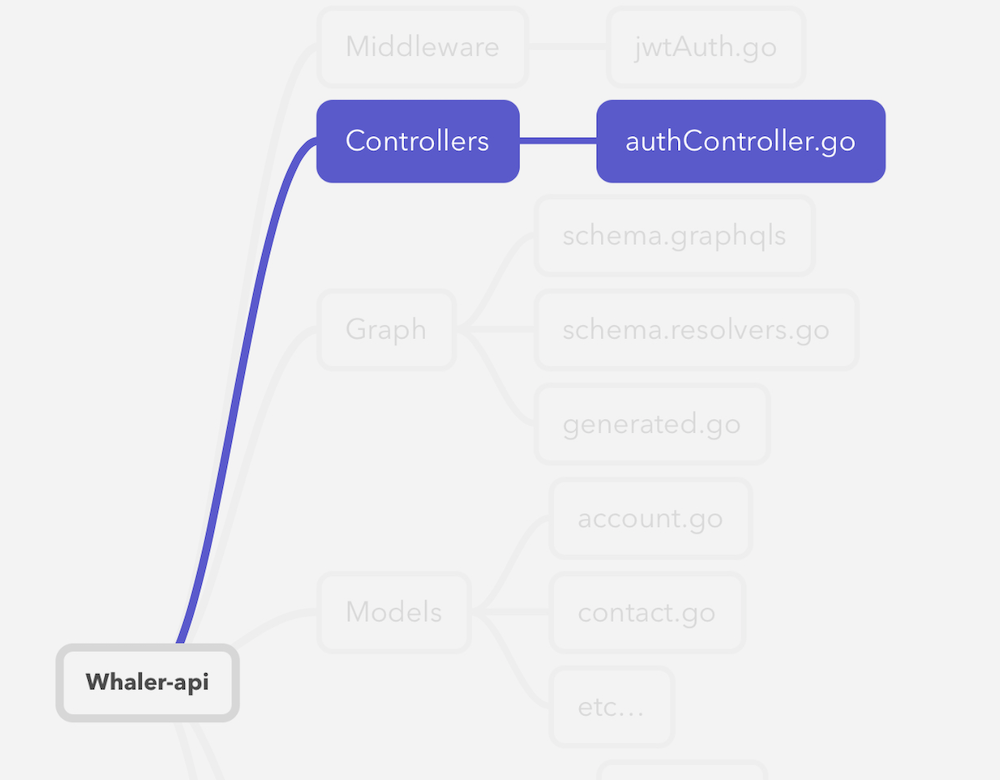
Whaler-api only uses REST endpoints for authentication related requests. In authController.go, you'll find the handlers for those requests, namely logging in and refreshing the token.
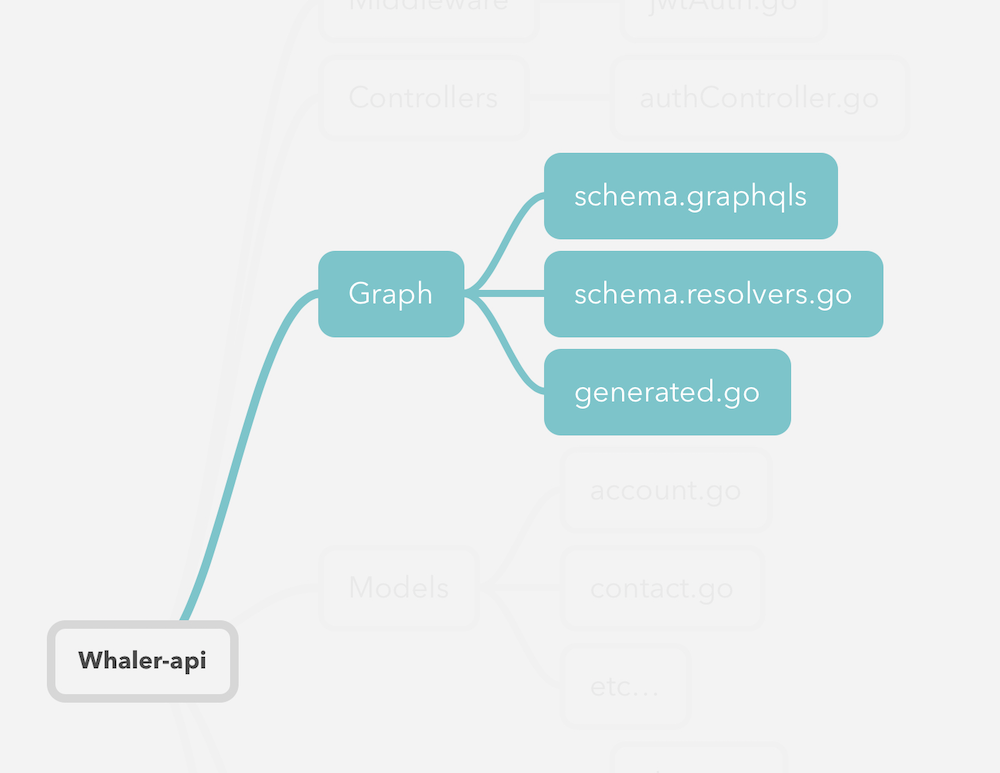
Whaler-api uses GraphQL for all data operations. The full schema is available in this directory as schema.graphqls. Whaler-api uses a Go module called gqlgen to generate the GraphQL-related boilerplate. This schema-first approach lets us focus on defining our API needs and then leveraging the strong typing of GraphQL and Go to catch any inconsistencies as the API changes.
In order to generate the boilerplate with the current schema, use go run github.com/99designs/gqlgen generate. The generated code will be placed in generated.go and includes Go interfaces defining the schema and Go functions implementing the actual GraphQL operations themselves. You don't need to worry much about the contents of this file; generate will place empty resolver methods in schema.resolvers.go. Each query and mutation in the schema will map to a resolver function added to this file, and all you have to do then is fill in those resolver functions. This effectively abstracts almost all of the implementation details of GraphQL and lets us focus on the parts that are specific to this project. Amazing!
generate will create Go structs for each type in the schema, but you can also map them to your own structs if you wish. Mappings can be added to the top-level gqlgen.yml file. For the sake of having more control over struct definitions, most of our models are mapped.
A schema explorer called playground runs on the /schema route accessable on the browser. This playground introspects your schema and presents an explorer alongside a terminal where you can execute queries and mutations. This is very useful for using and testing resolvers. Note: These requests do still require a token, so you'll need to generate one from the REST endpoint and add it as the Authorization header in the playground interface.
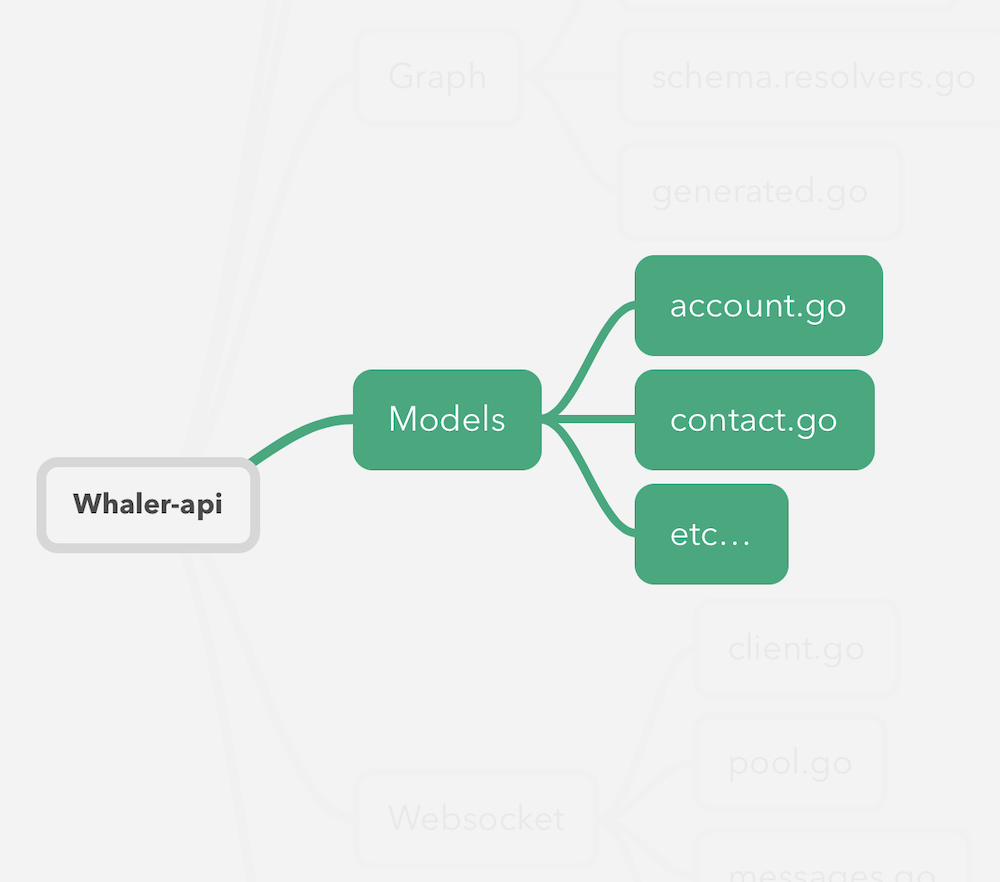
This package contains all of the Whaler-api database models. gorm is the ORM that facilitates communication with the connected Postgres database. Models include account, contact, accountAssignmentEntry, note, task, token, and more. Each class has functions that provide CRUD operations on the data and are usually called from GraphQL resolvers.
Access tokens, defined in token.go, are of the JWT format, and encode the userId in addition to the standard JWT claims. Refresh tokens, also defined in token.go, contain the userId, an expiration date, and a randomly generated 256 byte hash. The current expiration time is 90 days for refresh tokens.
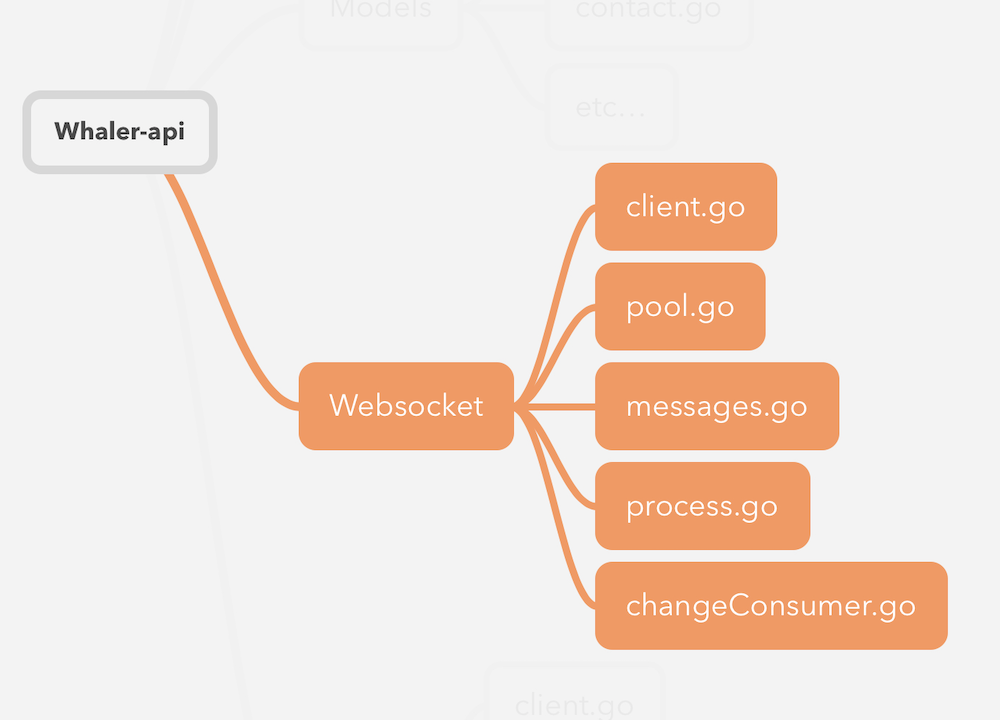
Websocket connections are represented as Clients defined in clients.go. When a new connection request is received (websocket.go), a Client is created and added to the Pool associated with the resourceId passed with the request. If this is the first connection seen for that resourceId, then a new Pool is created. When a Client receives a message, it does a bit of pre-processing in client.go before sending the message to the Process function defined in process.go. From here, the message type is used to decode the message data into the appropriate struct, which is then sent into the correct handler function.
Messages can easily be broadcast to an entire Pool by sending a SocketMessage into the Pool.broadcast channel. The Pool will iterate over each of its clients and send it the new message. If you're trying to replicate an incoming message across other members of the pool, then you can leverage the message.SenderId property to ensure the data will not be sent back to the originating Client.
New connections arrive with a grouping identifier, typically the resource id of the model they want updates on. For example, on the account details page, we register a connection with the accound.id. In the special case of a websocket client wanting updates for all the accounts they're tracking, this id will be the user's organizationId. The first iteration of real time model updates simply fires a message containing the resource id of the updated model to each client registered for that id. This ResourceUpdate message and all other websocket messages are defined in messages.go.
The models package defines a ChangeConsumer interface that is implemented by websocket.ChangeConsumer. The websocket implementation is set as the consumer for the models package. When models are changed, these changes are forwarded to the ChangeConsumer for further handling. In most cases, that results in a message being broadcast to the Pool for the resourceId indicating that the model has changed. Currently, this triggers a reload on the client side, but later this message could be expanded to contain more information, even the updated model itself.
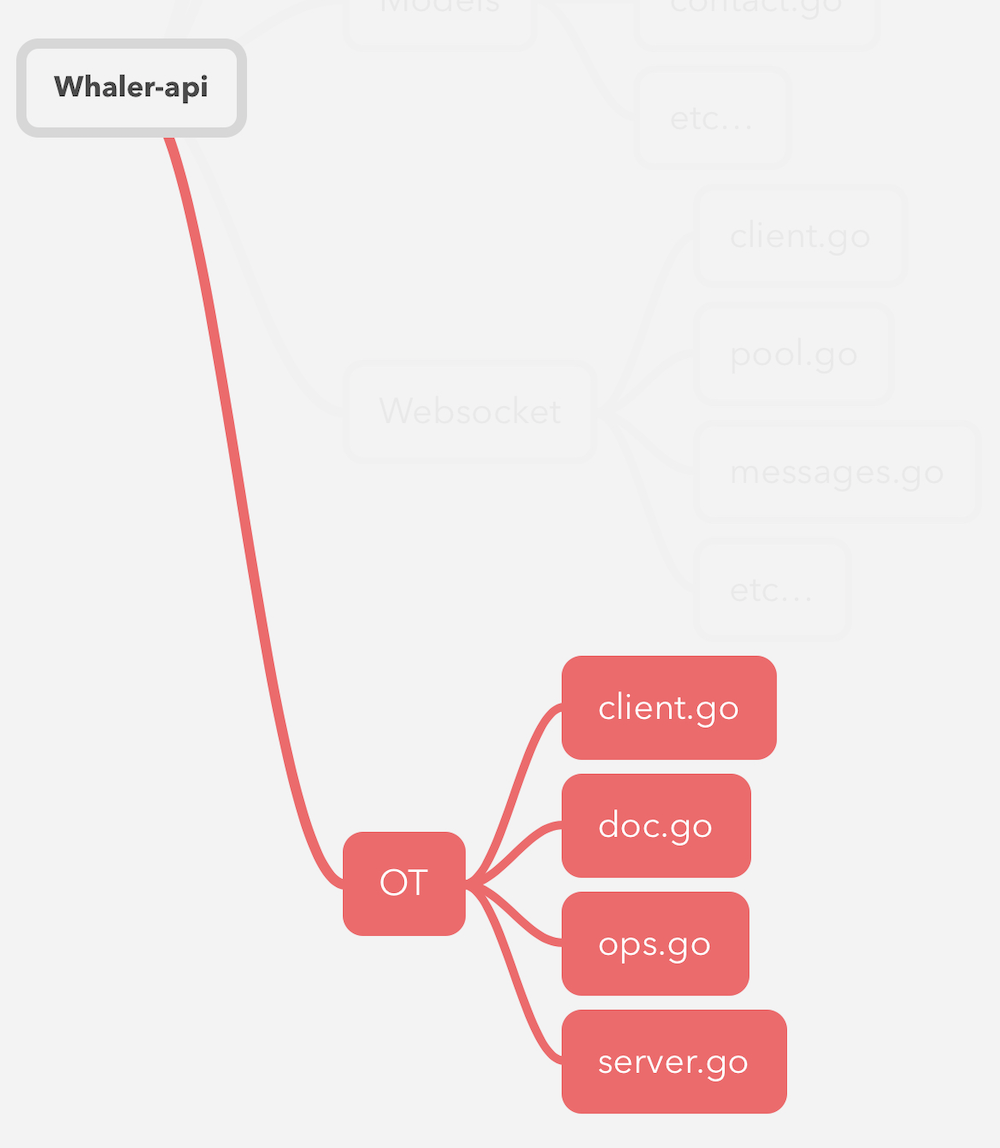
Whaler-api provides real-time document editing à la Google docs. Currently, this is used for the notes section of the account details page. It works via an operational transform implementation, where Whaler-api functions as the server in the algorithm, and the clients each run a corresponding client when they wish to engage in collaborative editing.
The full details of the operational transform algorithm are complex. There are plenty of resources online covering this topic; this one in particular helped me finally understand how it works: https://www.aha.io/blog/text-editor. This illustration of the system at work may also be helpful: http://operational-transformation.github.io.
Since it's a tricky topic, I'll briefly go over what you need to know to gain a working understanding. Whaler-api is the OT server (server.go), which means it maintains the source of truth doc (doc.go). This doc is held in memory as a 2D array of runes. clients also hold their own copy of the doc, and the goal is to keep all these copies in sync by conveying changes as a series of transformations. Each time a change is made to the doc by a client, that change is packaged up into a series of ops (ops.go). These Ops define the entire set of changes describing the whole document. For example, if the doc was the text Hello orld and a client added the missing w, that change would be described by this series of ops:
retain 6(H e l l o [space]) - 6 charsinsert "w"retain 4(o r l d) - 4 chars
A set of ops must fully describe the document or they will be rejected by the server. There is one more op type: delete. If you wanted to delete the space in the last phrase, you would do:
retain 5delete 1retain 5(don't forget we added the "w")
See the op struct defined in ops.go for more details on how these operations are represented using an int N and a string S. After a set of changes is sent to the server and applied, it must acknowledge to the client that the changes were accepted. The client will buffer any future changes until it does so.
Because the server and clients each maintain their own copy of the doc, they need the ability to reconcile different sets of changes with their own copy. This primarily comes in the form of two functions: Compose and Transform.
Compose is used to merge consecutive ops together. Recall how the client must buffer ops if it already has a change in flight with the server. If one set of changes describes the whole document, then what do we do if, say, the user makes a second change that now must be buffered while we wait? We can't just stack them, of course, because the buffer needs to exactly describe the document – once, not multiple times. To solve this, we Compose ops together. In this case, we know that the two sets of ops happened consecutively, and that knowledge informs how we should merge them together to ultimately describe the document just one time.
This might be best understood with an example.
Take the doc I see dead people.. Lets say we first modify it to delete the word dead (including trailing space). We'll define those changes as Ops A, and it looks like:
retain 6(I [space] s e e [space])delete 5(d e a d [space])retain 7(p e o p l e .)
But let's say we need to buffer Ops A with a new set called Ops B, which describes deleting the word people. Operating on the newly changed doc, Ops B looks like:
retain 6(I [space] s e e [space])delete 6(p e o p l e)retain 1(.)
How could we Compose this simple example into one series of Ops describing our current state of the document? Starting from the original revision (I see dead people.), we can do it like so:
Compose(OpsA, OpsB) =>
retain 6(I [space] s e e [space])delete 11(d e a d [space] p e o p l e)retain 1(.)
Tada! We've composed six ops into three with no loss of information. This is a simple case of composing two deletions, but you can imagine how complicated composition can get when mixing message types across overlapping boundaries. This makes up some of the "meat" of the algorithm, and the full implementation can be found in ops.go.
Transform is a similar concept to Compose except that it works on concurrent ops. These are ops that we do not know the order in which they took place. Why might this matter? Well, Compose is great for buffering ops as they happen, but what if while you're buffering, the server sends you a new set of ops? Presumably, these would be coming from a different client having had changes registered before yours. You now need to apply these new ops to your buffer in order to keep the state consistent, but you no longer have the convenience of having a strict order of operations. You now have to reconcile or transform the new state of the doc against the state you've been working off of. This provides the rest of the "meat" of the algorithm. It's is a bit more complicated, but a good example with illustrations is provided at the link above. The implementation can be found in ops.go.
As a starting point, I dropped in this package https://github.com/mb0/ot, which is a Go OT implementation based on an older JS implementation. I didn't have to modify the OT package too much other than to integrate it with my codebase. The reason why I had to learn so much about it was because I wrote Swift clients for the frontend. Writing tests, debugging, and adding cursor support were a real treat that helped me get quite intimate with the algorithm and client-server communication. :)
-
The Salesforce integration should be moved to the backend. The frontend would still be responsible for initiating the integration process, but once a Salesforce token is obtained, it would be sent to the backend, where the integration would then be managed. Moving all the Salesforce data management to the backend would free up the app to focus on being a great frontend. As a part of that migration, I would abstract the few direct Salesforce references (e.g.
SalesforceId) behind a generic CRM integration interface. Then, adding support for HubSpot, Pipedrive, or any other CRM would be much simpler. -
The current reliance on storing docs in memory would present challenges when scaling later. A longer term solution would be to use Redis to store these docs. Then, we could scale the api to multiple Heroku dynos.
-
We need pre-production environments, namely a develop and staging environment. This would need to include seperate DBs, as testing migrations is a key reason for the seperation.
If developing with VSCode, here's a launch.json that will run Whaler-api locally within VSCode.
    "version": "0.2.0",
    "configurations": [
        {
            "name": "Server",
            "type": "go",
            "request": "launch",
            "mode": "auto",
            "program": "${workspaceRoot}/main.go",
            "env": {"DATABASE_URL": "[INSERT DB URL HERE]"},
            "args": []
        }
    ]
}
In the terminal, standard commands go get, go build, and go run will be your friend.
Make sure you have Go version 1.12 or newer and the Heroku Toolbelt installed.
$ git clone https://github.com/heroku/whaler-api.git
$ cd whaler-api
$ go build -o bin/whaler-api -v . # or `go build -o bin/whaler-api.exe -v .` in git bash
github.com/mattn/go-colorable
gopkg.in/bluesuncorp/validator.v5
golang.org/x/net/context
github.com/heroku/x/hmetrics
github.com/gin-gonic/gin/render
github.com/manucorporat/sse
github.com/heroku/x/hmetrics/onload
github.com/gin-gonic/gin/binding
github.com/gin-gonic/gin
github.com/heroku/whaler-api
$ heroku local
Your app should now be running on localhost:5000.
$ heroku create
$ git push heroku master
$ heroku open
or

For more information about using Go on Heroku, see these Dev Center articles: