-
If Facebook is not available in your country, then you will need a VPN. You need to distribute Internet within same network for VR glasses and applications on your smartphone. The easiest way to do this is with Wi-Fi on a laptop. If you get already into an endless boot process then you can reset settings helmet by holding button down "power" and "volume buttons". Then select "Factory Reset" from menu.
-
For example lets take VPN Psiphon. You need to install Windows version and enable L2TP/IPSec in transport mode settings. This is necessary in order to be able to use VPN for distribution within your network. Next you have to enable mobile hotspot in windows. You can find out how to do it in the official instructions "Use your Windows PC as a mobile hotspot" If you encounter a problem using standard tools windows see step 3.
-
If you encounter Wi-Fi sharing issues in step 2. Then you need to use software Connectify Hotspot. The purpose of this software is same create a Wi-Fi hotspot. To do this, you need to start the VPN and select Psiphon in "Wi-Fi Network to Repeat" list then enter network name and password and click Start Hotspot. Please note that this software is paid. But there is also a free period that should be enough for complete first steps of setup.
-
After update has been downloaded and installed you will be asked to enter numbers from screen. For this you need to install an app on your smartphone called Oculus. If you already have Facebook then you just need to click button sign in with Facebook and sign in to your account. Next you should be prompted to sign in to Oculus using Facebook. This may not happen and to fix this you can try to log into your account again with using app Oculus. You don't need to do anything on Facebook itself it should happen automatically. If you do not have a Facebook account then see next step. You will also be ask in vr helmet to turn on bluetooth and connect to your phone. Next follow instructions in vr helmet to complete setup.

-
If you dont have a Facebook account then you need to follow this step. The Facebook system is very sensitive. Therefore it is best to use a phone number that has already been used on Instagram or WhatsApp. So less likely to face automatic blocking after registration. If you previously had Facebook and use same email then most likely system will block you automatically after registration. During registration process you need to do everything slowly so that system does not take you for a bot. If you do everything right and system does not consider you a bot then you will be able to connect to Oculus. Otherwise you will need to appeal and follow further Facebook requirements or try to register a new account.
-
After you have finished setting up, you will be taken to virtual room. At this stage you can already use full virtual reality helmet. You can already get acquainted with rest of settings and functions on your own. If you decide to connect a virtual reality helmet to your PC then follow step 7.
/cdn.vox-cdn.com/uploads/chorus_asset/file/21882209/Home_environment_view_2.png)
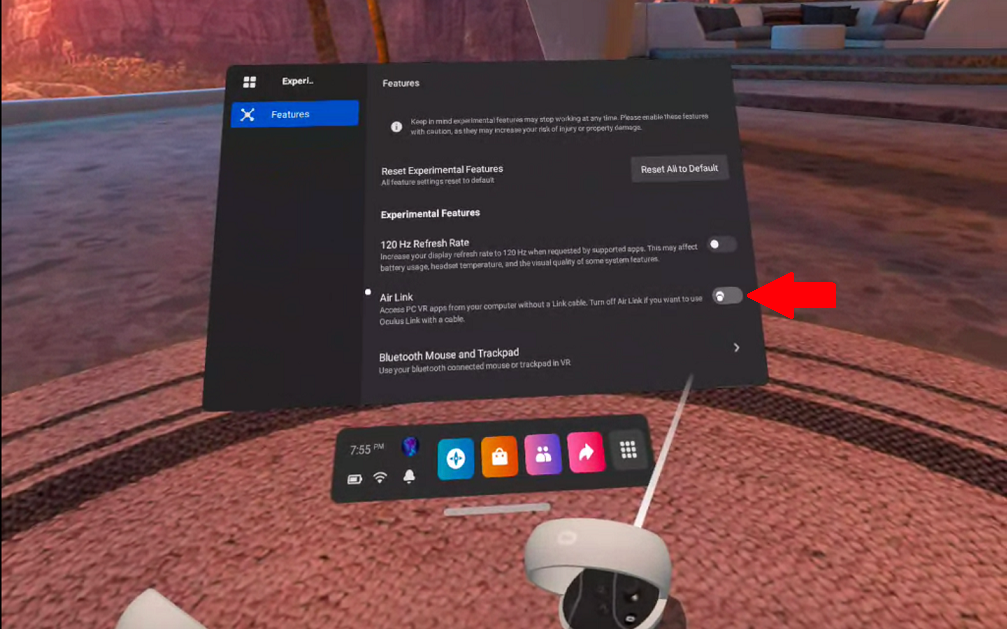
- There are two ways to connect your Oculus to your PC using a wire or Wi-Fi. In our case we will consider option with Wi-Fi (Air Link). To connect Oculus PC you need to download Oculus software to your computer. If you don't have access to Facebook servers install a VPN on your computer. You will then be able to download software. Then put on your VR headset and go to your Oculus settings. Go to Experimental Features section and enable Air Link.
-
Now you need to go back to your PC and launch Oculus software. You will also need to sign in to your Facebook account again. At this stage you may run into some problems. If you are not allowed into your account for unknown reasons you can try to change your password using a forgotten password. If you do not receive SMS to reset passwords try clicking another recovery method. You may also get standard errors that may ask you to try again later.
-
After you log into Facebook you should be prompted to continue with your Facebook account after which you should be taken to Oculus software. One of common problems you may encounter is endless loading. Oculus support cites many reasons why this might be happening. One solution that can help you is to replace your DNS with Google Public DNS.
-
To do this you need to do in Windows. Start menu/Settings/Network & Internet/Change adapter options/Internet Protocol Version 4 (TCP/IPv4) - properties/The Following DNS Server Addresses then specify 8.8.8.8. This should solve your problem and you can continue with setup. After completing standard settings you need to activate Air Link on PC. To do this press settings and select Beta then activate Air Link.

-
Now you can connect your VR headset with Air Link. Click add devices and follow instructions. To activate Air Link on VR headset. Click settings and select Oculus Air Link and select your computer. After completing settings you will enter Air Link room it will be different from your main room Oculus. If you have previously used a VPN, you can now disable it. Now you're ready to install Steam VR on your computer. You must be in Air Link room to launch Steam VR. It will be displayed in your library or you can select Steam from "Browser" button. If you have a VR-enabled game installed you will be able to select it in Steam VR room. Congratulations now can say that you have finally finished setting up your Oculus Quest 2.
-
When connected to your Wi-Fi in vr helmet you can select advanced settings item. Instead of DHCP select your settings and specify values that router assigns to you. At very bottom you will find DNS item here we specify Google Public DNS 8.8.8.8 and 8.8.4.4 and click connect. Thus your Oculus will partially work with Internet without VPN but you will not be able to update firmware in this state.
How do we can see in Oculus Quest 2 is one of worst UX to date. Not having time to turn on virtual reality helmet we face many obstacles and difficulties. This spoils impression of virtual reality helmet and it is quite difficult for an ordinary user to deal with all this. Also linking to Facebook creates additional difficulties in regions where Facebook is not available and interaction with technical support leaves a negative impression. All this not only harms development of virtual reality helmets but also business in general. Despite fact that virtual reality helmets have been around for quite a few years they are still far from mass use. Apparently world needs another company that can develop right virtual reality helmet where everything will work out of box.
If Psiphon VPN has been blocked in your country. This method also works with Planet Vpn. If you are trying to update your helmet to latest version, then keep in mind that after clicking the "download" button download indicator does not appear. If you have used Connectify Hotspot you will be able to see network activity. Otherwise pay attention to whether VR helmet has become warmer on front, if so, then it is most likely downloads update.
How To Force Any Unity Game to Run In Native VR Mode