Create a composite control that displays different images that react to the mouse movement to create a depth effect
Install the library and css into your project
$ yarn add vue-parallax-viewor
$ npm i vue-parallax-viewConfigure your main.js
import VueParallaxView from "vue-parallax-view"
Vue.use(VueParallaxView)
import "vue-parallax-view/dist/vue-parallax-view.css";
All left to do is configure the layers array and passe it to the component. In this example I'm using images from the assets directory, if this is your case use the require(...) function.
- name: unique name for the layer. Make sure this is unique
- horizontalDisplacement: the amount of horizontal displacement for this layer. See displacement for more information
- verticalDisplacement: the amount of vertical displacement for this layer. See displacement for more information
- image: image resource to be use for this layer. Can be from the assets folder (use require() function), an absolute url or a relative url for your public/static folder.
- class: add a custom class to control how this specific layer looks
data() {
return {
layers: [
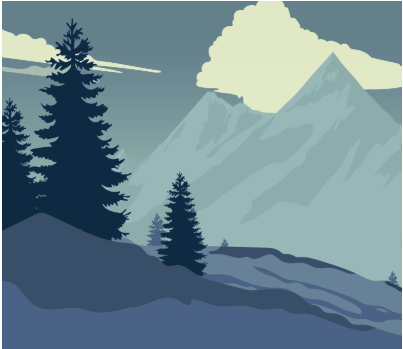
{
name: "bg_sky",
horizontalDisplacement: 0,
verticalDisplacement: 0,
image: require('@/assets/bg/layer_sky.png')
},
{
name: "bg_clouds",
horizontalDisplacement: 0.1,
verticalDisplacement: 0.1,
image: require('@/assets/bg/layer_clouds.png')
},
{
name: "bg_mountain",
horizontalDisplacement: 0.075,
verticalDisplacement: 0.075,
image: require('@/assets/bg/layer_bg_mountains.png')
},
{
name: "bg_pines",
horizontalDisplacement: 0.11,
verticalDisplacement: 0.11,
image: require('@/assets/bg/layer_bg_pines.png')
},
{
name: "ground",
horizontalDisplacement: 0.15,
verticalDisplacement: 0.15,
image: require('@/assets/bg/layer_ground.png')
},
{
name: "pines",
horizontalDisplacement: 0.3,
verticalDisplacement: 0.3,
image: require('@/assets/bg/layer_pines.png')
}
]
}
}And in your template add the markup. Although width and height are optional feel free to configure them to match your UI. You can use 300px, 100%, 50vw, etc.
<vue-parallax-view :layers="layers" :width="'400px'" :height="'350px'" />A brief explanation on how displacement works:
Images are scaled in order to allow the parallax effect. If the images where the same size as the portrait containing them the translation wouldn't work. To solve this the displacement parameter is created. It can be interpreted as a scaling factor.
For example a horizontalDisplacement of 0.2 means there is a 20% of the image being hidden. This is distributed equally on the axis, for this case 10% is hidden for the right and left sides of the image.
The way this react to the movement of the mouse is: if the mouse is centered horizontally on the screen the image is considered centered and there is a 10% of the image not being shown for each side. As the mouse gets further away from the horizontal center of the screen the opposite hidden area of the image stars to appear. This also applies for vertical displacement.
The greater the value the more noticeable the movement will be.
There is a base style for each layer:
  position: absolute;
  transform-origin: left bottom;
  will-change: transform;
  transition: 300ms transform linear;
  background-repeat: no-repeat;
  background-size: cover;
You can override these in any way you like with the class parameter:
  {
    name: "pines",
    horizontalDisplacement: 0.3,
    verticalDisplacement: 0.3,
    image: require('@/assets/bg/layer_pines.png'),
    class:"my-custom-layer-class"
  }
If you still don't see the changes try to give more specificity:
<vue-parallax-view class="my-parallax" :layers="layers" :width="'400px'" :height="'350px'" />.my-parallax .my-custom-layer-class {
position: absolute;
transform-origin: left bottom;
will-change: transform;
transition: 300ms transform linear;
background-repeat: no-repeat;
background-size: cover;
}Be careful when playing with the transition rule. Using anything but linear will result on a choppy animation. The same occurs if you decrease the time.
qqwhpypxxwc6w5pms8s4d3zz8w37t6rfa5hq89u5pg
Vue Parallax View is open source and released under the MIT Licence.
Copyright (c) 2019 Angel Arcoraci