This project demonstrates how to use Spring Cloud Alibaba Nacos related Starters to complete the service discovery and configuration management of Spring Cloud applications.
Nacos It is Alibaba's open source dynamic service discovery, configuration management and service management platform that is easier to build cloud-native applications.
In Nacos 2.2.x, functions related to user authentication are added. When starting Nacos Server for the first time, it needs to be configured correctly to avoid the problem of startup failure.
The Nacos serv version used in this example is 2.2.3!
Nacos supports both direct download and source code construction. Nacos Server version 2.2.3 is recommended for Spring Cloud Alibaba 2022.x.
- Direct download: Nacos Server download page
- Source code construction: Enter Nacos Github project page, git clone the code to the local compilation and packaging 参考文档.
Open the \nacos-server-2.2.3\conf\application.properties configuration file and modify the following configuration items:
Take the MySQL database as an example here, and use the nacos-server-2.2.3\conf\mysql-schema.sql initialization database table file. Modify the following configuration as well
#*************** Config Module Related Configurations ***************#
### If use MySQL as datasource:
spring.datasource.platform=mysql

### Count of DB:
db.num=1

### Connect URL of DB:
db.url.0=jdbc:mysql://127.0.0.1:3306/nacos?characterEncoding=utf8&connectTimeout=1000&socketTimeout=3000&autoReconnect=true&useUnicode=true&useSSL=false&serverTimezone=UTC&allowPublicKeyRetrieval=true
db.user.0=root
db.password.0=root

### Connection pool configuration: hikariCP
db.pool.config.connectionTimeout=30000
db.pool.config.validationTimeout=10000
db.pool.config.maximumPoolSize=20
db.pool.config.minimumIdle=2Note: If it is not enabled, login failure exception will occur in 2.2.x!
### The auth system to use, currently only 'nacos' and 'ldap' is supported:
nacos.core.auth.system.type=nacos

### If turn on auth system:
nacos.core.auth.enabled=truenacos.core.auth.server.identity.key=test
nacos.core.auth.server.identity.value=test### The default token (Base64 String):
nacos.core.auth.plugin.nacos.token.secret.key=SecretKey012345678901234567890123456789012345678901234567890123456789** When using the Nacos service discovery and configuration function, be sure to configure username and password attribute, otherwise the user will not be found! **
Authentication is required when using the Open api interface in nacos server 2.2.x: For more details, please refer to: Nacos api authentication
-
Obtain accessToken: Use username and password to log in to the nacos server:
curl -X POST '127.0.0.1:8848/nacos/v1/auth/login' -d 'username=nacos&password=nacos'If the username and password are correct, the returned information is as follows:
{"accessToken":"eyJhbGciOiJIUzI1NiJ9.eyJzdWIiOiJuYWNvcyIsImV4cCI6MTYwNTYyOTE2Nn0.2TogGhhr11_vLEjqKko1HJHUJEmsPuCxkur-CfNojDo", "tokenTtl": 18000, "globalAdmin": true} -
Use accessToken to request the nacos api interface:
curl -X GET '127.0.0.1:8848/nacos/v1/cs/configs?accessToken=eyJhbGciOiJIUzI1NiJ9.eyJzdWIiOiJuYWNvcyIsImV4cCI6MTYwNTYyMzkyM30.O-s2yWfDSUZ7Svd3Vs7jy9tsfDNHs1SuebJB4KlNY8Q&dataId=nacos.example.1&group=nacos_group'
-
Start Nacos Server, enter the folder after downloading to the local and decompressing (enter the folder after compiling and packaging by using the source code construction method), then enter its relative folder
nacos/bin, and execute the following command according to the actual situation of the operating system. 详情参考此文档。-
Linux/Unix/Mac operating system, execute the command
sh startup.sh -m standalone -
Windows operating system, executing command
cmd startup.cmd
-
-
Access Nacos Server Console.
The browser enters the address http://127.0.0.1:8848/nacos , The first login needs to bind the nacos user, because the new version adds authentication, and the user name and password need to be configured during application registration and configuration binding.
Before starting the application sample to demonstrate the project function, first understand how the Spring Cloud application accesses Nacos Config as the service configuration center.
Note that this section is only for the convenience of understanding the access method. The access work has been completed in this sample code, and no further modification is required.
-
First, modify the
pom.xmlfile to introduce spring-cloud-starter-alibaba-nacos-config;<dependency> <groupId>com.alibaba.cloud</groupId> <artifactId>spring-cloud-starter-alibaba-nacos-config</artifactId> </dependency>
-
Configuring a Nacos address in an
/src/main/resources/application.yamlapplied configuration file and introducing a service configuration;spring: cloud: nacos: serverAddr: 127.0.0.1:8848 username: 'nacos' password: 'nacos' config: import: - nacos:nacos-config-example.properties?refresh=true&group=DEFAULT_GROUP
-
After completing the above two steps, the application will obtain the corresponding configuration from Nacos Server and add it to the Property Sources of Spring Environment. There are four ways to save a portion of the Nacos configuration using the Nacos Configuration Center:
- BeanAutoRefres hConfig Example: An example of supporting automatic refresh of configuration changes by configuring configuration information as beans;
- ConfigListenerEx ample: example of monitoring configuration information;
- Docking Interface Example: An example of docking the Nacos interface and completing the addition, deletion, modification and query of the configuration information through the interface;
- ValueAnnotation Example: An example of obtaining configuration information through the @ Value annotation.
Add a configuration to the Nacos Server by executing the following command from the command line. Can be injected directly through the Nacos console!
$ curl -X POST "http://127.0.0.1:8848/nacos/v1/cs/configs?accessToken=XXXXXXXXXXXXXXXXXXXXXXXXXXX&dataId=nacos-config-example.properties&group=DEFAULT_GROUP&content=spring.cloud.nacos.config.serverAddr=127.0.0.1:8848%0Aspring.cloud.nacos.config.prefix=PREFIX%0Aspring.cloud.nacos.config.group=GROUP%0Aspring.cloud.nacos.config.namespace=NAMESPACE"Details of the added configuration are as follows:
# dataId is nacos-config-example.properties
# group is DEFAULT_GROUP

# content is:

spring.cloud.nacos.config.serveraddr=127.0.0.1:8848
spring.cloud.nacos.config.prefix=PREFIX
spring.cloud.nacos.config.group=GROUP
spring.cloud.nacos.config.namespace=NAMESPACE-
Add configuration, and add basic configuration information in the application
/src/main/resources/application.yml;server: port: 18084 management: endpoints: web: exposure: include: '*'
-
Start the application, support IDE direct start and start after compilation and packaging.
- IDE direct startup: find the main class
NacosConfigApplicationand execute the main method to start the application. - Start after packaging and compiling: First
mvn clean package, compile and package the project, and then enter thetargetfolder tojava -jar nacos-config-example.jarstart the application.
- IDE direct startup: find the main class
Enter http://127.0.0.1:18084/nacos/bean in the browser address bar and click turn around to see that the data is successfully obtained from the Nacos Server.

-
Execute the following command to modify the configuration data on the Nacos Server side
$ curl -X POST "http://127.0.0.1:8848/nacos/v1/cs/configs?accessToken=XXXXXXXXXXXXXXXXXXXXXXXXXXX&dataId=nacos-config-example.properties&group=DEFAULT_GROUP&content=spring.cloud.nacos.config.serveraddr=127.0.0.1:8848%0Aspring.cloud.nacos.config.prefix=PREFIX%0Aspring.cloud.nacos.config.group=DEFAULT_GROUP%0Aspring.cloud.nacos.config.namespace=NAMESPACE" -
Type
http://127.0.0.1:18084/nacos/beanin the address bar of the browser and click Turn, and you can see that the application obtains the latest data from the Nacos Server, and the group becomes the DEFAULT _ GROUP.

Nacos Config uniquely identifies a piece of configuration primarily by dataId and group, assuming you already know this background. If you don't know, please refer to Nacos 文档.
When the Nacos Client obtains data from the Nacos Server, it calls this interface ConfigService.getConfig(String dataId, String group, long timeoutMs).
In the Nacos Config Starter, the concatenation format of dataId is as follow
${prefix} - ${spring.profiles.active} . ${file-extension}
-
The
prefixdefault value isspring.application.name. It can also be configured through configuration itemsspring.cloud.nacos.config.prefix. -
spring.profiles.activeThis is the profile corresponding to the current environment. For details, please refer to
** Note that when the active profile is empty, the corresponding connector - does not exist, and the concatenation format of dataId becomes ${prefix}. ${file-extension} **
file-extensionIt is used to configure the data format of content, which can be configured by configuration itemspring.cloud.nacos.config.file-extension. Currently only types are supportedproperties.
groupThe default isDEFAULT_GROUP, which can bespring.cloud.nacos.config.groupconfigured.
The Spring Cloud Alibaba Nacos Config Starter implements the org.springframework.boot.context.config.ConfigDataLoader interface and sets the priority to the highest.
During the Spring Cloud application startup phase, it will actively obtain the corresponding data from the Nacos Server side, convert the obtained data into PropertySource, and inject it into the Property Sources attribute of the Environment. Therefore, the @ Value annotation can also be used to directly obtain the contents of the Nacos Server configuration.
By default, the Nacos Config Starter is a refresh method that is triggered org.springframework.cloud.context.refresh.ContextRefresher in real time when the monitoring function is added to the configuration item of all Nacos that have successfully obtained data and changes in the server configuration are monitored.
If you need to refresh the Bean dynamically, refer to the Spring and Spring Cloud specifications. It is recommended that you add @RefreshScope or @ConfigurationProperties annotate the class,
For more details, please refer to ContextRefresher Java Doc.
Spring Boot applications support the use of Endpoints to expose relevant information, as does the Spring Cloud Alibaba Nacos Config Starter.
Before using it, you need to add spring-boot-starter-actuator a dependency in Maven and allow Endpoints access in the configuration.
Spring Boot 3.x can be accessed by visiting http://127.0.0.1:18084/actuator/nacosconfig .

As shown in the figure above, Sources indicates which Nacos Config configuration items the client has obtained information from, and RefreshHistory indicates the history of dynamic refresh, with a maximum of 20 entries saved. NacosConfig Properties is the configuration of the Nacos Config Starter itself.
| Configuration item | key | Default value | Description |
|---|---|---|---|
| Server address | spring. Cloud. Nacos. Config. Server-addr | server IP and port | |
| Prefix of DataId | spring. Cloud. Nacos. Config. Prefix | ${ spring. Application. Name } | Prefix of DataId. The default value is the application name |
| Group | spring.cloud.nacos.config.group | DEFAULT_GROUP | |
| Suffix of DataId and content file format | spring. Cloud. Nacos. Config. File -extension | properties | Suffix of DataId, which is also the file format of configuration content. Currently, only properties is supported |
| Encoding method of the configured content | spring. Cloud. Nacos. Config. Encode | UTF-8 | Configured encoding |
| Obtain the configured timeout | spring. Cloud. Nacos. Config. Timeout | 3000 | Unit: ms |
| Namespace of configuration | spring. Cloud. Nacos. Config. Namespace | One of the common scenarios is to distinguish and isolate the configurations of different environments, such as the resource isolation between the development and testing environments and the production environment. | |
| AccessKey | spring.cloud.nacos.config.access-key | ||
| SecretKey | spring.cloud.nacos.config.secret-key | ||
| Relative path | spring. Cloud. Nacos. Config. Context-path | Relative path of the server API | |
| Access point | spring. Cloud. Nacos. Config. Endpoint | The domain name of a service in a region. The server address can be obtained dynamically through this domain name | |
| Whether to enable listening and automatic refresh | spring. Cloud. Nacos. Config. Refresh -enabled | true | |
| Cluster service name | spring. Cloud. Nacos. Config. Cluster -name |
Before launching the Nacos Discovery sample for demonstration, take a look at how Spring Cloud applications access Nacos Discovery.
Note that this section is only for your convenience to understand the access method. The access work has been completed in this sample code, and you do not need to modify it.
-
First, modify the
pom.xmlfile and introduce spring-cloud-alibaba-nacos-discovery-starter;<dependency> <groupId>com.alibaba.cloud</groupId> <artifactId>spring-cloud-starter-alibaba-nacos-discovery</artifactId> </dependency>
-
Configuring a Nacos Server address in an
/src/main/resources/application.propertiesapplied configuration file;spring.cloud.nacos.discovery.server-addr=127.0.0.1:8848 -
Use @ EnableDiscoveryClient annotation to enable service registration and discovery;
@SpringBootApplication
@EnableDiscoveryClient
public class ProviderApplication {

    public static void main(String[] args) {
        SpringApplication.run(ProviderApplication.class, args);
    }

    @RestController
    class EchoController {
        @GetMapping(value = "/echo/{string}")
        public String echo(@PathVariable String string) {
                return string;
        }
    }
}
-
Add the configuration, and add the basic configuration information in the nacos-discovery-provider-example project
/src/main/resources/application.properties;spring.application.name=service-provider server.port=18082
-
Start the application, support IDE direct start and start after compilation and packaging.
- IDE direct startup: Find the main class
ProviderApplicationof the nacos-discovery-provider-example project, and execute the main method to start the application. - Start after compilation: Compile and package
mvn clean packagethe project in the nacos-discovery-provider-example project, and thenjava -jar nacos-discovery-provider-example.jarstart the application.
- IDE direct startup: Find the main class
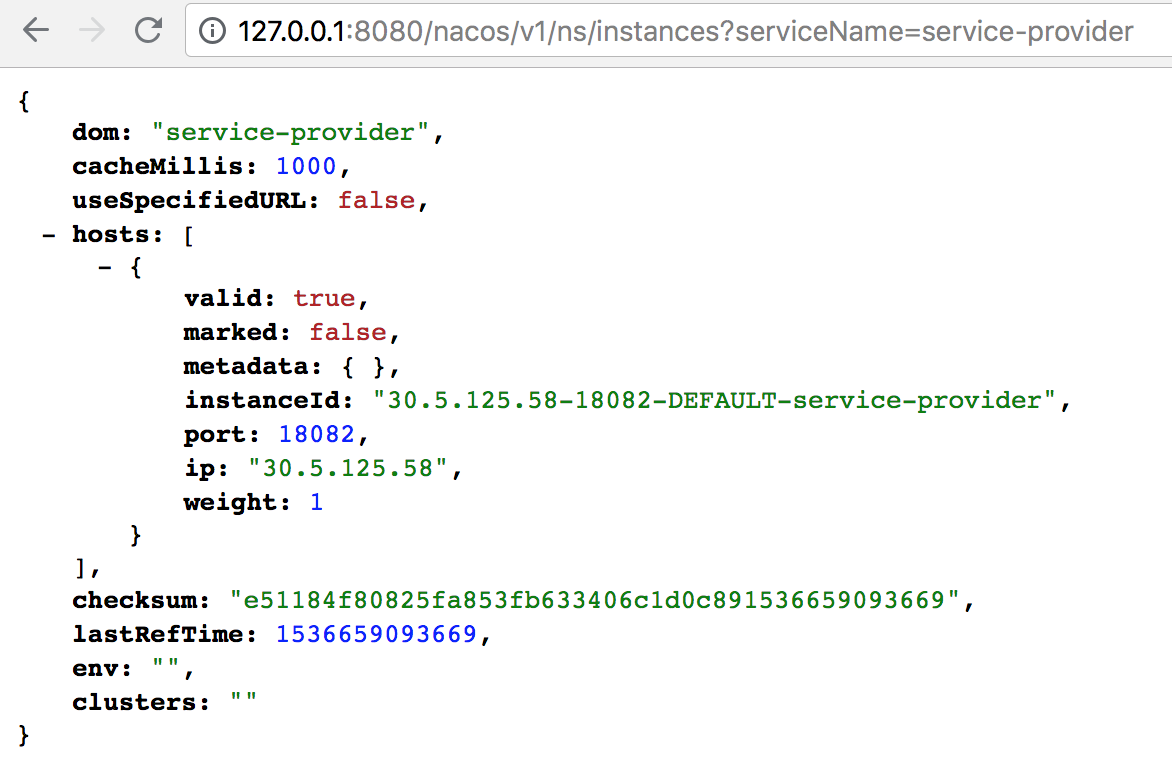
Enter this address http://127.0.0.1:8848/nacos/v1/ns/catalog/instances?serviceName=service-provider&clusterName=DEFAULT&pageSize=10&pageNo=1&namespaceId= in the browser and click Jump to see that the service node has been successfully registered to the Nacos Server.
<dependencies>
    <dependency>
        <groupId>org.springframework.cloud</groupId>
        <artifactId>spring-cloud-loadbalancer</artifactId>
    </dependency>
</dependencies>
Add the following configuration to use the load balancing strategy provided by the Spring Cloud Alibaba community for Spring Cloud Loadbalancer load balancing dependencies, so as to use all the capabilities provided by the Spring Cloud Alibaba:
spring.cloud.loadbalancer.ribbon.enabled=false
spring.cloud.loadbalancer.nacos.enabled=trueAfter configuring the Spring Cloud Loadbalancer as a load balancing strategy, the application will register the IPv4 address and IPv6 address of the microservice in the registration center by default after starting, where the IPv4 address will be stored under the IP field in the Nacos service list. The IPv6 address is in the metadata field of Nacos, and its corresponding Key is IPv6. When the service consumer calls the service provider, it will select the appropriate IP address type to initiate the service call according to its own IP address stack support. Specific rules: (1) If the service consumer itself supports both IPv4 and IPv6 address stacks or only supports IPv6 address stacks, the service consumer will use the IPv6 address provided by the service to initiate a service call. If the IPv6 address call fails, if it also supports IPv4 address stacks, (2) When the service consumer itself only supports IPv4 single address stack, the service consumer will use the IPv4 address provided by the service to initiate a service call.
If you want to register using only IPv4 addresses, you can use the following configuration at the application. Properties:
spring.cloud.nacos.discovery.ip-type=IPv4If you want to use only IPv6 addresses, you can use the following configuration on the application. Properties:
spring.cloud.nacos.discovery.ip-type=IPv6Here's a look at the code for the nacos-discovery-consumer-example project to show how to RestTemplate and FeignClient.
Note that this section is only for the convenience of understanding the access method. The access work has been completed in this sample code, and you do not need to modify it. Only Ribbon, RestTemplate and FeignClient are involved here. If other service discovery components have been used, Nacos Discovery can be accessed by directly replacing dependencies.
-
Add the @ LoadBalanced annotation to make the RestTemplate access the Ribbon
@Bean
@LoadBalanced
public RestTemplate restTemplate() {
   return new RestTemplate();
}
-
FeignClient has been integrated with Ribbon by default. Here is how to configure a FeignClient.
@FeignClient(name = "service-provider")
public interface EchoService {
   @GetMapping(value = "/echo/{str}")
   String echo(@PathVariable("str") String str);
}
Use the @ FeignClient annotation to wrap the Echo Service interface as a FeignClient, and the attribute name corresponds to the service name service-provider.
The @ RequestMapping annotation on the echo method corresponds the echo method to the URL "/echo/{ str}", and the @ PathVariable annotation corresponds the str in
{str}the URL path to the parameter of the echo method. -
After the above configuration is completed, the two are automatically injected into the TestController.
@RestController
public class TestController {

    @Autowired
    private RestTemplate restTemplate;
    @Autowired
    private EchoService echoService;

    @GetMapping(value = "/echo-rest/{str}")
    public String rest(@PathVariable String str) {
        return restTemplate.getForObject("http://service-provider/echo/" + str, String.class);
    }
    @GetMapping(value = "/echo-feign/{str}")
    public String feign(@PathVariable String str) {
        return echoService.echo(str);
    }
}
-
Configure the necessary configuration and add the basic configuration information in the nacos-discovery-consumer-example project
/src/main/resources/application.properties.@RestController public class TestController { @Autowired private RestTemplate restTemplate; @Autowired private EchoService echoService; @GetMapping(value = "/echo-rest/{str}") public String rest(@PathVariable String str) { return restTemplate.getForObject("http://service-provider/echo/" + str, String.class); } @GetMapping(value = "/echo-feign/{str}") public String feign(@PathVariable String str) { return echoService.echo(str); } }
5.Start the application, support IDE direct start and start after compilation and packaging.
- IDE direct startup: Find the main class
ConsumerApplicationof the nacos-discovery-consumer-example project, and execute the main method to start the application. - Start after compilation: Compile and package
mvn clean packagethe project in the nacos-discovery-consumer-example project, and thenjava -jar nacos-discovery-consumer-example.jarstart the application.
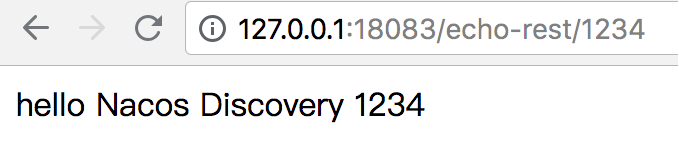
- Enter http://127.0.0.1:18083/echo-rest/1234,点击跳转,可以看到浏览器显示了 the message "hello Nacos Discovery 1234" returned by nacos-discovery-provider-example in the browser address bar to prove that the service discovery is valid.
- Enter http://127.0.0.1:18083/echo-feign/12345,点击跳转,可以看到浏览器显示 the message "hello Nacos Discovery 12345" returned by nacos-discovery-provider-example in the browser address bar to prove that the service discovery is effective.

The Spring Cloud Alibaba Nacos Discovery follows the Spring cloud Common standard. The three interfaces of AutoService Registration, Service Registry and Registration are implemented.
In the startup phase of the Spring Cloud application, the WebServerInitializedEvent event is monitored. After the Web container is initialized, that is, after the WebServerInitializedEvent event is received, the registration action is triggered. Call the register method of the Service Registry to register the service with the Nacos Server.
Spring Boot applications support the use of Endpoints to expose relevant information, as does the Spring Cloud Alibaba Nacos Discovery Starter.
Before using it, you need to add spring-boot-starter-actuator a dependency in Maven and allow Endpoints access in the configuration.
Spring Boot 3.x can be accessed by visiting http://127.0.0.1:18083/actuator/nacos-discovery .

As shown in the figure above, NacosDiscovery Properties refers to the configuration of the Spring Cloud Alibaba Nacos Discovery itself, including the content registered by the local machine, and subscribe refers to the subscribed service information of the local machine.
| Configuration item | key | Default value | Description |
|---|---|---|---|
| Server address | spring. Cloud. Nacos. Discovery. Server -addr | ||
| Service Name | spring. Cloud. Nacos. Discovery. Service | ${ spring. Application. Name } | The name of the service registered to Nacos. The default is the application name |
| Weight | spring. Cloud. Nacos. Discovery. Weight | 1 | Values range from 1 to 100. The larger the value, the greater the weight |
| Network card name | spring. Cloud. Nacos. Discovery. Network -interface | When IP is not configured, the registered IP is the IP address corresponding to this network card. If this item is not configured, the address of the first network card is used by default | |
| Registered IP Address | spring. Cloud. Nacos. Discovery. IP | Highest Priority | |
| Registered IP address type | spring. Cloud. Nacos. Discovery. IP -type | Dual stack address | Both IPv4 and IPv6 types can be configured. If there are multiple IP addresses of the same type in the network card and you want to designate a specific network segment address, you can configure the filtering address with spring.cloud.inetutils.preferred-networks |
| Registered port | spring. Cloud. Nacos. Discovery. Port | -1 | is not configured by default and will be detected automatically |
| Namespace | spring. Cloud. Nacos. Discovery. Namespace | One of the common scenarios is to distinguish and isolate the registration of different environments, such as the isolation of resources (such as configurations and services) between the development and testing environments and the production environment. | |
| AccessKey | spring.cloud.nacos.discovery.access-key | ||
| SecretKey | spring.cloud.nacos.discovery.secret-key | ||
| Metadata | spring. Cloud. Nacos. Discovery. Metadata | Configure using Map format | |
| Log file name | spring. Cloud. Nacos. Discovery. Log -name | ||
| Cluster | spring. Cloud. Nacos. Discovery. Cluster -name | DEFAULT | Nacos cluster name |
| Access point | spring. Cloud. Nacos. Discovery. Endpoint | The domain name of a service in a region. The server address can be obtained dynamically through this domain name | |
| Integrate LoadBalancer | spring. Cloud. Loadbalancer. Nacos. Enabled | false | |
| Nacos Watch enabled | spring. Cloud. Nacos. Discovery. Watch. Enabled | false | can be set to true to enable watch |
| Enable Nacos | spring. Cloud. Nacos. Discovery. Enabled | true | Start by default. If set to false, automatic registration with Nacos will be disabled |
Before starting the demo, learn how Spring Cloud applications connect to Spring Cloud, Nacos Discovery, and Spring Cloud Gateway.
Note that this section is only for your convenience to understand the access method. The access work has been completed in this sample code, and you do not need to modify it.
-
First, modify the
pom.xmlfile to introduce Spring Cloud Alibaba Nacos Discovery Starter and Spring Cloud Gateway Starter.<dependency> <groupId>com.alibaba.cloud</groupId> <artifactId>spring-cloud-starter-alibaba-nacos-discovery</artifactId> </dependency> <dependency> <groupId>org.springframework.cloud</groupId> <artifactId>spring-cloud-starter-gateway</artifactId> </dependency>
-
Configure the Nacos Server address in the applied
/src/main/resources/application.propertiesconfiguration filmsspring.cloud.nacos.discovery.server-addr=127.0.0.1:8848 -
Configure Spring Cloud Gateway routing in the application's
/src/main/resources/application.propertiesconfiguration filespring.cloud.gateway.routes[0].id=nacos-route spring.cloud.gateway.routes[0].uri=lb://service-gateway-provider spring.cloud.gateway.routes[0].predicates[0].name=Path spring.cloud.gateway.routes[0].predicates[0].args[pattern]=/nacos/** spring.cloud.gateway.routes[0].filters[0]=StripPrefix=1
-
Use the @ EnableDiscoveryClient annotation to turn on service registration and discovery
@SpringBootApplication
@EnableDiscoveryClient
public class GatewayApplication {

    public static void main(String[] args) {
        SpringApplication.run(GatewayApplication.class, args);
    }

}
Start the application, support IDE direct start and start after compilation and packaging.
- IDE direct startup: Find the main class
GatewayApplicationof the nacos-gateway-discovery-example project, and execute the main method to start the application. - Start after compilation: Compile and package
mvn clean packagethe project in the nacos-gateway-discovery-example project, and thenjava -jar nacos-gateway-discovery-example.jarstart the application.
Start the application, support IDE direct start and start after compilation and packaging.
- Start the IDE directly: find the main class
ProviderApplicationof the nacos-gateway-provider-example project, and execute the main method to start the application. - Start after compilation: Compile and package
mvn clean packagethe project in the nacos-gateway-provider-example project, and thenjava -jar nacos-gateway-provider-example.jarstart the application.
 curl 'http://127.0.0.1:18085/nacos/echo/hello-world'

 hello Nacos Discovery hello-world⏎
curl 'http://127.0.0.1:18085/nacos/divide?a=6&b=2'
3⏎ Please refer to the Spring Cloud Alibaba website
Nacos provides users with service infrastructure including dynamic service discovery, configuration management, service management, etc., to help users build, deliver and manage their microservice platforms more flexibly and easily. Based on Nacos, users can build modern cloud native applications centered on "services" more quickly. Nacos can be seamlessly integrated with Spring Cloud, Kubernetes/CNCF, Dubbo and other micro-service ecosystems to provide users with a better experience. For more information about Nacos, see the Nacos 项目.
If you have any suggestions or ideas about Spring Cloud Nacos Discovery, please feel free to send them to us in the issue or through other community channels.