<TLDR></TLDR> The final goal this note is to simulate remote debugging of Microsoft Visual Studio 2017 © on a Linux target computer (e.g. a tiny ARM computer, such as a Raspberry Pi © or a FriendlyARM NanoPi M1 Plus ©), but using Microsoft Visual Studio Code ©.
Following the great Scott Hanselman's article Writing and debugging Linux C++ applications from Visual Studio using the "Windows Subsystem for Linux", let's try to create a Cross Platform Linux Console Application project with Visual Studio 2017.

The next step is to configure the IDE to connect via ssh, to the remote Linux client. From the Tools->Options... menu, search for the Cross Platform->Connection Manager item,

and click on the Add button

and fill it with the ssh coordinates of the target client. Now we're ready, let's build our simple project and see what happens.

The first time we'll compile our project in Debug Mode, set a breakpoint in the source file and start a debug session. As shown in the following images the debugger stops correctly at the breakpoint,

and the output is

For sake of completness, let's compile our project also in Release Mode
Reading the build output shown in Figure 4, the steps taken by the full fledged IDE are:
- Validating sources;
- Copying sources remotely to '192.168.0.101';
- Validating architecture;
- Starting remote build;
- Compiling sources: main.cpp;
- Start a debug session of the program running on the remote target;
Omitting the first step, the following are the ones that we will try to reproduce with Visual Studio Code ©
So the thing VS2017 does is copying all the necessary files to the remote target. Taking a close look to what has been copied, we have:
└── projects
    └── ConsoleApplication1
        ├── bin
        │   └── ARM
        │       ├── Debug
        │       │   └── ConsoleApplication1.out
        │       └── Release
        │           └── ConsoleApplication1.out
        ├── main.cpp
        └── obj
            └── ARM
                ├── Debug
                │   └── main.o
                └── Release
                    └── main.o

10 directories, 5 files
pi@NanoPi-M1-Plus:~$
We know that for that purpose, the IDE uses the previously configured ssh connection with the target. For that result we can use the same ssh connection to issue a rsync command, through a VSCode Task,
{
    // See https://go.microsoft.com/fwlink/?LinkId=733558
    // for the documentation about the tasks.json format
    "version": "2.0.0",
    "tasks": [
        {
            "label": "build",
            "type": "shell",
            "command": [
                "rsync -r -a -v -e ssh --delete --exclude '.vscode' $ {workspaceFolder}/ pi@192.168.0.102:/home/pi/projects/console-application/"
                ]
        }
    ]
}With the same tecnique above we can also create the necessary folder structure and build our simple project
{
    // See https://go.microsoft.com/fwlink/?LinkId=733558
    // for the documentation about the tasks.json format
    "version": "2.0.0",
    "tasks": [
        {
            "label": "build",
            "type": "shell",
            "command": [

                ...

                "&&",
                "ssh pi@192.168.0.102",
                "'mkdir /home/pi/projects/console-application/build",
                "&& cd /home/pi/projects/console-application/build",
                "&& cmake .. && make'"
            ]
        }
    ]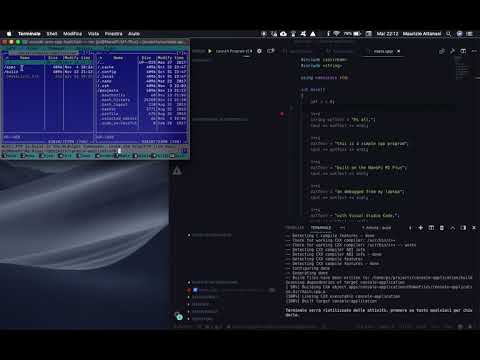
}Last but not least we need a proper way to debug remotely our application. For that purpose we'll configure a debug session using the VSCode C++ debugger features.

First of all, from the debug launch dropdown menu

{
    // Usare IntelliSense per informazioni sui possibili attributi.
    // Al passaggio del mouse vengono visualizzate le descrizioni degli attributi esistenti.
    // Per ulteriori informazioni, visitare: https://go.microsoft.com/fwlink/?linkid=830387
    "version": "0.2.0",
    "configurations": [
        {
            "type": "gdb",
            "request": "launch",
            "name": "Launch Program (SSH)",
            "target": "./build/apps/console-application/console-application",
            "cwd": "${workspaceRoot}",
            "windows": {
                "ssh": {
                    "host": "192.168.1.2",
                    "cwd": "/home/pi/projects/console-application",
                    "keyfile": "C:\\Users\\mauri\\.ssh\\id_rsa",
                    "user": "pi",
                }
            },
            "osx": {
                "ssh": {
                    "host": "192.168.1.2",
                    "cwd": "/home/pi/projects/console-application",
                    "keyfile": "/Users/maurizioattanasi/.ssh/id_rsa",
                    "user": "pi",
                }
            },
            "linux": {
                "ssh": {
                    "host": "192.168.1.2",
                    "cwd": "/home/pi/projects/console-application",
                    "keyfile": "/Users/maurizioattanasi/.ssh/id_rsa",
                    "user": "pi",
                }
            },
            "preLaunchTask": "build"
        }
    ]
}In the following video, available on my YouTube Channel, there is a short demo of the toolchain in action.
Enjoy