The aim of this example is to demonstrate how the cdk-cloud-test-kit can be used to test the Request API construct, as shown below.
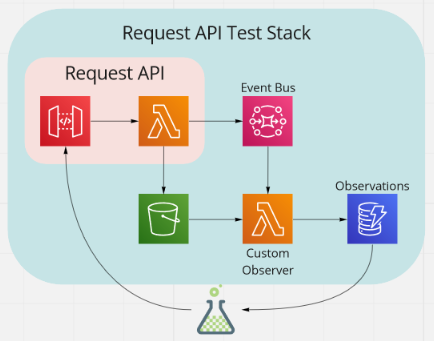
In particular, this example shows how the cdk-cloud-test-kit can be used to help invoke API Gateway instances and how it can be used to create custom observers that can be used to record any sort of observation you like.
The construct under test consists of an API Gateway backed by a Lambda function. The Lambda function does the following:
- Generates a unique reference
- Stores the body of the request in S3, under the reference generated
- Creates a pre-signed URL, allowing access to the S3 object created
- Publishes an event to EventBridge containing the reference and the pre-signed URL
The challenge is to assert the following in a test:
- The Lambda function is wired up correctly to the API Gateway
- The body of the request is stored in S3 and the pre-signed URL can be used to access it
- The event is published as expected to EventBridge
One challenge with writing a test to invoke an API Gateway can be how to specify the auto-generated URL. The cdk-cloud-test-kit can make this easier, by enabling you to tag the resource for easy identification.
In our example, the RequestApi construct exposes the RestApi construct as shown below.
export default class RequestApi extends Construct {

  readonly api: RestApi;

  constructor(scope: Construct, id: string, props: RequestApiProps) {
    // Snip
  }
}
This enable us to tag the resource in our integration test stack, using a call to addTestResourceTag.
const sut = new RequestApi(this, 'SUT', {
  eventBus,
  bucket,
});

this.addTestResourceTag(sut.api, RequestApiTestStack.RequestApiId);
With the resource tagged, the IntegrationTestClient method getApiGatewayBaseUrlByStackId can be used to retrieve the base URL.
const testClient = new IntegrationTestClient({
  testStackId: RequestApiTestStack.Id,
});

let requestApiBaseUrl: string | undefined;

before(async () => {
  await testClient.initialiseClientAsync();
  requestApiBaseUrl = testClient.getApiGatewayBaseUrlByStackId(RequestApiTestStack.RequestApiId);
});
This returns something like the following, which then can be used to call the endpoint using your favourite HTTP client.
https://2eb931k3ze.execute-api.eu-west-2.amazonaws.com
The cdk-cloud-test-kit makes it easy to add simple observer functions that return the event received. However, sometimes you want to have an observer that can record more than the event. In our case, we want to assert that the pre-signed URL works as expected.
To do this, we create the handler as show below. It uses the fetch npm package to use the pre-signed URL to retrieve the S3 object, then records the event detail along with the retrieved data.
const testFunctionClient = new TestFunctionClient(new DocumentClient());

export const handler = async (
  event: EventBridgeEvent<'LoanApplicationSubmitted', LoanApplicationSubmitted>
): Promise<any> => {

  const fetchResponse = await fetch(event.detail.data.loanApplicationDetailsUrl);
  const loanApplicationDetails: LoanApplicationDetails = await fetchResponse.json();

  await testFunctionClient.recordObservationDataAsync({
    actualEventDetail: event.detail,
    actualLoanApplicationDetails: loanApplicationDetails,
  });
};
In our integration test stack, we use the addTestFunction method to ensure the function has access to the integration test table where the observations are written.
this.addTestFunction(
  new NodejsFunction(this, RequestApiTestStack.EventObserverId, {
    logRetention: RetentionDays.ONE_DAY,
  })
);
We then create a test event bus and add rule so that the custom observer receives the event.
const eventBus = new EventBus(this, 'EventBus');

this.addEventBridgeRuleTargetFunction(
  this.addEventBridgePatternRule('Rule', eventBus, {
    detailType: [EventDetailType.LoanApplicationSubmitted],
  }),
  RequestApiTestStack.EventObserverId
);
Finally, within the test we can wait until we have at least one observation.
// Await

const { observations, timedOut } = await testClient.pollTestAsync({
  until: async (o) => o.length > 0,
});

// Assert

expect(timedOut, 'timedOut').to.be.false;

const { actualEventDetail, actualLoanApplicationDetails } = observations[0].data;
We can then inspect the contents of actualEventDetail and actualLoanApplicationDetails and verify that our construct is working as expected.