Before you start, you need to have the following installed:
After you downloaded the above, connect the pgadmin4 to your postgresql local server by following the instruction here
If you have these already installed, you are ready to start.
- Follow the instruction on the Fork, Clone, and Remote page for this step.
-
Create a new virtual environment:
virtualenv venv --python=python3. Note: Do not use the same virtual environment for Mentorship System and BIT. -
Activate the virtual environment:
source ./venv/bin/activateFor git bash users :
source ./venv/Scripts/activateFor cmd users :
venv\Scripts\activate
Install all dependencies in the requirements.txt file: pip install -r requirements.txt
-
Run postgresql shell command:
psql. -
Create database, name it "bit_schema":
create DATABASE bit_schema; -
If you are not currently connected as
postgres, run the following to connect to the database you've just created as the superuserpostgres.\c bit_schema postgres

- Create the BIT schema:
create schema bitschema; - Confirm to check the new schema has been added.
You should see 2 schemas, public and bitschema.

You can now closed the psql shell by typing \q and hit enter.
You should see the local_data and when you expand the arrow, you should see the 2 schemas.

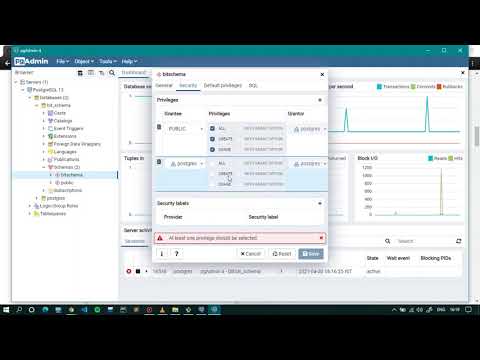
By default, public schema will be accessible to PUBLIC and postgres users. We need to make sure bitschema and bit_schema also have the same permission settings.
To do this, click on bit_schema on the left sidebar, go to Properties (top navbar) > Edit (top right) and adjust the settings under the Security tab to look like the screenshots below. Do the same with bitschema.

Note: If you happened to create the bit_schema under your username instead of postgres, don't worry, don't change anything else, just add PUBLIC access on top of the existing one.
To set up the test database, do the same steps as creating bit_schema above (see 3rd step), but change the name to bit_schema_test instead. Don't forget to also create bitschema as well as 2 other required schemas for PostgreSQL tests: test_schema and test_schema_2. Remember to change the permission settings to include PUBLIC in all added schemas.
Your bit_schema_test database should look like this screenshot now.

To make sure the second schema bitschema is discoverable, set the search_path to bitschema and public from the terminal. The steps are as followed:
-
Run the command below to make sure we have 2 schemas already in the database
$ psql -c "\dn;" -U postgres -d bit_schema
you should see the following

-
Run the next command to show the existing search_path
$ psql -c "show search_path;" -U postgres -d bit_schema

-
Then run this command to set new search_path to both bitschema and public
psql -c "ALTER DATABASE bit_schema SET search_path TO bitschema,public;" -U postgres -d bit_schema

- Finally, run the same command on step 2 to check if the new path has been set

Do the same steps to set new search_path on bit_schema_test. You just need to set bitschema and public as it is done here (no need to set search path for test_schema and test_schema_2 as there are the default postgresql test schemas)
Now when you run the application using python run.py (after first completing step 7) from the terminal, you should see that the tables are created under each schemas.

Update the values of corresponding environment variables or make sure you exported the following environment variables:
export FLASK_ENVIRONMENT_CONFIG = <local-or-dev-or-test-or-prod>
export SECRET_KEY = <your-secret-key>
export SECURITY_PASSWORD_SALT = <your-security-password-salt>
export MAIL_DEFAULT_SENDER = <mail-default-sender>
export MAIL_SERVER = <mail-server>
export APP_MAIL_USERNAME = <app-mail-username>
export APP_MAIL_PASSWORD = <app-mail-password>
export MOCK_EMAIL = <True-or-False>
export FLASK_APP=run.py
NOTE: If you are on a Windows or Linux OS, you must do the following steps to allow connection to your local postgresql database:
- Go to
config.py - Under
LocalConfig, uncomment line 88 and comment-out line 86

- Then go back to your .env file and add your db credentials as per the following
Note: For Windows or Ubuntu machines, you might have to remove export from the front of these variables to make it work.
export DB_TYPE=postgresql
export DB_USERNAME= <db-username>
export DB_PASSWORD= <db-password>
export DB_ENDPOINT= localhost:5432
export DB_NAME= bit_schema
export DB_TEST_NAME=bit_schema_test
Important: Depending on your OS, you can use DB_TYPE from the following options:
* postgresql
* postgres
* postgresql+psycopg2
* postgres+psycopg2
Now, you can run the app by executing the following on the terminal: python run.py
Navigate to http://localhost:5000 in your browser
When you are done using the app, deactivate the virtual environment: deactivate
To run the unitests run the following command in the terminal (while the virtual environment is activated):
python -m unittest discover tests
Important If you are running test cases from Windows or Ubuntu OS, you also need to do the following extra steps to make sure the app can access your local test database:
- uncomment line 102 under the
TestingConfigsection inconfig.pyand comment out line 100

IMPORTANT!!! For BIT project, you need to run a BIT version of MS backend server (at least until BIT and MS backend are fully integrated). Setup MS-for-BIT server by following the setup instruction for Mentorship Backend here but using the code base from Maya Treacy's fork repository ms-backend-server branch. To do this, run the following codes on the terminal after you fork and clone the MS backend repository:
$ git checkout -b bit-ms-backend-server develop
$ git pull https://github.com/mtreacy002/mentorship-backend.git ms-backend-server
Follow the rest of the setup instructions (providing the environment credentials) mentioned on the MS README Run app section. Note Notice that since BIT already occupies port 5000 of your localhost, the MS server is set to run on port 4000 for this BridgeInTech project.
---
Note : If you got stuck while setting up the development environment, then don't worry 😉 You may check out this setup tutorial 👇 :
Now you have setup the BIT and MS backend servers which connected to one postgresql database. You can run both BIT and MS backend servers and try the application starting with creating then login as a new user.
That's it. Happy hacking 👌