In this guide, we'll learn how to execute the end-to-end LLM workflows to develop & productionize LLMs at scale.
- Data preprocessing: prepare our dataset for fine-tuning with batch data processing.
- Fine-tuning: tune our LLM (LoRA / full param) with key optimizations with distributed training.
- Evaluation: apply batch inference with our tuned LLMs to generate outputs and perform evaluation.
- Serving: serve our LLMs as a production application that can autoscale, swap between LoRA adapters, etc.
Throughout these workloads we'll be using Ray, a framework for distributing ML, used by OpenAI, Netflix, Uber, etc. And Anyscale, a platform to scale your ML workloads from development to production.
💵 Cost: $0 (using free Anyscale credits)
🕑 Total time: 90 mins (including fine-tuning)
🔄 REPLACE indicates to replace with your unique values
💡 INSIGHT indicates infrastructure insight
Join Slack community to share issues / questions.
We can execute this notebook entirely for free (no credit card needed) by creating an Anyscale account. Once you log in, you'll be directed to the main console where you'll see a collection of notebook templates. Click on the "End-to-end LLM Workflows" to open up our guide and click on the README.ipynb to get started.
Workspaces are a fully managed development environment which allow us to use our favorite tools (VSCode, notebooks, terminal, etc.) on top of infinite compute (when we need it). In fact, by clicking on the compute at the top right (
✅ 1 node, 8 CPU), we can see the cluster information:
- Head node (Workspace node): manages the cluster, distributes tasks, and hosts development tools.
- Worker nodes: machines that execute work orchestrated by the head node and can scale back to 0.

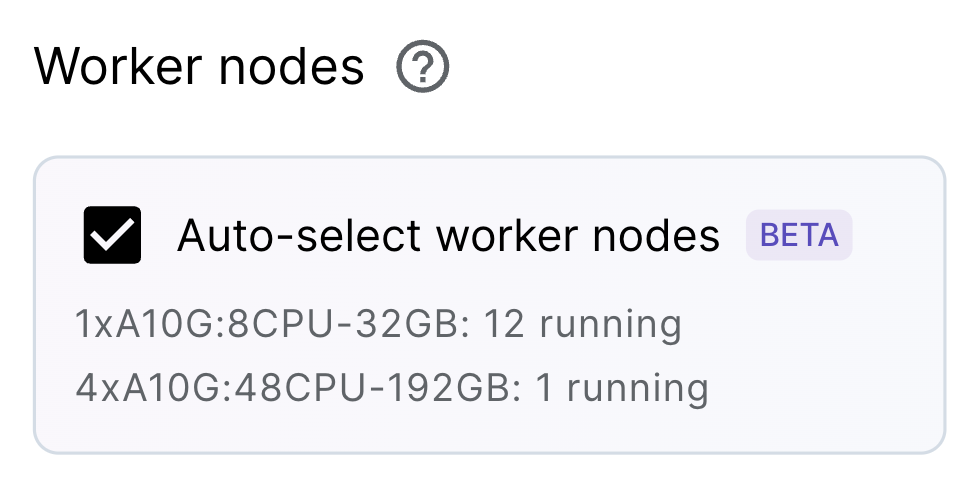
💡 INSIGHT : Because we have Auto-select worker nodes enabled, that means that the required worker nodes (ex. GPU workers) will automagically be provisioned based on our workload's needs! They'll spin up, run the workload and then scale back to zero. This allows us to maintain a lean workspace environment (and only pay for compute when we need it) and completely remove the need to manage any infrastructure.
Note: we can explore all the metrics (ex. hardware util), logs, dashboards, manage dependencies (ex. images, pip packages, etc.) on the menu bar above.
import os
import ray
import warnings
warnings.filterwarnings("ignore")
%load_ext autoreload
%autoreload 2
We'll need a free Hugging Face token to load our base LLMs and tokenizers. And since we are using Llama models, we need to login and accept the terms and conditions here.
🔄 REPLACE : Place your unique HF token below. If you accidentally ran this code block before pasting your HF token, then click the Restart button up top to restart the notebook kernel.
# Initialize HF token
os.environ['HF_TOKEN'] = ''  # <-- replace with your token
ray.init(runtime_env={'env_vars': {'HF_TOKEN': os.environ['HF_TOKEN']}})
(autoscaler +15m27s) [autoscaler] Downscaling node i-0267f387d8cf66c2e (node IP: 10.0.21.202) due to node idle termination.
(autoscaler +15m28s) [autoscaler] Cluster resized to {8 CPU, 0 GPU}.We'll start by preprocessing our data in preparation for fine-tuning our LLM. We'll use batch processing to apply our preprocessing across our dataset at scale.

For our task, we'll be using the Viggo dataset dataset, where the input (meaning_representation) is a structured collection of the overall intent (ex. inform) and entities (ex. release_year) and the output (target) is an unstructured sentence that incorporates all the structured input information. But for our task, we'll reverse this task where the input will be the unstructured sentence and the output will be the structured information.
# Input (unstructured sentence):
"Dirt: Showdown from 2012 is a sport racing game for the PlayStation, Xbox, PC rated E 10+ (for Everyone 10 and Older). It's not available on Steam, Linux, or Mac."

# Output (intent + entities):
"inform(name[Dirt: Showdown], release_year[2012], esrb[E 10+ (for Everyone 10 and Older)], genres[driving/racing, sport], platforms[PlayStation, Xbox, PC], available_on_steam[no], has_linux_release[no], has_mac_release[no])"
from datasets import load_dataset
ray.data.set_progress_bars(enabled=False)# Load the VIGGO dataset
dataset = load_dataset("GEM/viggo", trust_remote_code=True)# Data splits
train_set = dataset['train']
val_set = dataset['validation']
test_set = dataset['test']
print (f"train: {len(train_set)}")
print (f"val: {len(val_set)}")
print (f"test: {len(test_set)}")train: 5103
val: 714
test: 1083
# Sample
train_set[0]
{
"gem_id": "viggo-train-0",
"meaning_representation": "inform(name[Dirt: Showdown], release_year[2012], esrb[E 10+ (for Everyone 10 and Older)], genres[driving/racing, sport], platforms[PlayStation, Xbox, PC], available_on_steam[no], has_linux_release[no], has_mac_release[no])",
"target": "Dirt: Showdown from 2012 is a sport racing game for the PlayStation, Xbox, PC rated E 10+ (for Everyone 10 and Older). It's not available on Steam, Linux, or Mac.",
"references": [
"Dirt: Showdown from 2012 is a sport racing game for the PlayStation, Xbox, PC rated E 10+ (for Everyone 10 and Older). It's not available on Steam, Linux, or Mac."
]
}We'll use Ray to load our dataset and apply preprocessing to batches of our data at scale.
import re# Load as a Ray Dataset
train_ds = ray.data.from_items(train_set)
train_ds.take(1)[
{
  "gem_id": "viggo-train-0",
  "meaning_representation": "inform(name[Dirt: Showdown], release_year[2012], esrb[E 10+ (for Everyone 10 and Older)], genres[driving/racing, sport], platforms[PlayStation, Xbox, PC], available_on_steam[no], has_linux_release[no], has_mac_release[no])",
  "target": "Dirt: Showdown from 2012 is a sport racing game for the PlayStation, Xbox, PC rated E 10+ (for Everyone 10 and Older). It's not available on Steam, Linux, or Mac.",
  "references": [
    "Dirt: Showdown from 2012 is a sport racing game for the PlayStation, Xbox, PC rated E 10+ (for Everyone 10 and Older). It's not available on Steam, Linux, or Mac."
  ]
}
]The preprocessing we'll do involves formatting our dataset into the schema required for fine-tuning (system, user, assistant) conversations.
system: description of the behavior or personality of the model. As a best practice, this should be the same for all examples in the fine-tuning dataset, and should remain the same system prompt when moved to production.user: user message, or "prompt," that provides a request for the model to respond to.assistant: stores previous responses but can also contain examples of intended responses for the LLM to return.
conversations = [
    {"messages": [
        {'role': 'system', 'content': system_content},
        {'role': 'user', 'content': item['target']},
        {'role': 'assistant', 'content': item['meaning_representation']}]},
    {"messages": [...],}
    ...
]
def to_schema(item, system_content):
messages = [
{'role': 'system', 'content': system_content},
{'role': 'user', 'content': item['target']},
{'role': 'assistant', 'content': item['meaning_representation']}]
return {'messages': messages}Our system_content will guide the LLM on how to behave. Our specific directions involve specifying the list of possible intents and entities to extract.
# System content
system_content = (
"Given a target sentence construct the underlying meaning representation of the input "
"sentence as a single function with attributes and attribute values. This function "
"should describe the target string accurately and the function must be one of the "
"following ['inform', 'request', 'give_opinion', 'confirm', 'verify_attribute', "
"'suggest', 'request_explanation', 'recommend', 'request_attribute']. The attributes "
"must be one of the following: ['name', 'exp_release_date', 'release_year', 'developer', "
"'esrb', 'rating', 'genres', 'player_perspective', 'has_multiplayer', 'platforms', "
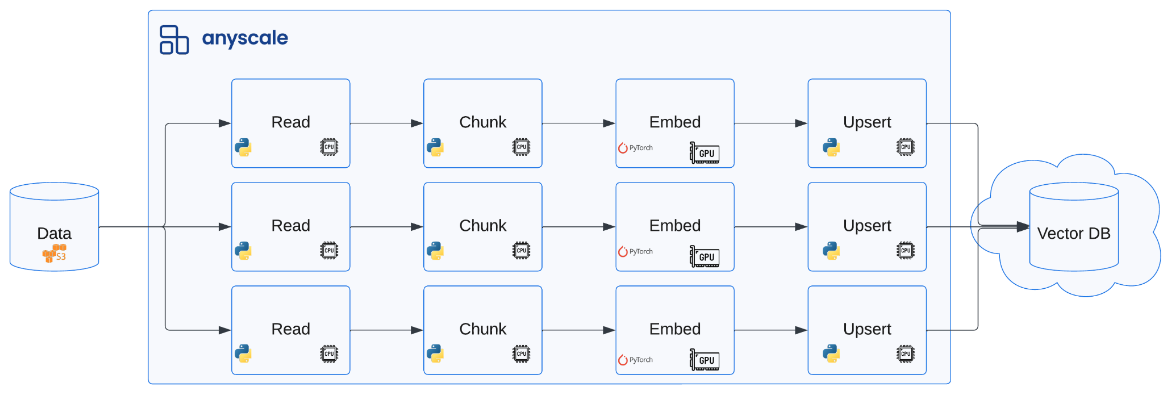
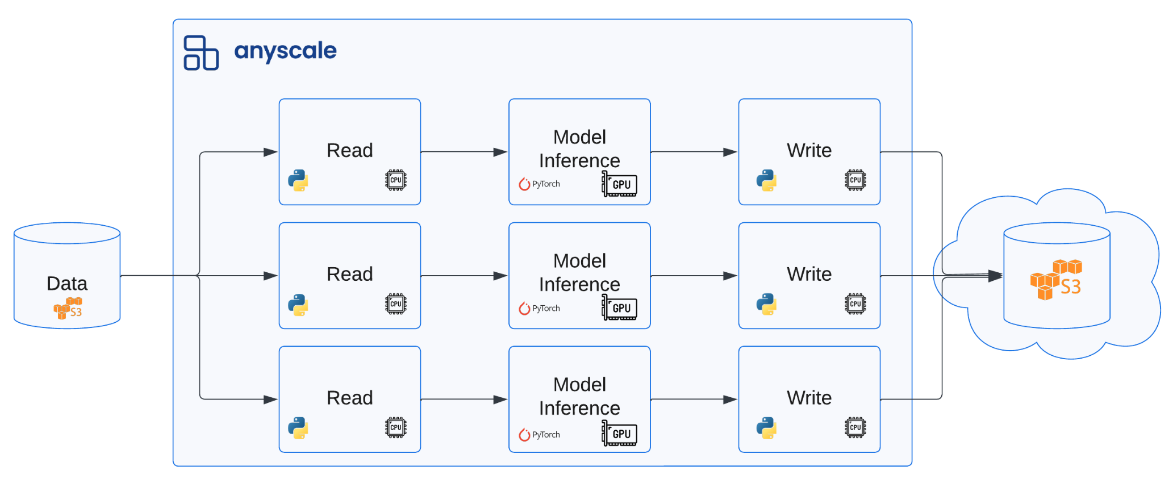
"'available_on_steam', 'has_linux_release', 'has_mac_release', 'specifier']")To apply our function on our dataset at scale, we can pass it to ray.data.Dataset.map. Here, we can specify the function to apply to each sample in our data, what compute to use, etc. The diagram below shows how we can read from various data sources (ex. cloud storage) and apply operations at scale across different hardware (CPU, GPU). For our workload, we'll just use the default compute strategy which will use CPUs to scale out our workload.
Note: If we want to distribute a workload across batches of our data instead of individual samples, we can use ray.data.Dataset.map_batches. We'll see this in action when we perform batch inference in our evaluation template. There are also many other distributed operations we can perform on our dataset.
# Distributed preprocessing
ft_train_ds = train_ds.map(to_schema, fn_kwargs={'system_content': system_content})
ft_train_ds.take(1)
[
{
"messages": [
{
"content": "Given a target sentence construct the underlying meaning representation of the input sentence as a single function with attributes and attribute values. This function should describe the target string accurately and the function must be one of the following ['inform', 'request', 'give_opinion', 'confirm', 'verify_attribute', 'suggest', 'request_explanation', 'recommend', 'request_attribute']. The attributes must be one of the following: ['name', 'exp_release_date', 'release_year', 'developer', 'esrb', 'rating', 'genres', 'player_perspective', 'has_multiplayer', 'platforms', 'available_on_steam', 'has_linux_release', 'has_mac_release', 'specifier']",
"role": "system"
},
{
"content": "Dirt: Showdown from 2012 is a sport racing game for the PlayStation, Xbox, PC rated E 10+ (for Everyone 10 and Older). It's not available on Steam, Linux, or Mac.",
"role": "user"
},
{
"content": "inform(name[Dirt: Showdown], release_year[2012], esrb[E 10+ (for Everyone 10 and Older)], genres[driving/racing, sport], platforms[PlayStation, Xbox, PC], available_on_steam[no], has_linux_release[no], has_mac_release[no])",
"role": "assistant"
}
]
}
]# Repeat the steps for other splits
ft_val_ds = ray.data.from_items(val_set).map(to_schema, fn_kwargs={'system_content': system_content})
ft_test_ds = ray.data.from_items(test_set).map(to_schema, fn_kwargs={'system_content': system_content})We can save our data locally and/or to remote storage to use later (training, evaluation, etc.). All workspaces come with a default cloud storage locations and shared storage that we can write to.
os.environ['ANYSCALE_ARTIFACT_STORAGE']'s3://anyscale-test-data-cld-i2w99rzq8b6lbjkke9y94vi5/org_7c1Kalm9WcX2bNIjW53GUT/cld_kvedZWag2qA8i5BjxUevf5i7/artifact_storage'
# Write to cloud storage
ft_train_ds.write_json(f"{os.environ['ANYSCALE_ARTIFACT_STORAGE']}/viggo/train.jsonl")
ft_val_ds.write_json(f"{os.environ['ANYSCALE_ARTIFACT_STORAGE']}/viggo/val.jsonl")
ft_test_ds.write_json(f"{os.environ['ANYSCALE_ARTIFACT_STORAGE']}/viggo/test.jsonl")
# Load from cloud storage
ft_train_ds = ray.data.read_json(f"{os.environ['ANYSCALE_ARTIFACT_STORAGE']}/viggo/train.jsonl")
ft_train_ds.take(1)[
{
"messages": [
{
"content": "Given a target sentence construct the underlying meaning representation of the input sentence as a single function with attributes and attribute values. This function should describe the target string accurately and the function must be one of the following ['inform', 'request', 'give_opinion', 'confirm', 'verify_attribute', 'suggest', 'request_explanation', 'recommend', 'request_attribute']. The attributes must be one of the following: ['name', 'exp_release_date', 'release_year', 'developer', 'esrb', 'rating', 'genres', 'player_perspective', 'has_multiplayer', 'platforms', 'available_on_steam', 'has_linux_release', 'has_mac_release', 'specifier']",
"role": "system"
},
{
"content": "Dirt: Showdown from 2012 is a sport racing game for the PlayStation, Xbox, PC rated E 10+ (for Everyone 10 and Older). It's not available on Steam, Linux, or Mac.",
"role": "user"
},
{
"content": "inform(name[Dirt: Showdown], release_year[2012], esrb[E 10+ (for Everyone 10 and Older)], genres[driving/racing, sport], platforms[PlayStation, Xbox, PC], available_on_steam[no], has_linux_release[no], has_mac_release[no])",
"role": "assistant"
}
]
}
]In this template, we'll fine-tune a large language model (LLM) using our dataset from the previous data preprocessing template.
Note: We normally would not jump straight to fine-tuning a model. We would first experiment with a base model and evaluate it so that we can have a baseline performance to compare it to.

We'll fine-tune our LLM by choosing a set of configurations. We have created recipes for different LLMs in the training configs folder which can be used as is or modified for experiments. These configurations provide flexibility over a broad range of parameters such as model, data paths, compute to use for training, number of training epochs, how often to save checkpoints, padding, loss, etc. We also include several DeepSpeed configurations to choose from for further optimizations around data/model parallelism, mixed precision, checkpointing, etc.
We also have recipes for LoRA (where we train a set of small low ranked matrices instead of the original attention and feed forward layers) or full parameter fine-tuning. We recommend starting with LoRA as it's less resource intensive and quicker to train.
# View the training (LoRA) configuration for llama-3-8B
!cat configs/training/lora/llama-3-8b.yamlmodel_id: meta-llama/Meta-Llama-3-8B-Instruct # <-- change this to the model you want to fine-tune
train_path: s3://llm-guide/data/viggo/train.jsonl # <-- change this to the path to your training data
valid_path: s3://llm-guide/data/viggo/val.jsonl # <-- change this to the path to your validation data. This is optional
context_length: 512 # <-- change this to the context length you want to use
num_devices: 16 # <-- change this to total number of GPUs that you want to use
num_epochs: 4 # <-- change this to the number of epochs that you want to train for
train_batch_size_per_device: 16
eval_batch_size_per_device: 16
learning_rate: 1e-4
padding: "longest" # This will pad batches to the longest sequence. Use "max_length" when profiling to profile the worst case.
num_checkpoints_to_keep: 1
dataset_size_scaling_factor: 10000
output_dir: /mnt/local_storage
deepspeed:
config_path: configs/deepspeed/zero_3_offload_optim+param.json
dataset_size_scaling_factor: 10000 # internal flag. No need to change
flash_attention_2: true
trainer_resources:
memory: 53687091200 # 50 GB memory
worker_resources:
accelerator_type:A10G: 0.001
lora_config:
r: 8
lora_alpha: 16
lora_dropout: 0.05
target_modules:
- q_proj
- v_proj
- k_proj
- o_proj
- gate_proj
- up_proj
- down_proj
- embed_tokens
- lm_head
task_type: "CAUSAL_LM"
modules_to_save: []
bias: "none"
fan_in_fan_out: false
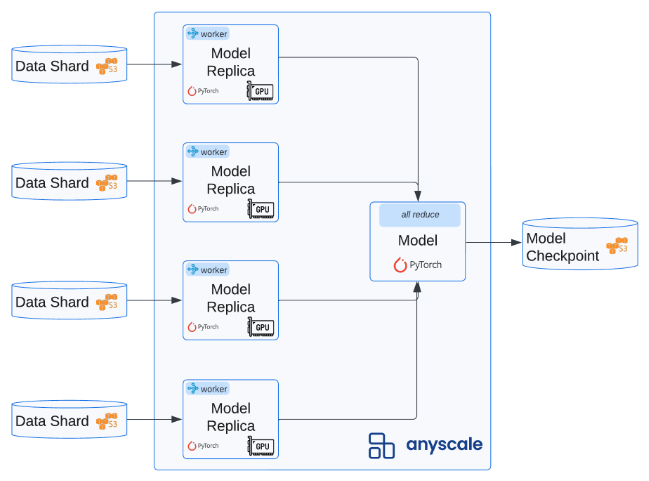
init_lora_weights: trueThis Workspace is still running on a small, lean head node. But based on the compute we want to use (ex. num_devices and accelerator_type) for fine-tuning, the appropriate worker nodes will automatically be initialized and execute the workload. And afterwards, they'll scale back to zero!
💡 INSIGHT : With Ray we're able to execute a large, compute intensive workload like this using smaller, more available resources (ex. using A10s instead of waiting for elusive A100s). And Anyscale's smart instance manager will automatically provision the appropriate and available compute for the workload based on what's needed.
While we could execute python src/ft.py configs/training/lora/llama-3-8b.yaml directly inside a Workspace notebook (see this example), we'll instead kick off the fine-tuning workload as an isolated job. An Anyscale Job is a great way to scale and execute a specific workload. Here, we specify the command that needs to run (ex. python [COMMAND][ARGS]) along with the requirements (ex. docker image, additional, pip packages, etc.).
Note: Executing an Anyscale Job within a Workspace will ensure that files in the current working directory are available for the Job (unless excluded with --exclude). But we can also load files from anywhere (ex. Github repo, S3, etc.) if we want to launch a Job from anywhere.
# View job yaml config
!cat deploy/jobs/ft.yamlname: llm-fine-tuning-guide
entrypoint: python src/ft.py configs/training/lora/llama-3-8b.yaml
image_uri: localhost:5555/anyscale/llm-forge:0.4.3.2
requirements: []
max_retries: 0💡 INSIGHT : When defining this Job config, if we don't specify the compute config to use, then Anyscale will autoselect based on the required compute. However, we also have the optionality to specify and even make highly cost effective decisions such as spot to on-demand fallback (or vice-versa).
# Sample compute config
- name: gpu-worker-a10
  instance_type: g5.2xlarge
  min_workers: 0
  max_workers: 16
  use_spot: true
  fallback_to_ondemand: true
# Job submission
!anyscale job submit --config-file deploy/jobs/ft.yaml --exclude assetsOutput
(anyscale +0.8s) Submitting job with config JobConfig(name='llm-fine-tuning-guide', image_uri='localhost:5555/anyscale/llm-forge:0.4.3.2', compute_config=None, env_vars=None, py_modules=None).
(anyscale +3.2s) Uploading local dir '.' to cloud storage.
(anyscale +4.8s) Job 'llm-fine-tuning-guide' submitted, ID: 'prodjob_515se1nqf8ski7scytd52vx65e'.
(anyscale +4.8s) View the job in the UI: https://console.anyscale.com/jobs/prodjob_515se1nqf8ski7scytd52vx65e
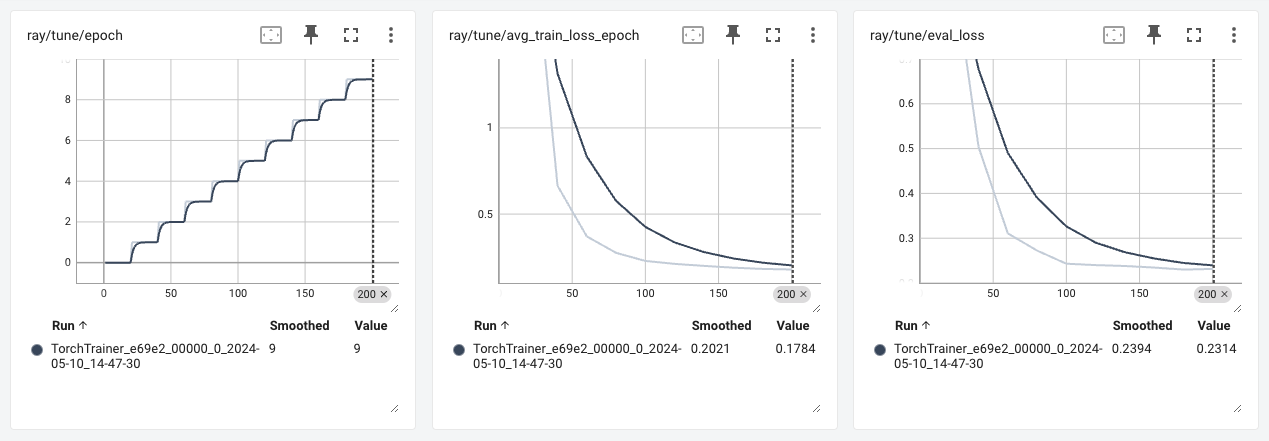
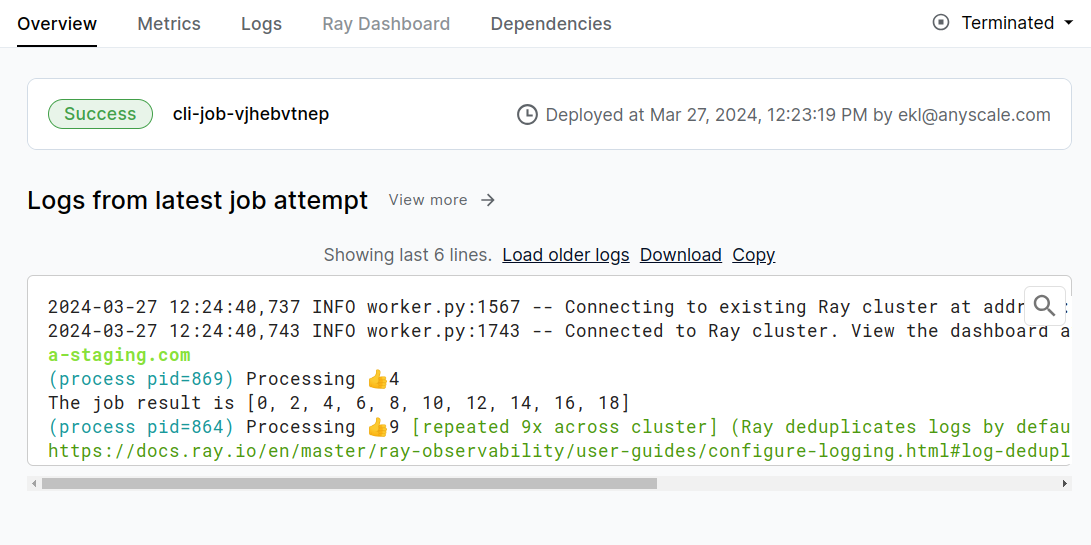
(anyscale +4.8s) Use `--wait` to wait for the job to run and stream logs.This workload (we set to five epochs) will take ~45 min. to complete. As the job runs, you can monitor logs, metrics, Ray dashboard, etc. by clicking on the generated Job link above (https://console.anyscale.com/jobs/prodjob_...)

From the very end of the logs, we can also see where our model artifacts are stored. For example:
Successfully copied files to to bucket: anyscale-test-data-cld-i2w99rzq8b6lbjkke9y94vi5 and path: org_7c1Kalm9WcX2bNIjW53GUT/cld_kvedZWag2qA8i5BjxUevf5i7/artifact_storage/lora_fine_tuning/meta-llama/Meta-Llama-3-8B-Instruct:gokum:atyhk
We'll load these artifacts from cloud storage to a local cluster storage to use for other workloads.
from src.utils import download_files_from_bucket🔄 REPLACE : Update the information below for the specific model and artifacts path for our fine-tuned model (retrieved from the logs from the Anyscale Job we launched above).
# Locations
artifacts_dir = '/mnt/cluster_storage'  # storage accessible by head and worker nodes
model = 'meta-llama/Meta-Llama-3-8B-Instruct'
uuid = 'goku_:ueewk'  # REPLACE with your NAME + MODEL ID (from Job logs)
artifacts_path = (
    f"{os.environ['ANYSCALE_ARTIFACT_STORAGE'].split(os.environ['ANYSCALE_CLOUD_STORAGE_BUCKET'])[-1][1:]}"
    f"/lora_fine_tuning/{model}:{uuid}")
# Download artifacts
download_files_from_bucket(
bucket=os.environ['ANYSCALE_CLOUD_STORAGE_BUCKET'],
path=artifacts_path,
local_dir=artifacts_dir)Downloaded org_7c1Kalm9WcX2bNIjW53GUT/cld_kvedZWag2qA8i5BjxUevf5i7/artifact_storage/lora_fine_tuning/meta-llama/Meta-Llama-3-8B-Instruct:gokum:atyhk/README.md to /mnt/cluster_storage/org_7c1Kalm9WcX2bNIjW53GUT/cld_kvedZWag2qA8i5BjxUevf5i7/
...
Downloaded org_7c1Kalm9WcX2bNIjW53GUT/cld_kvedZWag2qA8i5BjxUevf5i7/artifact_storage/lora_fine_tuning/meta-llama/Meta-Llama-3-8B-Instruct:gokum:atyhk/tokenizer_config.json to /mnt/cluster_storage/org_7c1Kalm9WcX2bNIjW53GUT/cld_kvedZWag2qA8i5BjxUevf5i7/artifact_storage/lora_fine_tuning/meta-llama/Meta-Llama-3-8B-Instruct:gokum:atyhk/tokenizer_config.json
Now we'll evaluate our fine-tuned LLM to see how well it performs on our task. There are a lot of different ways to perform evaluation. For our task, we can use traditional metrics (ex. accuracy, precision, recall, etc.) since we know what the outputs should be (extracted intent and entities).
However for many generative tasks, the outputs are very unstructured and highly subjective. For these scenarios, we can use distance/entropy based metrics like cosine, bleu, perplexity, etc. But, these metrics are often not very representative of the underlying task. A common strategy here is to use a larger LLM to judge the quality of the generated outputs. We can ask the larger LLM to directly assess the quality of the response (ex. rate between 1-5) with a set of rules or compare it to a golden / preferred output and rate it against that.
We'll start by performing offline batch inference where we will use our tuned model to generate the outputs.

# Load test set for eval
ft_test_ds = ray.data.read_json(f"{os.environ['ANYSCALE_ARTIFACT_STORAGE']}/viggo/test.jsonl")
test_data = ft_test_ds.take_all()
test_data[0]
{
"messages": [
{
"content": "Given a target sentence construct the underlying meaning representation of the input sentence as a single function with attributes and attribute values. This function should describe the target string accurately and the function must be one of the following ['inform', 'request', 'give_opinion', 'confirm', 'verify_attribute', 'suggest', 'request_explanation', 'recommend', 'request_attribute']. The attributes must be one of the following: ['name', 'exp_release_date', 'release_year', 'developer', 'esrb', 'rating', 'genres', 'player_perspective', 'has_multiplayer', 'platforms', 'available_on_steam', 'has_linux_release', 'has_mac_release', 'specifier']",
"role": "system"
},
{
"content": "Have you ever given any games on PC but not on Steam a try, like The Sims?",
"role": "user"
},
{
"content": "suggest(name[The Sims], platforms[PC], available_on_steam[no])",
"role": "assistant"
}
]
}# Separate into inputs/outputs
test_inputs = []
test_outputs = []
for item in test_data:
test_inputs.append([message for message in item['messages'] if message['role'] != 'assistant'])
test_outputs.append([message for message in item['messages'] if message['role'] == 'assistant'])We'll also load the appropriate tokenizer to apply to our input data.
from transformers import AutoTokenizer# Model and tokenizer
HF_MODEL = 'meta-llama/Meta-Llama-3-8B-Instruct'
tokenizer = AutoTokenizer.from_pretrained(HF_MODEL)When we fine-tuned our model, special tokens (ex. beginning/end of text, etc.) were automatically added to our inputs. We want to apply the same special tokens to our inputs prior to generating outputs using our tuned model. Luckily, the chat template to apply to our inputs (and add those tokens) is readily available inside our tuned model's tokenizer_config.json file. We can use our tokenizer to apply this template to our inputs.
import json# Extract chat template used during fine-tuning
with open(os.path.join(artifacts_dir, artifacts_path, 'tokenizer_config.json')) as file:
tokenizer_config = json.load(file)
chat_template = tokenizer_config['chat_template']
print (chat_template){% set loop_messages = messages %}{% for message in loop_messages %}{% set content = '<|start_header_id|>' + message['role'] + '<|end_header_id|>
'+ message['content'] | trim + '<|eot_id|>' %}{% if loop.index0 == 0 %}{% set content = bos_token + content %}{% endif %}{{ content }}{% endfor %}{% if add_generation_prompt %}{{ '<|start_header_id|>assistant<|end_header_id|>
' }}{% endif %}
# Apply chat template
test_input_prompts = [{'inputs': tokenizer.apply_chat_template(
    conversation=inputs,
    chat_template=chat_template,
    add_generation_prompt=True,
    tokenize=False,
    return_tensors='np'), 'outputs': outputs} for inputs, outputs in zip(test_inputs, test_outputs)]
test_input_prompts_ds = ray.data.from_items(test_input_prompts)
print (test_input_prompts_ds.take(1))
[
{
"inputs": "system\n\nGiven a target sentence construct the underlying meaning representation of the input sentence as a single function with attributes and attribute values. This function should describe the target string accurately and the function must be one of the following ['inform', 'request', 'give_opinion', 'confirm', 'verify_attribute', 'suggest', 'request_explanation', 'recommend', 'request_attribute']. The attributes must be one of the following: ['name', 'exp_release_date', 'release_year', 'developer', 'esrb', 'rating', 'genres', 'player_perspective', 'has_multiplayer', 'platforms', 'available_on_steam', 'has_linux_release', 'has_mac_release', 'specifier']user\n\nHave you ever given any games on PC but not on Steam a try, like The Sims?assistant\n\n",
"outputs": [
{
"content": "suggest(name[The Sims], platforms[PC], available_on_steam[no])",
"role": "assistant"
}
]
}
]We will use vLLM's offline LLM class to load the model and use it for inference. We can easily load our LoRA weights and merge them with the base model (just pass in lora_path). And we'll wrap all of this functionality in a class that we can pass to ray.data.Dataset.map_batches` to apply batch inference at scale.
from vllm import LLM, SamplingParams
from vllm.anyscale.lora.utils import LoRARequest
class LLMPredictor:
def __init__(self, hf_model, sampling_params, lora_path=None):
self.llm = LLM(model=hf_model, enable_lora=bool(lora_path))
self.sampling_params = sampling_params
self.lora_path = lora_path
def __call__(self, batch):
if not self.lora_path:
outputs = self.llm.generate(
prompts=batch['inputs'],
sampling_params=self.sampling_params)
else:
outputs = self.llm.generate(
prompts=batch['inputs'],
sampling_params=self.sampling_params,
lora_request=LoRARequest('lora_adapter', 1, self.lora_path))
inputs = []
generated_outputs = []
for output in outputs:
inputs.append(output.prompt)
generated_outputs.append(' '.join([o.text for o in output.outputs]))
return {
'prompt': inputs,
'expected_output': batch['outputs'],
'generated_text': generated_outputs,
}During our data preprocessing template, we used the default compute strategy with map_batches. But this time we'll specify a custom compute strategy (concurrency, num_gpus, batch_size and accelerator_type).
# Fine-tuned model
hf_model = 'meta-llama/Meta-Llama-3-8B-Instruct'
sampling_params = SamplingParams(temperature=0, max_tokens=2048)
ft_pred_ds = test_input_prompts_ds.map_batches(
    LLMPredictor,
    concurrency=4,  # number of LLM instances
    num_gpus=1,  # GPUs per LLM instance
    batch_size=10,  # maximize until OOM, if OOM then decrease batch_size
    fn_constructor_kwargs={
        'hf_model': hf_model,
        'sampling_params': sampling_params,
        'lora_path': os.path.join(artifacts_dir, artifacts_path)},
    accelerator_type='A10G',  # A10G or L4
)
# Batch inference will take ~4 minutes
ft_pred = ft_pred_ds.take_all()
ft_pred[3](autoscaler +6m32s) Tip: use `ray status` to view detailed cluster status. To disable these messages, set RAY_SCHEDULER_EVENTS=0.
(autoscaler +6m32s) [autoscaler] [4xA10G:48CPU-192GB] Upscaling 1 node(s).
(autoscaler +6m33s) [autoscaler] [4xA10G:48CPU-192GB|g5.12xlarge] [us-west-2a] [on-demand] Launched 1 instances.
(autoscaler +7m46s) [autoscaler] Cluster upscaled to {56 CPU, 4 GPU}.{
"prompt": "system\n\nGiven a target sentence construct the underlying meaning representation of the input sentence as a single function with attributes and attribute values. This function should describe the target string accurately and the function must be one of the following ['inform', 'request', 'give_opinion', 'confirm', 'verify_attribute', 'suggest', 'request_explanation', 'recommend', 'request_attribute']. The attributes must be one of the following: ['name', 'exp_release_date', 'release_year', 'developer', 'esrb', 'rating', 'genres', 'player_perspective', 'has_multiplayer', 'platforms', 'available_on_steam', 'has_linux_release', 'has_mac_release', 'specifier']user\n\nI like first person games normally, but not even that could make a music game fun for me. In fact in Guitar Hero: Smash Hits, I think the perspective somehow made an already bad game even worse.assistant\n\n",
"expected_output": [
{
"content": "give_opinion(name[Guitar Hero: Smash Hits], rating[poor], genres[music], player_perspective[first person])",
"role": "assistant"
}
],
"generated_text": "give_opinion(name[Guitar Hero: Smash Hits], rating[poor], genres[music], player_perspective[first person])assistant\n\n"
}# Exact match (strict!)
matches = 0
mismatches = []
for item in ft_pred:
if item['expected_output'][0]['content'] == item['generated_text'].split('<|eot_id|>')[0]:
matches += 1
else:
mismatches.append(item)
matches / float(len(ft_pred))0.9399815327793167
Note: you can train for more epochs (num_epochs: 10) to further improve the performance.
Even our mismatches are not too far off and sometimes it might be worth a closer look because the dataset itself might have a few errors that the model may have identified.
# Inspect a few of the mismatches
mismatches[0:2]
[
{
"prompt": "system\n\nGiven a target sentence construct the underlying meaning representation of the input sentence as a single function with attributes and attribute values. This function should describe the target string accurately and the function must be one of the following ['inform', 'request', 'give_opinion', 'confirm', 'verify_attribute', 'suggest', 'request_explanation', 'recommend', 'request_attribute']. The attributes must be one of the following: ['name', 'exp_release_date', 'release_year', 'developer', 'esrb', 'rating', 'genres', 'player_perspective', 'has_multiplayer', 'platforms', 'available_on_steam', 'has_linux_release', 'has_mac_release', 'specifier']user\n\nDance Dance Revolution Universe 3 got poor ratings when it came out in 2008. It might have been the worst multiplayer music game for the Xbox.assistant\n\n",
"expected_output": [
{
"content": "inform(name[Dance Dance Revolution Universe 3], release_year[2008], rating[poor], genres[music], has_multiplayer[yes], platforms[Xbox])",
"role": "assistant"
}
],
"generated_text": "give_opinion(name[Dance Dance Revolution Universe 3], release_year[2008], rating[poor], has_multiplayer[yes], platforms[Xbox])assistant\n\n"
},
{
"prompt": "system\n\nGiven a target sentence construct the underlying meaning representation of the input sentence as a single function with attributes and attribute values. This function should describe the target string accurately and the function must be one of the following ['inform', 'request', 'give_opinion', 'confirm', 'verify_attribute', 'suggest', 'request_explanation', 'recommend', 'request_attribute']. The attributes must be one of the following: ['name', 'exp_release_date', 'release_year', 'developer', 'esrb', 'rating', 'genres', 'player_perspective', 'has_multiplayer', 'platforms', 'available_on_steam', 'has_linux_release', 'has_mac_release', 'specifier']user\n\nA first person game I recently got on Steam is Assetto Corsa. Have you heard of it?assistant\n\n",
"expected_output": [
{
"content": "recommend(name[Assetto Corsa], player_perspective[first person], available_on_steam[yes])",
"role": "assistant"
}
],
"generated_text": "recommend(name[Assetto Corsa], available_on_steam[yes])assistant\n\n"
}
]
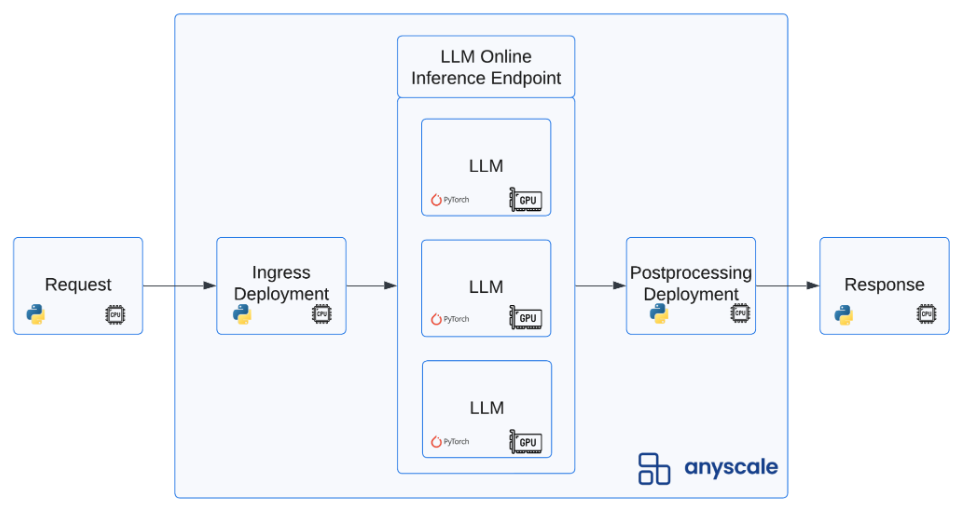
For model serving, we'll first serve it locally, test it and then launch a production grade service that can autoscale to meet any demand.

We'll start by generating the configuration for our service. We provide a convenient CLI experience to generate this configuration but you can create one from scratch as well. Here we can specify where our model lives, autoscaling behavior, accelerators to use, lora adapters, etc.
💡 INSIGHT : Ray Serve and Anyscale support serving multiple LoRA adapters with a common base model in the same request batch which allows you to serve a wide variety of use-cases without increasing hardware spend. In addition, we use Serve multiplexing to reduce the number of swaps for LoRA adapters. There is a slight latency overhead to serving a LoRA model compared to the base model, typically 10-20%.
LoRA weights storage URI: s3://anyscale-test-data-cld-i2w99rzq8b6lbjkke9y94vi5/org_7c1Kalm9WcX2bNIjW53GUT/cld_kvedZWag2qA8i5BjxUevf5i7/artifact_storage/lora_fine_tuning
model: meta-llama/Meta-Llama-3-8B-Instruct:gokum:atyhk
We'll start by running the python command below to start the CLI workflow to generate the service yaml configuration:
mkdir /home/ray/default/deploy/services
cd /home/ray/default/deploy/services
python /home/ray/default/src/generate_serve_config.py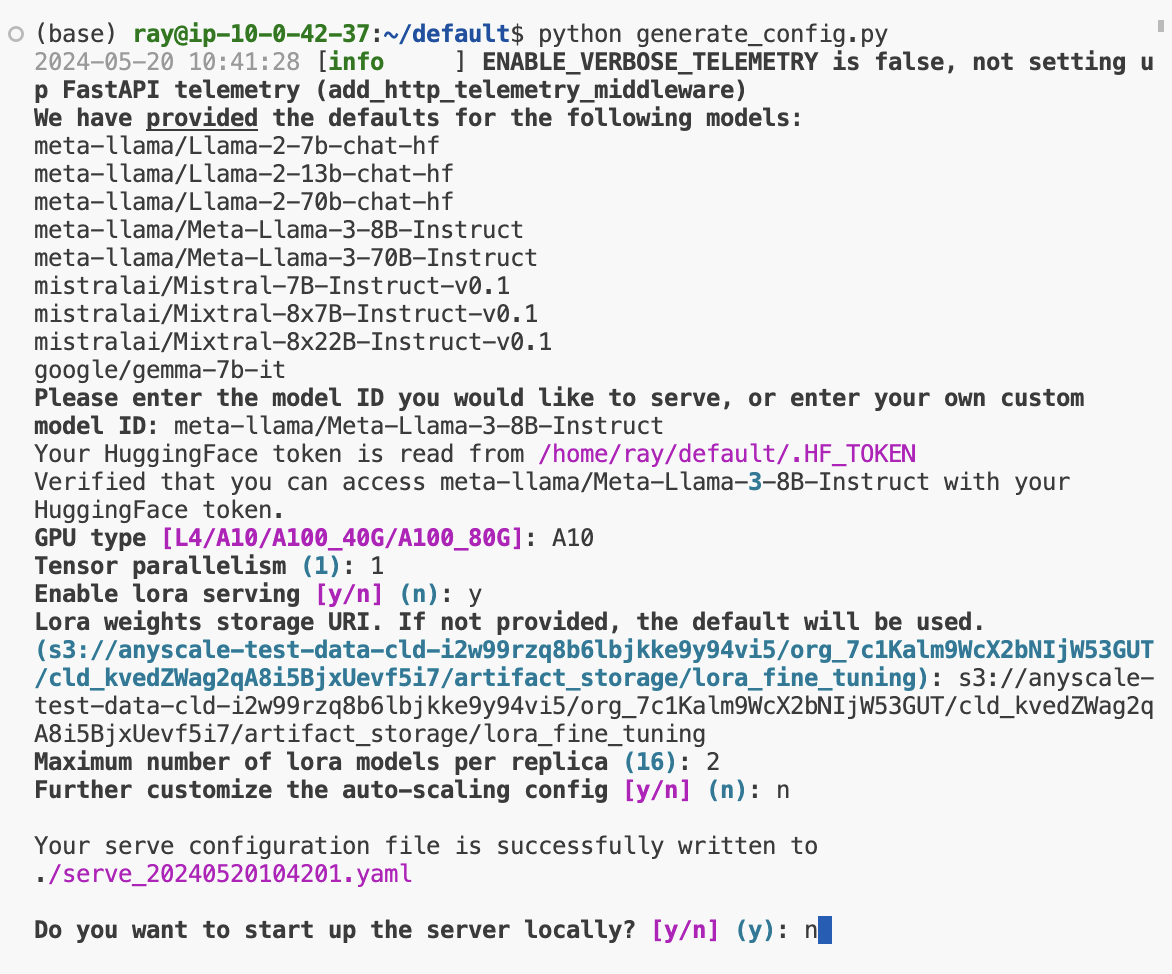
🔄 REPLACE : Use the serve configuration generated for you.
# Generated service configuration
!cat /home/ray/default/deploy/services/serve_{TIMESTAMP}.yamlapplications:
- args:
dynamic_lora_loading_path: s3://anyscale-test-data-cld-i2w99rzq8b6lbjkke9y94vi5/org_7c1Kalm9WcX2bNIjW53GUT/cld_kvedZWag2qA8i5BjxUevf5i7/artifact_storage/lora_fine_tuning
embedding_models: []
function_calling_models: []
models: []
multiplex_lora_adapters: []
multiplex_models:
- ./model_config/model_config_20240516095237.yaml
vllm_base_models: []
import_path: aviary_private_endpoints.backend.server.run:router_application
name: llm-endpoint
route_prefix: /This also generates a model configuration file that has all the information on auto scaling, inference engine, workers, compute, etc. It will be located under /home/ray/default/deploy/services/model_config/{MODEL_NAME}-{TIMESTAMP}.yaml. This configuration also includes the prompt_format which seamlessly matches any formatting we did prior to fine-tuning and applies it during inference automatically.
We can now serve our model locally and query it. Run the follow in the terminal (change to your serve yaml config):
cd /home/ray/default/deploy/services
serve run serve_{TIMESTAMP}.yamlNote: This will take a few minutes to spin up the first time since we're loading the model weights.
from openai import OpenAI# Query function to call the running service
def query(base_url: str, api_key: str):
if not base_url.endswith("/"):
base_url += "/"
# List all models
client = OpenAI(base_url=base_url + "v1", api_key=api_key)
models = client.models.list()
print(models)
# Note: not all arguments are currently supported and will be ignored by the backend
chat_completions = client.chat.completions.create(
model=f'{model}:{uuid}', # with your unique model ID
messages=[
{"role": "system", "content": "Given a target sentence construct the underlying meaning representation of the input sentence as a single function with attributes and attribute values. This function should describe the target string accurately and the function must be one of the following ['inform', 'request', 'give_opinion', 'confirm', 'verify_attribute', 'suggest', 'request_explanation', 'recommend', 'request_attribute']. The attributes must be one of the following: ['name', 'exp_release_date', 'release_year', 'developer', 'esrb', 'rating', 'genres', 'player_perspective', 'has_multiplayer', 'platforms', 'available_on_steam', 'has_linux_release', 'has_mac_release', 'specifier']"},
{"role": "user", "content": "I remember you saying you found Little Big Adventure to be average. Are you not usually that into single-player games on PlayStation?"},
],
temperature=0,
stream=True
)
response = ""
for chat in chat_completions:
if chat.choices[0].delta.content is not None:
response += chat.choices[0].delta.content
return response# Generate response
response = query("http://localhost:8000", "NOT A REAL KEY")
print (response.split('<|eot_id|>')[0])'verify_attribute(name[Little Big Adventure], rating[average], has_multiplayer[no], platforms[PlayStation])'
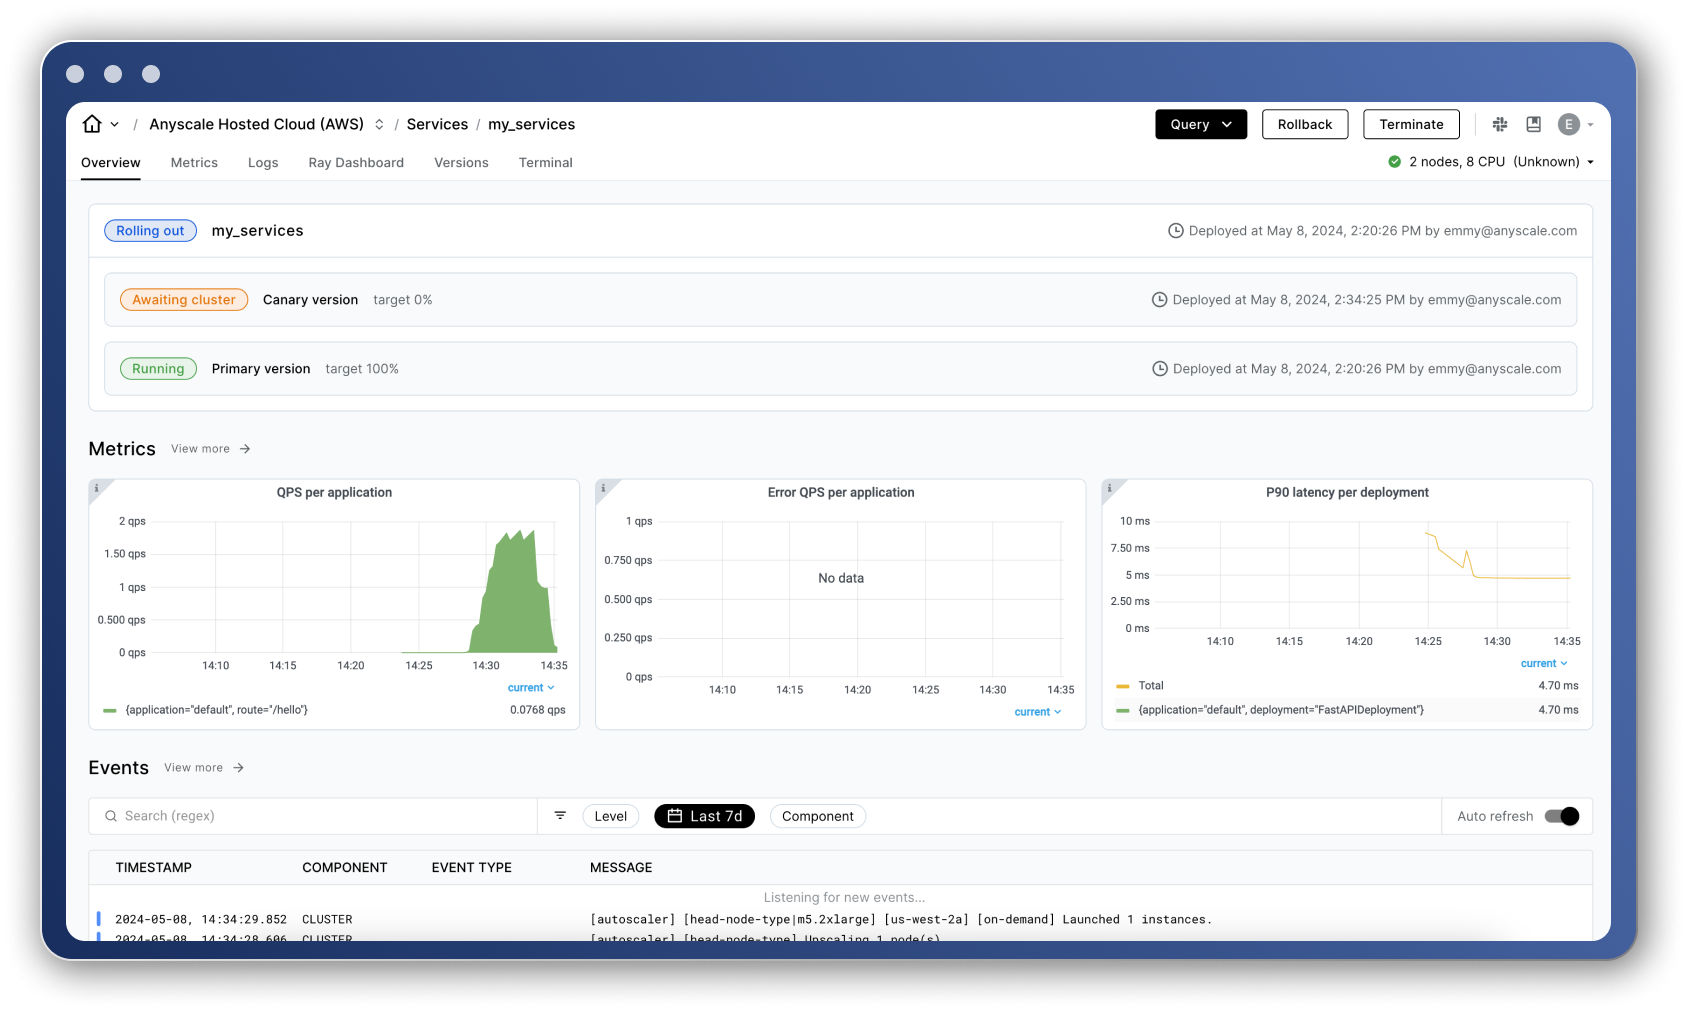
Now we'll create a production service that can truly scale. We have full control over this Service from autoscaling behavior, monitoring via dashboard, canary rollouts, termination, etc. → Anyscale Services
💡 INSIGHT : With Ray Serve and Anyscale, it's extremely easy to define our configuration that can scale to meet any demand but also scale back to zero to create the most efficient service possible. Check out this guide on how to optimize behavior around auto scaling, latency/throughout, etc.
Stop the local service (Control + C) and run the following:
cd /home/ray/default/deploy/services
anyscale service deploy -f serve_{TIMESTAMP}.yamlNote: This will take a few minutes to spin up the first time since we're loading the model weights.
Go to Home > Services (left panel) to view the production service.
🔄 REPLACE : the service_url and service_bearer_token generated for your service (top right corner under the Query button on the Service's page).
# Query the remote serve application we just deployed
service_url = "your_api_url"  # REPLACE ME
service_bearer_token = "your_secret_bearer_token"  # REPLACE ME
query(service_url, service_bearer_token)
'verify_attribute(name[Little Big Adventure], rating[average], has_multiplayer[no], platforms[PlayStation])'
Note: If we chose to fine-tune our model using the simpler Anyscale serverless endpoints method, then we can serve that model by going to Endpoints API > Services on the left panel of the main console page. Click on the three dots on the right side of your tuned model and follow the instructions to query it.
We've now served our model into production via Anyscale Services but we can just easily productionize our other workloads with Anyscale Jobs (like we did for fine-tuning above) to execute this entire workflow completely programmatically outside of Workspaces.
For example, suppose that we want to preprocess batches of new incoming data, fine-tune a model, evaluate it and then compare it to the existing production version. All of this can be productionized by simply launching the workload as a Job, which can be triggered manually, periodically (cron) or event-based (via webhooks, etc.). We also provide integrations with your platform/tools to make all of this connect with your existing production workflows.

💡 INSIGHT : Most industry ML issues arise from a discrepancy between the development (ex. local laptop) and production (ex. large cloud clusters) environments. With Anyscale, your development and production environments can be exactly the same so there is little to no difference introduced. And with features like smart instance manager, the development environment can stay extremely lean while having the power to scale as needed.
🛑 IMPORTANT : Please Terminate your service from the Service page to avoid depleting your free trial credits.
# Clean up
!python src/clear_cell_nums.py
!find . | grep -E ".ipynb_checkpoints" | xargs rm -rf
!find . | grep -E "(__pycache__|\.pyc|\.pyo)" | xargs rm -rf
!rm -rf __pycache__ data .HF_TOKEN deploy/servicesWe have a lot more guides that address more nuanced use cases:
- Batch text embeddings with Ray data
- Continued fine-tuning from checkpoint
- Serving multiple LoRA adapters with same base model (+ multiplexing)
- Deploy models for embedding generation
- Function calling fine-tuning and deployment
- Configs to optimize the latency/throughput
- Configs to control optimization parameters and tensor-parallelism
- Creating a Router between different models (base, fine-tuned, closed-source) to optimize for cost and quality.
- Stable diffusion fine-tuning and serving
And if you're interested in using our hosted Anyscale or connecting it to your own cloud, reach out to us at Anyscale. And follow us on Twitter and LinkedIn for more real-time updates on new features!