#XCGLogger


##tl;dr XCGLogger is the original debug log module for use in Swift projects.
Swift does not include a C preprocessor so developers are unable to use the debug log #define macros they would use in Objective-C. This means our traditional way of generating nice debug logs no longer works. Resorting to just plain old print calls means you lose a lot of helpful information, or requires you to type a lot more code.
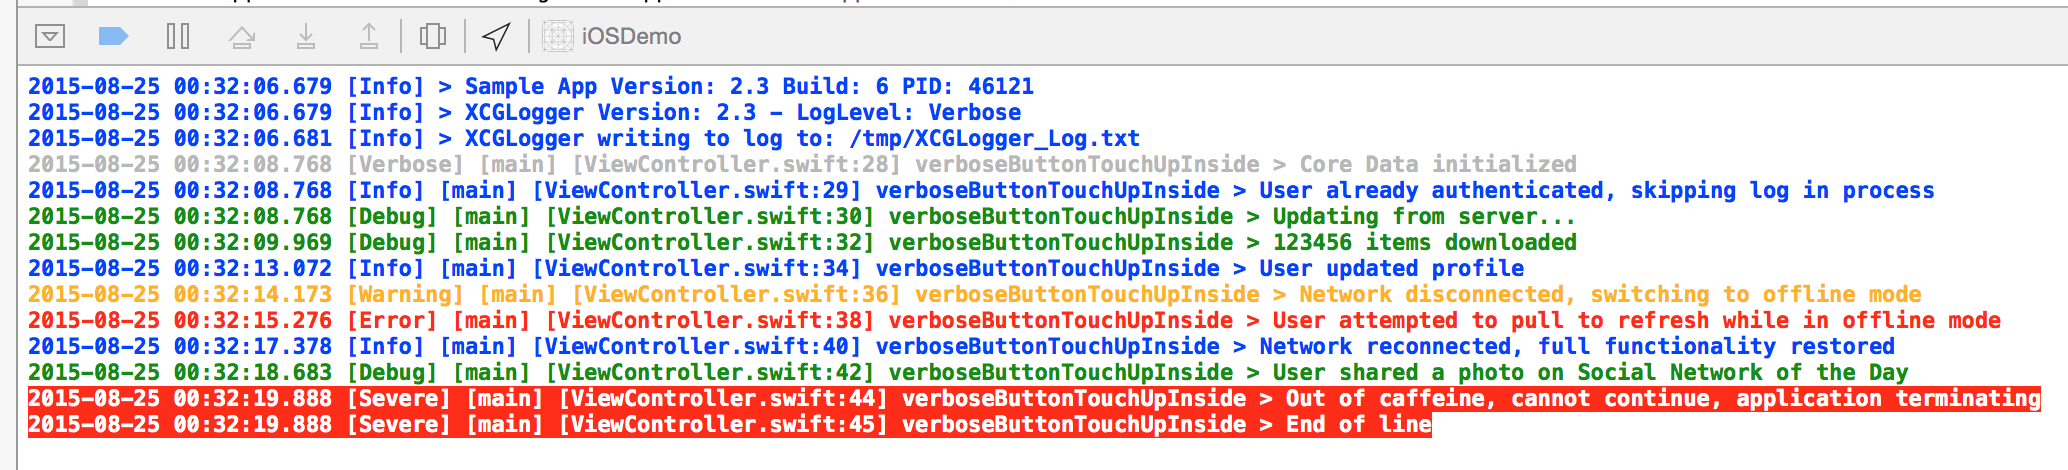
XCGLogger allows you to log details to the console (and optionally a file, or other custom destinations), just like you would have with NSLog() or print(), but with additional information, such as the date, function name, filename and line number.
Go from this:
Simple message
to this:
2014-06-09 06:44:43.600 [Debug] [AppDelegate.swift:40] application(_:didFinishLaunchingWithOptions:): Simple message
#####Example
###Communication (Hat Tip AlamoFire)
- If you need help, use Stack Overflow (Tag 'xcglogger').
- If you'd like to ask a general question, use Stack Overflow.
- If you've found a bug, open an issue.
- If you have a feature request, open an issue.
- If you want to contribute, submit a pull request.
- If you use XCGLogger, please Star the project on GitHub
##Installation
###Git Submodule
Execute:
git submodule add https://github.com/DaveWoodCom/XCGLogger.git
in your repository folder.
###Carthage
Add the following line to your Cartfile.
github "DaveWoodCom/XCGLogger" ~> 3.3
Then run carthage update --no-use-binaries or just carthage update. For details of the installation and usage of Carthage, visit it's project page.
###CocoaPods
Add the following lines to your Podfile.
source 'https://github.com/CocoaPods/Specs.git'
platform :ios, '8.0'
use_frameworks!

pod 'XCGLogger', '~> 3.3'
Then run pod install. For details of the installation and usage of CocoaPods, visit it's official web site.
###Backwards Compatibility
Use:
- XCGLogger version 3.3 for Swift 2.2
- XCGLogger version 3.2 for Swift 2.0-2.1
- XCGLogger version 2.x for Swift 1.2
- XCGLogger version 1.x for Swift 1.1 and below.
##Standard Usage
Add the XCGLogger project as a subproject to your project, and add the appropriate library as a dependancy of your target(s).
Under the General tab of your target, add the XCGLogger.framework to the Embedded Binaries.
Then, in each source file:
import XCGLoggerIn your AppDelegate, declare a global constant to the default XCGLogger instance.
let log = XCGLogger.defaultInstance()In the
application(application: UIApplication, didFinishLaunchingWithOptions launchOptions: [NSObject : AnyObject]?) // iOS, tvOSor
applicationDidFinishLaunching(aNotification: NSNotification) // OS Xfunction, configure the options you need:
log.setup(.Debug, showThreadName: true, showLogLevel: true, showFileNames: true, showLineNumbers: true, writeToFile: "path/to/file", fileLogLevel: .Debug)The value for writeToFile: can be a String or NSURL. If the file already exists, it will be cleared before we use it. Omit a value or set it to nil to log to the console only. You can optionally set a different log level for the file output using the fileLogLevel parameter. Set it to nil or omit it to use the same log level as the console.
Then, whenever you'd like to log something, use one of the convenience methods:
log.verbose("A verbose message, usually useful when working on a specific problem")
log.debug("A debug message")
log.info("An info message, probably useful to power users looking in console.app")
log.warning("A warning message, may indicate a possible error")
log.error("An error occurred, but it's recoverable, just info about what happened")
log.severe("A severe error occurred, we are likely about to crash now")
The different methods set the log level of the message. XCGLogger will only print messages with a log level that is >= its current log level setting.
##Advanced Usage
XCGLogger aims to be simple to use and get you up and running quickly with as few as 2 lines of code above. But it's allows for much greater control and flexibility. Here's an example of configuring the logger to output to the Apple System Log as well as a file.
// Create a logger object with no destinations
let log = XCGLogger(identifier: "advancedLogger", includeDefaultDestinations: false)

// Create a destination for the system console log (via NSLog)
let systemLogDestination = XCGNSLogDestination(owner: log, identifier: "advancedLogger.systemLogDestination")

// Optionally set some configuration options
systemLogDestination.outputLogLevel = .Debug
systemLogDestination.showLogIdentifier = false
systemLogDestination.showFunctionName = true
systemLogDestination.showThreadName = true
systemLogDestination.showLogLevel = true
systemLogDestination.showFileName = true
systemLogDestination.showLineNumber = true
systemLogDestination.showDate = true

// Add the destination to the logger
log.addLogDestination(systemLogDestination)

// Create a file log destination
let fileLogDestination = XCGFileLogDestination(owner: log, writeToFile: "/path/to/file", identifier: "advancedLogger.fileLogDestination")

// Optionally set some configuration options
fileLogDestination.outputLogLevel = .Debug
fileLogDestination.showLogIdentifier = false
fileLogDestination.showFunctionName = true
fileLogDestination.showThreadName = true
fileLogDestination.showLogLevel = true
fileLogDestination.showFileName = true
fileLogDestination.showLineNumber = true
fileLogDestination.showDate = true

// Process this destination in the background
fileLogDestination.logQueue = XCGLogger.logQueue

// Add the destination to the logger
log.addLogDestination(fileLogDestination)

// Add basic app info, version info etc, to the start of the logs
log.logAppDetails()
You can configure each log destination with different options depending on your needs.
Another common usage pattern is to have multiple loggers, perhaps one for UI issues, one for networking, and another for data issues.
Each log destination can have its own log level. As a convenience, you can set the log level on the log object itself and it will pass that level to each destination. Then set the destinations that need to be different.
#####Extending XCGLogger
You can create alternate log destinations (besides the two built in ones for the console and a file). Your custom log destination must implement the XCGLogDestinationProtocol protocol. Instantiate your object, configure it, and then add it to the XCGLogger object with addLogDestination. Take a look at XCGConsoleLogDestination and XCGFileLogDestination for examples.
#####Selectively Executing Code
All log methods operate on closures. Using the same syntactic sugar as Swift's assert() function, this approach ensures we don't waste resources building log messages that won't be printed anyway, while at the same time preserving a clean call site.
For example, the following log statement won't waste resources if the debug log level is suppressed:
log.debug("The description of \(thisObject) is really expensive to create")Similarly, let's say you have to iterate through a loop in order to do some calculation before logging the result. In Objective-C, you could put that code block between #if #endif, and prevent the code from running. But in Swift, previously you would need to still process that loop, wasting resources. With XCGLogger it's as simple as:
log.debug {
    var total = 0.0
    for receipt in receipts {
        total += receipt.total
    }

    return "Total of all receipts: \(total)"
}
In cases where you wish to selectively execute code without generating a log line, you can use the methods: verboseExec, debugExec, infoExec, warningExec, errorExec, and severeExec.
#####Custom Date Formats
You can create your own NSDateFormatter object and assign it to the logger.
let dateFormatter = NSDateFormatter()
dateFormatter.dateFormat = "MM/dd/yyyy hh:mma"
dateFormatter.locale = NSLocale.currentLocale()
log.dateFormatter = dateFormatter
#####Enhancing Log Messages With Colour
XCGLogger supports the XcodeColors plug-in. Once installed, each log level will have its own colour. These colours can be customized as desired. See the sample projects for examples. If using multiple logger's, you could alternatively set each logger to its own colour.
#####Initialization Using A Closure
Alternatively you can use a closure to initialize your global variable, so that all initialization is done in one place
let log: XCGLogger = {
    let log = XCGLogger.defaultInstance()
    log.setup(.Debug, showThreadName: true, showLogLevel: true, showFileNames: true, showLineNumbers: true, writeToFile: nil, fileLogLevel: .Debug)

    let dateFormatter = NSDateFormatter()
    dateFormatter.dateFormat = "MM/dd/yyyy hh:mma"
    dateFormatter.locale = NSLocale.currentLocale()
    log.dateFormatter = dateFormatter

    return log
}()Note: This creates the log object lazily, which means it's not created until it's actually needed. This delays the initial output of the app information details. Because of this, I recommend forcing the log object to be created at app launch by just referencing log at the top of your didFinishLaunching method if you don't already log something on app launch.
#####Alternate Configurations
By using Swift build flags, different log levels can be used in debugging versus staging/production.
Go to Build settings -> Swift Compiler - Custom Flags -> Other Swift Flags and add -DDEBUG to the Debug entry.
#if DEBUG
    log.setup(.Debug, showThreadName: true, showLogLevel: true, showFileNames: true, showLineNumbers: true, writeToFile: nil)
#else
    log.setup(.Severe, showThreadName: true, showLogLevel: true, showFileNames: true, showLineNumbers: true, writeToFile: nil)
#endif
You can set any number of options up in a similar fashion. See the updated iOSDemo app for an example of using different log destinations based on options, search for USE_NSLOG.
#####Background Log Processing
By default, the supplied log destinations will process the logs on the thread they're called on. This is to ensure the log message is displayed immediately when debugging an application. You can add a breakpoint immediately after a log call and see the results when the breakpoint hits.
However, if you're not actively debugging the application, processing the logs on the current thread can introduce a performance hit. You can now specify a destination process it's logs on a dispatch queue of your choice (or even use a default supplied one).
fileLogDestination.logQueue = XCGLogger.logQueueor even
fileLogDestination.logQueue = dispatch_get_global_queue(DISPATCH_QUEUE_PRIORITY_BACKGROUND, 0)This works extremely well when combined with the Alternate Configurations method above.
#if DEBUG
    log.setup(.Debug, showThreadName: true, showLogLevel: true, showFileNames: true, showLineNumbers: true, writeToFile: nil)
#else
    log.setup(.Severe, showThreadName: true, showLogLevel: true, showFileNames: true, showLineNumbers: true, writeToFile: nil)
    if let consoleLog = log.logDestination(XCGLogger.Constants.baseConsoleLogDestinationIdentifier) as? XCGConsoleLogDestination {
        consoleLog.logQueue = XCGLogger.logQueue
    }
#endif
##Third Party Tools That Work With XCGLogger
XcodeColors: Enable colour in the Xcode console
KZLinkedConsole: Link from a log line directly to the code that produced it
XCGLoggerNSLoggerConnector: Send your logs to NSLogger
firelog: Send your logs to Firebase
##To Do
- Add more examples of some advanced use cases
- Add additional log destination types
- Add Objective-C support
- Add log file rotation options
- Add Swift Package Manager support
- Add Linux support
##More
If you find this library helpful, you'll definitely find these other tools helpful:
Watchdog: http://watchdogforxcode.com/
Slender: http://martiancraft.com/products/slender
Briefs: http://giveabrief.com/
Also, please check out some of my other projects:
Rudoku: App Store
TV Tune Up: https://www.cerebralgardens.com/tvtuneup
###Change Log
- Version 3.3: (2016/03/27) - Updated for Xcode 7.3 (Swift 2.2). If you're still using 7.2 (Swift 2.1), you must use XCGLogger 3.2.
- Version 3.2: (2016/01/04) - Added option to omit the default destination (for advanced usage), added background logging option
- Version 3.1.1: (2015/11/18) - Minor clean up, fixes an app submission issue for tvOS
- Version 3.1: (2015/10/23) - Initial support for tvOS
- Version 3.1b1: (2015/09/09) - Initial support for tvOS
- Version 3.0: (2015/09/09) - Bug fix, and WatchOS 2 suppport (thanks @ymyzk)
- Version 2.4: (2015/09/09) - Minor bug fix, likely the last release for Swift 1.x
- Version 3.0b3: (2015/08/24) - Added option to include the log identifier in log messages #79
- Version 2.3: (2015/08/24) - Added option to include the log identifier in log messages #79
- Version 3.0b2: (2015/08/11) - Updated for Swift 2.0 (Xcode 7 Beta 5)
- Version 2.2: (2015/08/11) - Internal restructuring, easier to create new log destination subclasses. Can disable function names, and/or dates. Added optional new log destination that uses NSLog instead of println().
- Version 3.0b1: (2015/06/18) - Swift 2.0 support/required. Consider this unstable for now, as Swift 2.0 will likely see changes before final release, and this library may undergo some architecture changes (time permitting).
- Version 2.1.1: (2015/06/18) - Fixed two minor bugs wrt XcodeColors.
- Version 2.1: (2015/06/17) - Added support for XcodeColors (https://github.com/robbiehanson/XcodeColors). Undeprecated the *Exec() methods.
- Version 2.0: (2015/04/14) - Requires Swift 1.2. Removed some workarounds/hacks for older versions of Xcode. Removed thread based caching of NSDateFormatter objects since they're now thread safe. You can now use the default date formatter, or create and assign your own and it'll be used. Added Thread name option (Thanks to Nick Strecker https://github.com/tekknick ). Add experimental support for CocoaPods.
- Version 1.9: (2015/04/14) - Deprecated the *Exec() methods in favour of just using a trailing closure on the logging methods (Thanks to Nick Strecker https://github.com/tekknick ). This will be the last version for Swift 1.1.
- Version 1.8.1: (2014/12/31) - Added a workaround to the Swift compiler's optimization bug, restored optimization level back to Fastest
- Version 1.8: (2014/11/16) - Added warning log level (Issue #16)
- Version 1.7: (2014/09/27) - Reorganized to be used as a subproject instead of a framework, fixed threading
- Version 1.6: (2014/09/09) - Updated for Xcode 6.1 Beta 1
- Version 1.5: (2014/08/23) - Updated for Xcode 6 Beta 6
- Version 1.4: (2014/08/04) - Updated for Xcode 6 Beta 5, removed
__FUNCTION__workaround - Version 1.3: (2014/07/27) - Updated to use public/internal/private access modifiers
- Version 1.2: (2014/07/01) - Added exec methods to selectively execute code
- Version 1.1: (2014/06/22) - Changed the internal architecture to allow for more flexibility
- Version 1.0: (2014/06/09) - Initial Release