This sample uses the Auth0 Angular SDK to implement the following security tasks:
- Add user login and logout.
- Retrieve user profile information.
- Protect application routes.
- Make secure calls to an API.
This project has a few branches for different purposes:
starter- this contains the bare minimum that you can use as a starting point if you are following along with the tutorialstate/ngrx- this contains the final state of the application when using Auth0 with NgRxstate/akita- this contains the final state of the application when using Auth0 with Akitastate/ngxs- this contains the final state of the application when using Auth0 with Ngxs
Clone the repository:
git clone -b starter git@github.com:auth0-blog/spa_angular_typescript_dashboard.gitMake the project directory your current directory:
cd spa_angular_typescript_dashboardInstall the project dependencies:
Angular requires an active LTS or maintenance LTS version of Node.js. Angular applications also depend on npm packages for many features and functions. To download and install npm packages, you need an npm package manager such as npm or yarn.
npm install-
Open the Applications section of the Auth0 Dashboard.
-
Click on the Create Application button.
-
Provide a Name value such as Hello World Client.
-
Choose "Single Page Web Applications" as the application type.
-
Click on the Create button.
View "Register Applications" document for more details.
Your Auth0 application page loads up.
Your Angular application will redirect users to Auth0 whenever they trigger an authentication request. Auth0 will present them with a login page. Once they log in, Auth0 will redirect them back to your Angular application. For that redirecting to happen securely, you must specify in your Auth0 Application Settings the URLs to which Auth0 can redirect users once it authenticates them.
As such, click on the "Settings" tab of your Auth0 Application page and fill in the following values:
Allowed Callback URLs
http://localhost:4040Allowed Logout URLs
http://localhost:4040Allowed Web Origins
http://localhost:4040Scroll down and click the "Save Changes" button.
Create an auth-config.ts file under your Angular project directory and populate it as follows:
// src/environments/auth-config.ts

export const AuthConfig = {
	domain: '',
	clientId: '',
	serverUrl: 'http://localhost:7070', // depending on the port you use in the next section
	 authorizationParams: {
        redirect_uri: window.location.origin,
        audience: 'https://menu.example.com', // we will be using this as part of the server setup
	},
};
Head back to your Auth0 application page. Follow these steps to get the domain and clientId values:
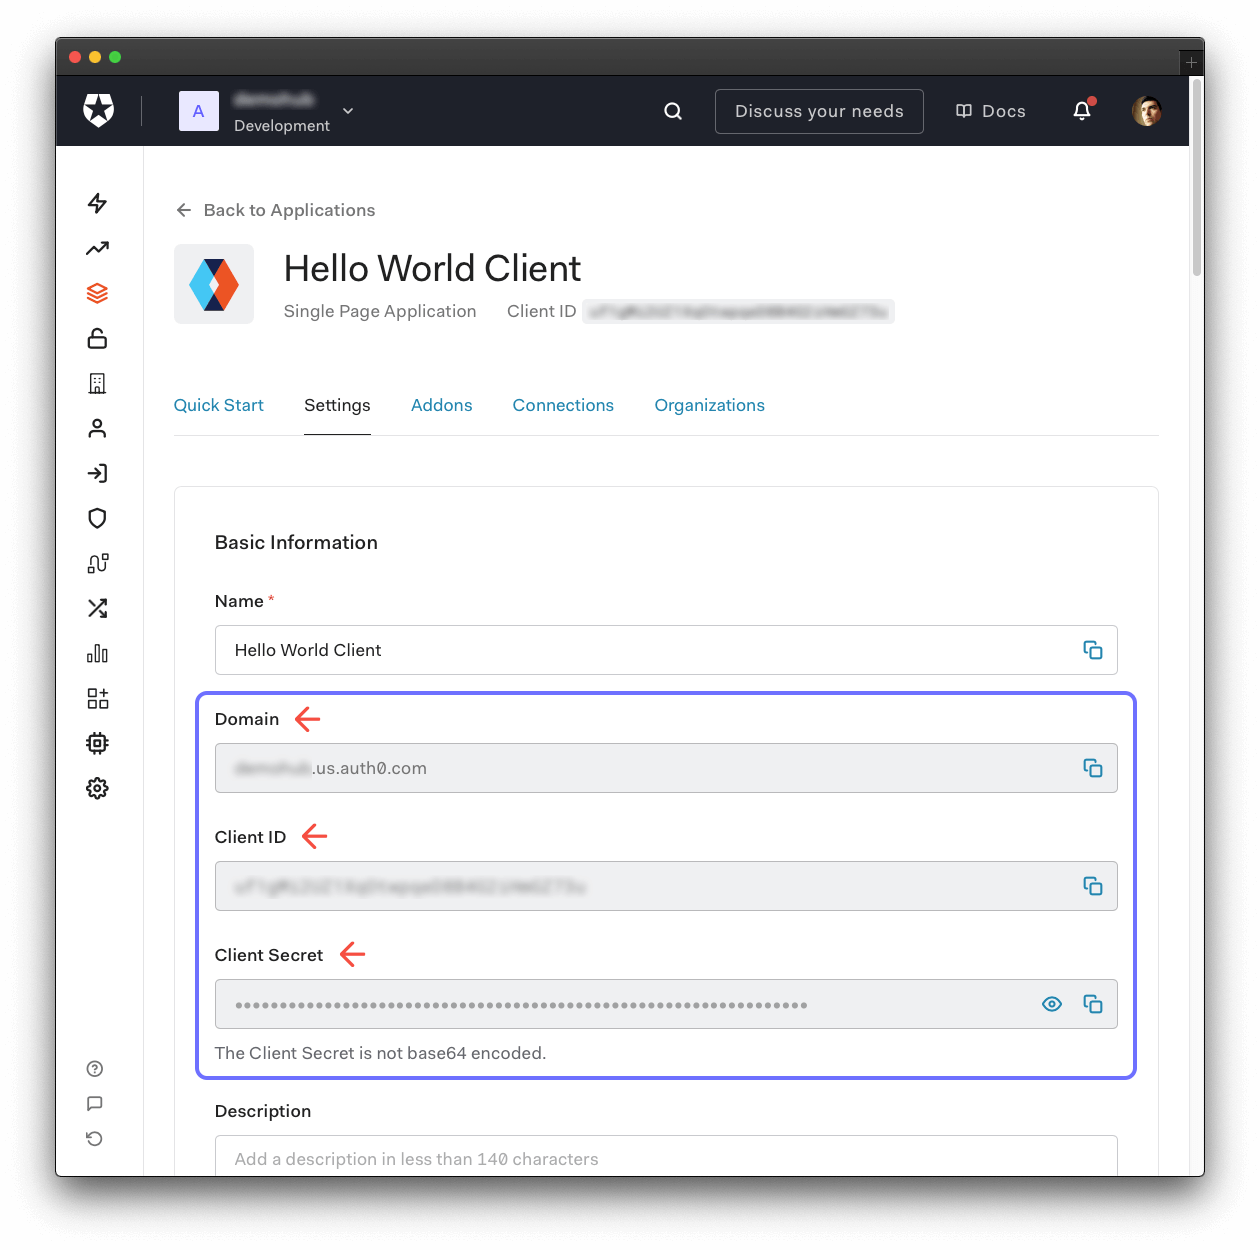
-
Click on the "Settings" tab, if you haven't already.
-
Use the "Domain" value from the "Settings" as the value of
domaininauth-config.ts. -
Use the "Client ID" value from the "Settings" as the value of
clientIdinauth-config.ts.
For more information on setting up Auth0 for Angular applications, refer to this blogpost
Make sure that the
Allowed Callback URLs,Allowed Logout URLs, andAllowed Web Originsin theApplication URIssection of your app on Auth0 is set to the url of your running app. By default this app runs onhttp://localhost:4040. You can modify the port by updating theportin theangular.json.
With the Auth0 configuration set, run the Angular application by issuing the following command:
npm startVisit http://localhost:4040/ to access the application.
The external API used in this Angular sample is the "Menu API: Express Sample".
Follow the instructions on that README of that repository to set up and run the API. You can read a detailed writeup on how to setup the server side with Auth0 in this blogpost.
Make sure that the Identifier of the API is set to the same value as the
audienceof theAuthConfigin the previous section (https://menu.example.com).
You can use the Auth0 Dashboard to create an admin role and assign it the following permissions:
create:itemsdelete:itemsread:itemsupdate:items
Then, you can assign the admin role to any user that you want to access the /admin endpoint.
If you need help doing so, check out the following resources: