This repository has been deprecated and migrated to https://github.com/autodesk-platform-services/aps-model.properties-versions.difference
This sample demonstrates the use case of comparing two versions of a model by Model Properties API. The result is visualized as added, removed and updated items from the previous version. Change can be geometry as well as among properties.

- Forge Account: Learn how to create a Forge Account, activate subscription and create an app at this tutorial. For this new app, use http://localhost:3000/api/forge/callback/oauth as Callback URL. Finally take note of the Client ID, Client Secret and Callback URL.
- BIM 360 or ACC Account: must be Account Admin to add the app integration. Learn about provisioning.
- Upload two model versions to one folder in BIM360 or ACC.
- Node.js: basic knowledge with Node.js.
- Basic knowledge with html5,JavaScript, css,jQuery, bootstrap.
- Basic knowledge with Data Management API with BIM 360 or ACC,and Forge Viewer.
- ngrok: Routing tool, download here
Install NodeJS, version 8 or newer.
Clone this project or download it (this nodejs branch only). It's recommended to install GitHub desktop. To clone it via command line, use the following (Terminal on MacOSX/Linux, Git Shell on Windows):
git clone https://github.com/Autodesk-Forge/forge-model.properties-versions.difference
Install the required packages using npm install. Set the environment variables with your client ID, client secret, callback url and finally start it. Via command line, navigate to the folder where this repository was cloned and use the following:
Mac OSX/Linux (Terminal)
npm install
export FORGE_CLIENT_ID=<<YOUR CLIENT ID FROM DEVELOPER PORTAL>>
export FORGE_CLIENT_SECRET=<<YOUR CLIENT SECRET>>
export FORGE_CALLBACK_URL=<<YOUR CALLBACK URL>>
npm start
Windows (use Node.js command line from Start menu)
npm install
set FORGE_CLIENT_ID=<<YOUR CLIENT ID FROM DEVELOPER PORTAL>>
set FORGE_CLIENT_SECRET=<<YOUR CLIENT SECRET>>
set FORGE_CALLBACK_URL=<<YOUR CALLBACK URL>>
npm start
OR, set environment variables at launch.json for debugging.
-
Open the browser: http://localhost:3000. Please watch the Video for the detail and usage.
-
After the user logging succeeds, the code will start to extract all hubs, all projects, folders and model versions.
-
Click one model version, the corresponding model data will be loaded in left Forge Viewer. Click another model version, the corresponding model data will be loaded in right Forge Viewer.
-
Click the Diff button, the code will start to request diff indexing by Model Properties API on the server side.

-
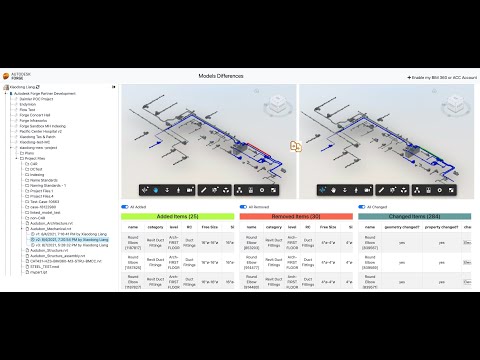
After the diff-indexing is completed, all added items (in new model version) will be listed in the {Added Items} table. All removed items (in old model version) will be listed in the {Removed Items} table. All changed items (in the two model versions) will be listed in the {Changed Items} table.
-
Click the switches All Added, _All Removed, All Changed to check the differences in two views.

- Click one item in {Added Items} table. The new item will be focused in the right view. The corresponding location in left view will be also zoomed in (but no element because this item does not exist in old version)

- Similarly, click one item in {Removed Items} table. The old item will be focused in left view. The corresponding location in right view will be also zoomed in (but no element because this item has been removed in new version).

- Click one item in {Changed Items} table. The item will be focused in both views. The table will also tell if geometry is changed, if properties are changed, and the changed properties list. Open the properties panel in both Forge Viewers and check the changed values.

To deploy this application to Heroku, the Callback URL for Forge must use your .herokuapp.com address. After clicking on the button below, at the Heroku Create New App page, set your Client ID, Secret and Callback URL for Forge.

For local development/testing, consider use nodemon package, which auto restart your node application after any modification on your code. To install it, use:
sudo npm install -g nodemon
Then, instead of npm run dev, use the following:
npm run nodemon
Which executes nodemon server.js --ignore www/, where the --ignore parameter indicates that the app should not restart if files under www folder are modified.
After installing Github desktop for Windows, on the Git Shell, if you see a error setting certificate verify locations error, use the following:
git config --global http.sslverify "false"
- Data Management API
- Viewer
- Model Properties API Reference
- Model Properties API Walkthrough in PowerShell Core
- Postman Collection for Model Properties
- Querying Model Properties
- Tracking Changes in Model Versions
- Query Language Reference
- Forge Blog
- Field of View, a BIM focused blog
This sample is licensed under the terms of the MIT License. Please see the LICENSE file for full details.
Xiaodong Liang @coldwood, Forge Advocate and Support