Challenges:
- Change smart-mirror invocation name
- Change Mirror Wakeword Activation color
- Show Color on all LEDs with Alexa
- Deploy Clock functionality
- Make Clock Respond to Invocation word "show clock"
- Update and add clock invocation intents/samples
- Visualize Timer with LEDs
- Create binary visualization of seconds since Epoch
NOTE! If you ever get stuck when doing challenges you can compare with what is available in
smart-mirror-full/extractedfolder in this repository
On example code Smart Mirror activation word is "Unicorn"
User: Alexa, open Unicorn
or
User: Alexa, Unicorn
The challenge is to update this to something else you like.
Please see additional information how the simple smart mirror works in this documentation
Additional details on how to work with Git: https://docs.gitlab.com/ee/gitlab-basics/ And further details on Cloud9 IDE https://docs.aws.amazon.com/cloud9/latest/user-guide/source-control-gitpanel.html
Tip: As everything is CI/CD driven you should do change in repository (interactionModels/custom/en-US.json)
Configuring Invocation name for custom skill: https://developer.amazon.com/en-US/docs/alexa/custom-skills/choose-the-invocation-name-for-a-custom-skill.html
See Answer how to change smart-mirror invocation name
- Open Cloud9 IDE and browse to your smart-mirror source code
- Update value for "invocationName" in interactionModels/custom/en-US.json
- Add, commit and push your code
git add .
git commit -m "Updated invocation word"
git push
- After a while (see code pipeline) your device get's new code (and this is also pushed to Amazon Developer Console / Alexa Custom Skill)
- Validate the change by activating skill with new invocation word (Note! it takes few minutes for skill to update)
On our example mirror "activation color" is yellow (What mirror reacts when you use your Alexa activation word).
The challenge is to update this to something else you like.
Please see additional information how the simple smart mirror works in this documentation
Additional details on how to work with Git: https://docs.gitlab.com/ee/gitlab-basics/ And further details on Cloud9 IDE https://docs.aws.amazon.com/cloud9/latest/user-guide/source-control-gitpanel.html
Tip: This is worked in
script/agt_smart_mirror.py
See Answer How to update Activation Color
- Open Cloud9 IDE and browse to your smart-mirror source code
- Update value for webcolors.name_to_rgb('
yellow') in script/agt_smart_mirror.py in functionon_alexa_gadget_statelistener_stateupdateto something you like better (examplepurple)
    def on_alexa_gadget_statelistener_stateupdate(self, directive):
        """
        This will trigger when your connected Alexa device changes state. Here we listening for your Alexa to react to you saying "Alexa..." or "Echo..."
        """
        for state in directive.payload.states:
            if state.name == 'wakeword':
                if state.value == 'active':
                    logger.info('Wake word active')
                    self.showColorOptions['color'] = webcolors.name_to_rgb('purple') #This is updated color
                    self.startAction(Actions.ShowColor)
                elif state.value == 'cleared':
                    logger.info('Wake word cleared')
self.startAction(self.lastAction)- Add, commit and push your code
git add .
git commit -m "Changed activation color"
git push
- After a while (see code pipeline) your device get's new code (and this is also pushed to Amazon Developer Console / Alexa Custom Skill)
- Validate the change by using your Alexa activation word and seeing new color
In the previous challenge you learned how to change the color when your Alexa is activated with the wakeword ("Alexa", "Echo").
In this challenge we want to explore how we can light up all LEDs with a color of our choosing with the help of Alexa. We want you to say something like "Change color to blue". So after activating the smart mirror skill with "Alexa, open unicorn" (or your invocation word) - say "Change color to blue". The LEDs should then turn blue.
Please see additional information how the simple smart mirror works in this documentation
There are 3 main problems to solve for this challenge. 1/ How can I tell Alexa what color I want and 2/ how can the Alexa device tell our gadget (the Raspberry Pi) that it should do something and 3/ How will I change the user input "Purple" into something the LEDs strip understands.
For 1/ check out the list of available built-in slot types here. If you want to know more about the basic building blocks of an Alexa Skill please read Create Intents, Utterances, and Slots.
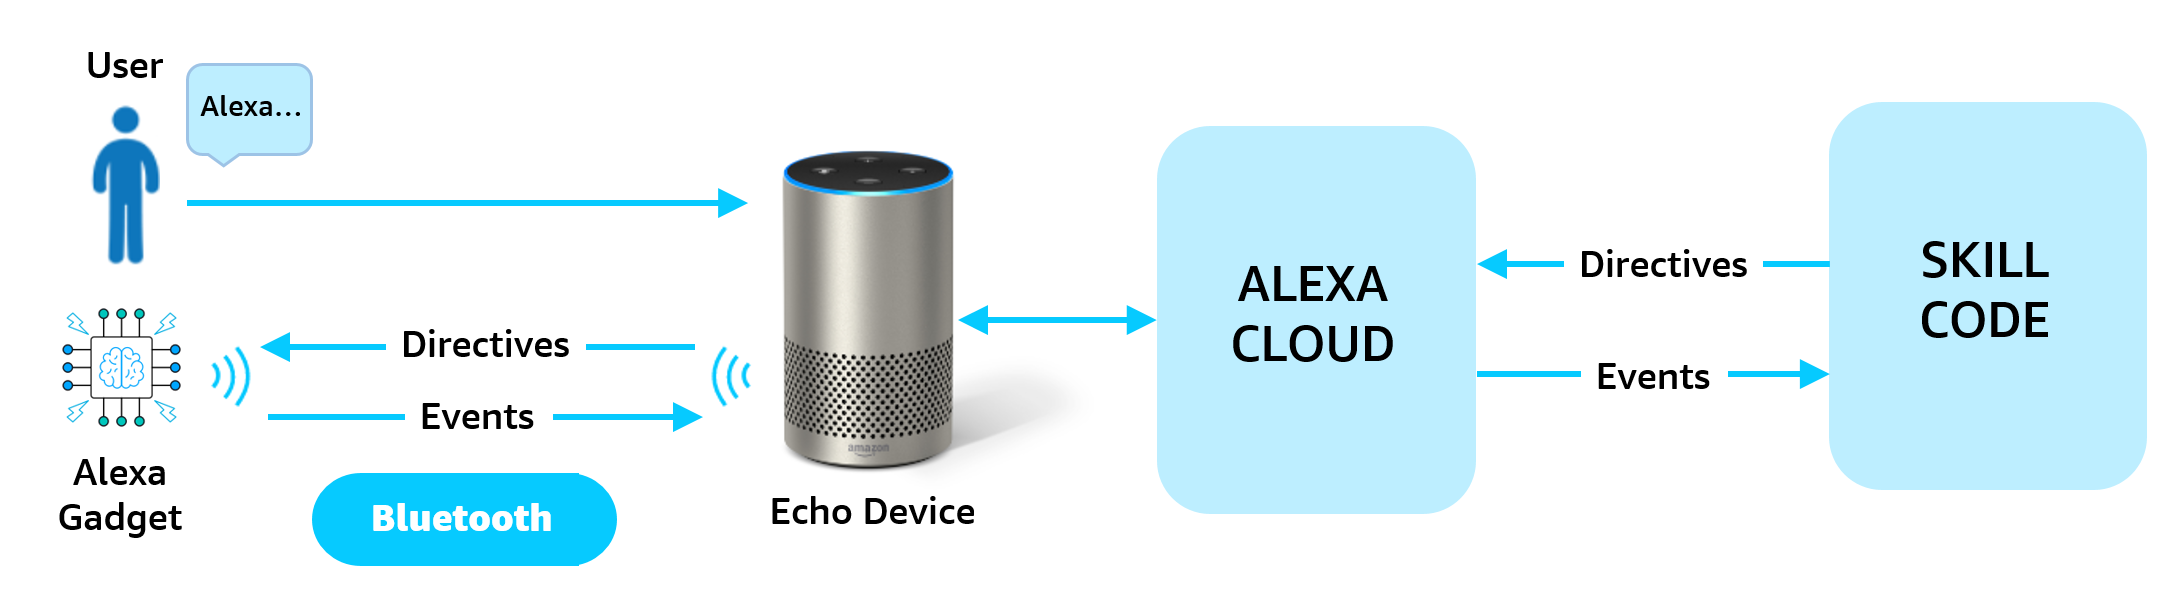
For 2/ have a look at the following documentation to understand how the Alexa device and the gadget communicate.
For 3/ please have a look at the following open source library: https://github.com/ubernostrum/webcolors The pip module was already installed during the setup process you followed earlier and is ready for use. Please have a closer look at the documentation Changing from color names to other formats. The library that is used to change the colors of the LEDs uses the RGB format to describe colors. Find out more about RGB here
To add this functionality you will have to modify the following files:
- interactionModels/custom/en-US.json
- lambda/custom/lambda_function.py
- device/script/agt_smart_mirror.py
Hint: Look at how "ShowRainbow" is implemented. You will very useful code in the above files that you can use to solve this challenge.
See how to change the color via Alexa
- Open Cloud9 IDE and browse to your smart-mirror source code
- Open interactionModels/custom/en-US.json and add the following intent to the intents (for example after the "ShowRainbow" intent)
{
  "name": "ShowColor",
  "slots": [
    {
      "name": "Color",
      "type": "AMAZON.Color"
    }
  ],
  "samples": [
    "Show color {Color}",
    "{Color} color",
    "Change color to {Color}",
    "Turn color to {Color}"
  ]
}
Feel free to add or remove sample utterances. AMAZON.Color supports a wide range of colors and works well for this example. The alternative is to build a custom slot type Custom Slot Types.
We define how our Alexa Skill can interact with the user in this file. You will find other intents in the file that might be interesting to explore. Notice that we use a mix of built-in Intents like AMAZON.StopIntent and custom intents like ShowRainbow.
- Open lambda/custom/lambda_function.py and add two new function to handle the "Show Color" intent
      @skill_builder.request_handler(can_handle_func=is_intent_name("ShowColor"))
      def yes_intent_handler(handler_input: HandlerInput):
          logger.info("ShowColor received. Sending color to device.")
          color_slot = "Color"

          # Retrieve the stored gadget endpointId from the SessionAttributes.
          session_attr = handler_input.attributes_manager.session_attributes
          endpoint_id = session_attr['endpointId']

          response_builder = handler_input.response_builder

          slots = handler_input.request_envelope.request.intent.slots

          if color_slot in slots:
              color = slots[color_slot].value
              (response_builder
              .speak(f'Alright. Lighting up in {color}')
              .add_directive(build_showcolor_directive(endpoint_id, color))
              .set_should_end_session(True))
          else:
              (response_builder
              .speak("Can you please repeat that?")
              .set_should_end_session(False))


          return response_builder.response

      def build_showcolor_directive(endpoint_id, color):
          return SendDirectiveDirective(
              header=Header(namespace='Custom.SmartMirror', name='Color'),
              endpoint=Endpoint(endpoint_id=endpoint_id),
              payload={
                  'color': color
              }
          )
This lambda is the backend of our Alexa skill. Here we can react to user input, fetch results, ask for clarifications and send instructions to our Alexa device. The @skill_builder.request_handler of the added function will handle requests to the ShowColor intent. If Alexa was able to pick up a color we will have the the user input available in requests slots. In this case we will prompt the user to repeat the request if we did not catch a color.
Another interesting aspect of this piece of code is when we send text to the Alexa device via the speak function. We also send a directive to the assistant. The directive is a message that will be passed on to our gadget (the Raspberry Pi). The directive message is created in the build_showcolor_directive function. It contains a namespace, a name and a payload with the color. This will be important in the next step.
- Open /device/script/agt_smart_mirror.py and add the following function to the SmartMirrorGadget Class
        # this matches the namespace that the skill adds in the payload (see lambda_function.py): (namespace='Custom.SmartMirror', name='Color'),
        def on_custom_smartmirror_color(self, directive):
            """
            Handles Custom.SmartMirror.Color directive
            """
            payload = json.loads(directive.payload.decode("utf-8"))
            color = payload['color'].lower() #this is the color name coming in from Alexa
            rgb = webcolors.name_to_rgb(color)
            logger.info(f'show color directive called with color {color} => {rgb}')

            self.showColorOptions['color'] = rgb
            self.startAction(Actions.ShowColor)
When the Alexa device receives the ShowColor directive from the Skill it knows to forward it to the Gadget. This is because we have configured the Alexa device to notify the Gadget by adding the namespace "Custom.SmartMirror" in device/script/smartmirror_service_start.ini (This has happened as part of the initial setup). All we have to do now is to follow a convention for the function that is supposed to receive the directive: on{namespace}_{name}. The function name needs to be lower case and replace the "." with an underscore. The directive contains the color the user selected in the payload. The last thing to do now is to convert the color name to an RGB value and start the ShowColor action on the LEDs. Check out the loop function in /device/script/agtsmart_mirror.py to see what happens when you call _self.startAction(Actions.ShowColor). The actual function that changes the color on the LED strip can be found in /device/script/smartmirror.py -> _showColor
- Add, commit and push your code
git add .
git commit -m "Changed activation color"
git push
- After a while (see code pipeline) your device get's new code (and this is also pushed to Amazon Developer Console / Alexa Custom Skill). You will only be able to test your changes after the entire pipeline is complete.
- Validate the change by saying "Alexa, open unicorn" (or your invocation word) - then say "Change color to blue". The LEDs should then turn blue.
Having a 60 LED strip on round object like mirror is cool - but what is even cooler is how to use this to show current time - and eventually control it through voice. Let's now build on what we have learned on previous challenge.
The first challenge is to build logic that shows a 12 hour clock in your smart mirror as default action.
In this challenge we build a clock logic that shows time with LED's lit as follows:
- green is second
- blue is minute
- red is hour
Please see additional information how the simple smart mirror works in this documentation
For clock activity you need to modify following files:
- script/agt_smart_mirror.py
- Alexa Gadget Skill skill
- script/smart_mirror.py
- Clock Logic
See Answer how to create a clock functionality
-
Open Cloud9 IDE and browse to your smart-mirror source code
-
Update script/agt_smart_mirror.py
Add class Action
Add Clock = next free number, in below example this is 4
class Actions(Enum):
    Off = 0
    Rainbow = 1
    Breathe = 2
    ShowColor = 3
    Clock = 4    # This is added for Clock
Update self.defaultAction to be Clock
    """
    An Alexa Gadget for your simple smart mirror.
    """
    def __init__(self):
        super().__init__()

        self.config = self.get_parameters()
        self.smart_mirror = SmartMirror(self.config)

        #This sets what action is started when the mirror starts
        self.defaultAction = Actions.Clock # This is updated to show Clock
Loop self action handling
under def loop(self) - handle Actions.Clock:
                    if self.currentAction == Actions.Clock:
                        self.smart_mirror.clock()
Add payload handling:
    # this matches the namespace that the skill adds in the payload (see lambda_function.py): (namespace='Custom.SmartMirror', name='Clock'),
    def on_custom_smartmirror_clock(self, directive):
        """
        Handles Custom.SmartMirror.Clock directive
        """

        logger.info('show clock directive called')

self.startAction(Actions.Clock)- update script/smart_mirror.py
Add main clock logic
    def clock (self):
        print("Showing Clock")
        self.reset()
        num_pixels = self.config.LedCount
        now = datetime.now()
        hourval = (now.hour % num_pixels % 12) # Adapt to led count, and set 12 hour clock (0-11)
        minutepixel = (now.minute  // (60 // num_pixels) % num_pixels) # Adapt to non 60 led count if needed
        secondpixel = (now.second // (60 // num_pixels) % num_pixels) # Adapt to non 60 led count if needed
        hourpixel = (hourval * 60 + minutepixel) // 12 # Adjusted position relative to minutes

        ## Define used colors for pixels - using webcolors library for mapping
        hourcolor = webcolors.name_to_rgb('red')
        minutecolor = webcolors.name_to_rgb('blue')
        secondcolor = webcolors.name_to_rgb('green')
        ## Turn on hour - minute - second pixels using ShowPixel function
        self.showPixel(hourpixel,hourcolor)
        self.showPixel(minutepixel,minutecolor)
self.showPixel(secondpixel,secondcolor)- Add, commit and push your code
git add .
git commit -m "Added clock functionality as default action"
git push
- After a while (see code pipeline) your device get's new code (and this is also pushed to Amazon Developer Console / Alexa Custom Skill)
- Validate the change - you should see clock in your smart mirror as default action
Previously we build clock functionality and added that as default action for smart mirror.
What if we want this to be available through Alexa ?
Challenge is to add to your clock a logic that opens when you say "show clock" in your smart mirror skill.
And make this activate with invocation / sample "show clock"
Please see additional information how the simple smart mirror works in this documentation
To add invocation word to your clock you need to modify following files:
- interactionModels/custom/en-US.json
- lambda/custom/lambda_function.py
See Answer
- Open Cloud9 IDE and browse to your smart-mirror source code
- Update interactionModels/custom/en-US.json
Update Intent for Clock ShowClock
                {
                    "name": "ShowClock",
                    "slots": [],
                    "samples": [
                        "show clock"
                    ]
}- Update lambda/custom/lambda_function.py
Handle intent and build clock directive
Add Clock to help intent handler:
@skill_builder.request_handler(can_handle_func=is_intent_name("AMAZON.HelpIntent"))
def help_intent_handler(handler_input: HandlerInput):
    logger.info("Received HelpIntent.")

    # Retrieve the stored gadget endpointId from the SessionAttributes.
    session_attr = handler_input.attributes_manager.session_attributes
    endpoint_id = session_attr['endpointId']

    response_builder = handler_input.response_builder

    return (response_builder
            .speak("You can say rainbow or show clock") # Updated "show clock" when help is called
            .set_should_end_session(False)
            .response)
Clock intent handler:
@skill_builder.request_handler(can_handle_func=is_intent_name("ShowClock"))
def clock_intent_handler(handler_input: HandlerInput):
    logger.info("Received *** ShowClockIntent ***")

    # Retrieve the stored gadget endpointId from the SessionAttributes.
    session_attr = handler_input.attributes_manager.session_attributes
    endpoint_id = session_attr['endpointId']

    response_builder = handler_input.response_builder

    return (response_builder
            .speak("Super! Showing clock")
            .add_directive(build_clock_directive(endpoint_id))
            .set_should_end_session(True)
            .response)
Build Clock Directive:
def build_clock_directive(endpoint_id):
    return SendDirectiveDirective(
        header=Header(namespace='Custom.SmartMirror', name='Clock'),
        endpoint=Endpoint(endpoint_id=endpoint_id),
        payload={}
)- Add, commit and push your code
git add .
git commit -m "Updated Clock Invocation functionality"
git push
- After a while (see code pipeline) your device get's new code (and this is also pushed to Amazon Developer Console / Alexa Custom Skill)
- Validate the change - Activate your smart mirror skill in Alexa your Invocation word and "show clock". You can also say "help" to get help.
Calling your clock with "Show Clock"is nice - but we can do better!
Challenge is to update intents for clock to include:
- "What is the time"
- "Clock"
- "Time"
- "Show 3 led's"
Update Invocation Samples
- Open Cloud9 IDE and browse to your smart-mirror source code
- Update File Update interactionModels/custom/en-US.json "ShowClock" intent
                {
                    "name": "ShowClock",
                    "slots": [],
                    "samples": [
                        "show clock",
                        "What is the time?",
                        "Clock",
                        "Time",
                        "Show 3 led's"
                    ]
}- Add, commit and push your code
git add .
git commit -m "Updated Clock Invocation samples"
git push
- After a while (see code pipeline) your device get's new code (and this is also pushed to Amazon Developer Console / Alexa Custom Skill)
- Test your new samples with Alexa
This challenge will help us to visualize a standard timer that is running on you Alexa device. When you start a timer by saying "Alexa start 10 minute timer" the LEDs will be used to show how far the timer has come. No LEDs will be turned on at the very beginning. 30 LEDs will be turned on after 5 minutes and all will be lit when the timer elapses after 10 minutes.
In this challenge we will make use of of a built-in directive that gets triggered as a reaction to native Alexa capability. This works just like the already implemented wakeword activation. You can find out which build-in directives can be sent to your device here.
As a prerequisite we must ensure that our gadget gets informed about this event by Alexa. This has already been done as part of the setup, but please check out the file device/script/smart_mirror_service_start.ini anyways. The important bit is the following:
Alerts = 1.1
This makes sure we can react to alert changes which includes timers.
The problems to solve in this challenge is to 1/ hook up to the timer activated and deleted event 2/ Extract all relevant timer information from the directive sent by the Alexa device and 3/ Calculate how many LEDs should be turned on for each iteration through the loop function in device/script/agt_smart_mirror.py
For 1/ and 2/ check out the interface documentation here
For 3/ use your creativity or use the hidden hints below.
To add this functionality you will have to modify the following file:
- device/script/agt_smart_mirror.py
Hints
-
Open Cloud9 IDE and browse to your smart-mirror source code
-
Open and modify device/script/agt_smart_mirror.py
-
Locate the Actions enumeration and add a new action for the Timer
      class Actions(Enum):
          Off = 0
          Rainbow = 1
          Breathe = 2
          ShowColor = 3
          Clock = 4
          Timer = 5
We need to add this action so the loop function is aware of the new Action. We will jump into the loop function later to implement the necessary changes.
- Now scroll down a bit to the constructor of SmartMirrorGadget class. Add the default options below the showColorOptions
    #default options for timer
    self.showTimerOptions = {
        'startTime': None,
        'endTime': None,
        'color': webcolors.name_to_rgb('red'),
        'timer_token': None
     }
Here we initialize the timer options we will be using later. You can ignore most of the settings for now, but you might want to change the color of the LEDs.
- Now let's add the Timer action to the loop function. You can add the following code snippet after the ShowColor block:
    if self.currentAction == Actions.Timer:
        timerPosition = self.getCurrentTimerPosition()
        if(timerPosition != 0):
            self.smart_mirror.showRange(0, timerPosition, 0.1, self.showTimerOptions['color'])
        else:
            self.smart_mirror.showColor(self.showTimerOptions['color'])
Now the loop is aware of the Timer action and if the action is active it will call the getCurrentTimerPosition function. We will implement this function shortly. If the getCurrentTimerPosition function returned a valid value we use the existing function showRange of device/script/smartmirror.py. The function lights up LEDs from index 0 to the variable timerPosition. If your LED strip has 60 LEDs and the timer is set for 10 minutes you should get a timerPosition=30 when there 5 minutes left on the timer. Also notice that we are using the color of the previous defined _showTimerOptions variable.
- Before we implement the getCurrentTimerPosition let us look at how we can be notified when a new timer has been set. For this add the following two functions to the SmartMirror Gadget:
    def on_alerts_setalert(self, directive):
        """
        Handles setting of alerts on your connected Alexa device e.g. "Alexa set timer for 60 seconds"
        """
        if directive.payload.type != 'TIMER':
            logger.info(
                "Received SetAlert directive but type != TIMER. Ignorning")
            return

        endTime = dateutil.parser.parse(directive.payload.scheduledTime).timestamp()
        now = time.time()

        if endTime <= 0:
            logger.info(
                "Received SetAlert directive but scheduledTime has already passed. Ignoring")
            return

        if self.showTimerOptions['timer_token'] == directive.payload.token:
            logger.info(
                "Received SetAlert directive to update to currently running timer. Adjusting")
            self.showTimerOptions['endTime'] = endTime
            return

        if self.currentAction == Actions.Timer:
            logger.info(
                "Received SetAlert directive but another timer is already running. Ignoring")
            return

        logger.info("Received SetAlert directive. Starting a timer. " +
                    str(int(endTime - now)) + " seconds left..")
        self.showTimerOptions['endTime'] = endTime
        self.showTimerOptions['startTime'] = now
        self.showTimerOptions['timer_token'] = directive.payload.token
        self.showTimerOptions['color'] = webcolors.name_to_rgb('red')

        self.startAction(Actions.Timer)

    def on_alerts_deletealert(self, directive):
        """
        Handles deletion of alert - reverts back to default action
        """
        self.startAction(self.defaultAction)
To hook up to the events sent by the Alexa device we have to implement onalerts_setalert and on_alerts_deletealert. You can read up about the interface here. The delete method is easy, when a timer is cancelled or elapsed we want to show the default action that we specified in the options (Clock, Rainbow or whatever you have configured). The setalert function is mainly used to parse the directive. We need to find out when the timer was started and when it will finish. We need to store this data somewhere so we can calculate the timer position in _getCurrentTimerPosition. We are using the timer options for that. The code also contains a couple of safegurads. It checks for example if there is already another timer running, if so the old one is replaced as we can only visualize one timer at a time with the current implementation.
Extra Challenge: Can you think of a way that makes it possibilities to visualize 2 timers at the same time?
- Now we only have one thing left to to before we can commit and deploy our code and that is to implement the getCurrentTimerPosition. Add a new function to the SmartMirrorGadget Class:
    def getCurrentTimerPosition(self):
        """
        Figure out how many LEDs should be turned on. If the timer is up all 60 LEDs shoul be lit.
        """
        start_time = self.showTimerOptions['startTime']
        end_time = self.showTimerOptions['endTime']
        current_time = time.time()
        timer_total = int(end_time - start_time)

        timer_left = int(max(0, end_time - current_time))

        if timer_left > 0:
            nextPosition = int((timer_total - timer_left)/timer_total * self.config.LedCount)
            time.sleep(1)
            return nextPosition  # Light up the leds
        else:
            return 0
The functions purpose is to read the current timers options to find out 1/ when has the timer started 2/ when does it end and 3/ how much time is left. With that data we have to figure out the number of LEDs to light up. We can use the variable self.config.LedCount to find out how many LEDs we have.
- Add, commit and push your code
git add .
git commit -m "Updated Clock Invocation samples"
git push
- After a short while (see code pipeline) your device get's the updated code. You do not need to wait until the skill is redeployed as we have not made any changes to the skill.
- You can validate your changes by saying "Alexa set timer for 60 seconds". Your LEDs should now slowly fill up until all of them are turned on with the configured color.
This challenge visualizes seconds passed since Epoch. Since we only have a LED strip, we can use same principle on which computers operate. That is binary number system that maps perfectly to simulate electrical charge state "charged or not", or electrical switches which can be "on" or "off".
In simple terms, binary system works like this: Let's assume you have 1 bit integer. A bit means a single representation of a state. Imagine a light bulb that can be on or off. How would you represent that? Simplest would be to use a 0 for "off" and 1 for "on". As you can see, mapping decimal numerical system to one bit would be very limiting. It would work if we wanted to count to 1. Let's add two bits to our binary number so we have three bits to play around. Now that we have 3 bits, each bit can have 2 different states (0 or 1), we have extended the range to allow us map some decimal numbers. So how many combinations (states, or actually numbers) can we map then? The answer is 2^3 which is 8. That would amount from 0-7.
As you can imagine, we need more bits than that to be able to represent amount of seconds since Epoch. Let's settle with 32bits. In fact, this will only suffice to count seconds to year 2038 but, let's not worry about that for now.
Before we dive deep into this challenge, let's talk about how binary numbers are written out. They are written from right to left, meaning first bit is furthest to the right.
Ok I got all that, but we are no machines, I can't read binary!!!
No worries, principle is simple, but it takes some time to get used to. When converting binary representation of our three bit number, for example 011, we start at right side,
and we map the first bit to number 1. If there is a 1 in the first bit, that means that we count with that 1. If it's a zero, we simply move on.
In our example there is a 1, so we keep that in mind. Second bit is mapped to the double previous value, which is 2. Since there is a 1 on that bit, that means "it's on" and we
need to add that to whatever current value we have so far (which is 1 at the moment) and that makes it 3. Let's move on. On third and last bit we have there is a zero. This means,
we are done and that the value of our number is 3, and in three bit binary representation it's 011.
Let's try another example, a four bit number 1110. Can you figure it out what would that be in decimal numbers?
See how
First bit (from the right) that maps to number 1 is 0, so it's "not on" so we can ignore it. Second bit is mapped to double the value of previous one, that means 1*2=2 and there is a 1 in that slot so it's a 2 that we need to remember. Third bit is mapped to 4 (again double of 2) and there is a 1 in that slot so we need to add that too. Finally fourth bit is mapped to 8 and there is a 1 in that slot so we need to add that as well.So we have 2+4+8 which is 14. So binary 1110 is decimal 14. Now go and look that up.
So basically going from the lowest bit to the left the decimal mapping is 1,2,4,8,16,32,64,128,256,512,1024,2048...(see the doubling of the mapped value?) as you can see some numbers are pretty familiar. Now you may start realizing why.
The problem is relatively simple:
-
We need to create led controlling code in
smart_mirror.py- We need to get current time in seconds since Epoch (which will be a 64 bit float (decimal))
- We need to convert it to binary representation (resulting in an array of zeroes and ones)
- Map those zeroes and ones to pixels on the led and turn them off if it's a zero and on if it's a one
-
We need to extend the capabilities of the skill by:
- Adding an intent
- Adding a Lambda handler code
- Adding a directive handler code in
agt_smart_mirror.py
In total, to add this functionality you will have to modify following files:
interactionModels/custom/en-US.jsonlambda/custom/lambda_function.pydevice/script/agt_smart_mirror.pydevice/script/smart_mirror.py
Ready to experiment? Good luck! If you need some help with code have a look at the hints below:
First we implement LED controlling code in smart_mirror.py
1. Getting the current time in seconds since Epoch
currentTime = round(datetime.now().timestamp())2. Converting the number into binary representation and making an array
Let's convert it and make an array in one go using the list()-function
(Here below, we know that we won't need more than 32bits to fit the decimal number that represents seconds from 1970-01-01 to 2038)
lightlist = list(f'{currentTime:032b}')The above formatting pattern will take the integer currentTime and convert it to binary b and if needed pad up to 32 32 bits with zeroes 0.
We want this so we have predictable length of our array even if there are zeroes at the end (far to the left). Remember that output of f'{currentTime:032b}' is a string.
So the array will contain a list of strings which are '0' or '1'. We'll need to remember this later.
3. Mapping the zeroes and ones to pixels on the LED
Now, remember that we write the binary representation from the right to left. Unfortunately this is how our array will be constructed. Personally I wanted start plotting ones, then tens, then hundreds and so on starting at the position 0 of my led. So I need to map the array starting with the last element (far right) and go left. Another method is to use reverse()-function to map it. Here is up to you how you want your binary representation to show up on your LED. Mine starts with position zero of ones. for pos in range(31,-1,-1): #As we have 32 bit, and we start with zero, it's 0-31, -1,-1 means decrement by one. If the array was reversed, this would not have been needed
if int(lightlist[pos]) == 0: #We convert the array position to integer before we compare it to number 0.
self.pixels[31-pos] = (0,0,0) #Well, if it's zero, we need to turn off the light
else:
self.pixels[31-pos] = (255,255,255) # It's not a zero, let's light this pixel then
self.pixels.show() # Finally we show our pixels.For the impatient one, the whole function:
def seconds_from_epoch(self):
    currentTime = round(datetime.now().timestamp())
    #Assume 32 bits
    lightlist = list(f'{currentTime:032b}')
    for pos in range(31,-1,-1):
        if int(lightlist[pos]) == 0:
            self.pixels[31-pos] = (0,0,0)
        else:
            self.pixels[31-pos] = (255,255,255)
    self.pixels.show()
Now that the hard part is done, we continue with adding an intent. By now, you might be familiar how to do that, if not here is a hint below:
Adding an intent
Open file interactionModel/custom/en-US.json
Add following block:
{
  "name": "ShowSecondsFromEpoch",
  "slots": [],
  "samples": ["show seconds since epoch"]
}
Choose utterance you want to use, here is "show seconds since epoch"
Don't forget the comma before and/or after the segment to keep the file valid.
Adding a Lambda handler code
Open lambda/custom/lambda_function.py and add following two methods.
Implement directive build helper:
def build_seconds_from_epoch_directive(endpoint_id):
    return SendDirectiveDirective(
        header=Header(namespace='Custom.SmartMirror', name='SecondsFromEpoch'),
        endpoint=Endpoint(endpoint_id=endpoint_id),
        payload={}
    )
Implement intent request handler:
@skill_builder.request_handler(can_handle_func=is_intent_name("ShowSecondsFromEpoch"))
def seconds_from_epoch_intent_handler(handler_input: HandlerInput):
    logger.info("Received *** ShowSecondsFromEpochIntent ***")

    # Retrieve the stored gadget endpointId from the SessionAttributes.
    session_attr = handler_input.attributes_manager.session_attributes
    endpoint_id = session_attr['endpointId']

    response_builder = handler_input.response_builder

    return (response_builder
            .speak("You are a nerd!")
            .add_directive(build_seconds_from_epoch_directive(endpoint_id))
            .set_should_end_session(True)
            .response)
Adding a directive handler code
Open device/script/agt_smart_mirror.py
Add action name to Actions enumeration using a number next in sequence.
class Actions(Enum):
    Off = 0
    Rainbow = 1
    Breathe = 2
    ShowColor = 3
    Clock = 4
    ...
    SecondsFromEpoch = 7
Add a directive handler mapping the name of the intent in lowercase, in our case "SecondsFromEpoch":
def on_custom_smartmirror_secondsfromepoch(self, directive):
    """
    Handles Custom.SmartMirror.SecondsFromEpoch directive
    """
    logger.info('Secondsfromepoch directive called')

    self.startAction(Actions.SecondsFromEpoch)
Finally in the loop-function add the call to smart_mirror-method you implemented when the Action is started:
...
if self.currentAction == Actions.SecondsFromEpoch:
    self.smart_mirror.seconds_from_epoch()
...
Congratulations, you are done! Commit your code and push it to the CodeCommit and wait for about 10 minutes for the CI/CD to deploy the changes to your device, Lambda and Alexa Voice service.