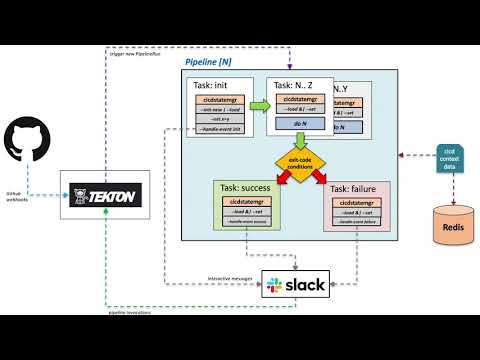
This is a more involved example showing how cicdstatemgr can be used to enhance and orchestrate a Tekton CICD workflow by utilizing Slack interactive messages and Slack slash commands to provide user-interaction. Visually the workflow this example produces looks like this:

This example runs locally using minikube
This assumes and prefers a clean minikube cluster environment on your machine. This example has been run on os-x.
Need help? join bitsofinfo.slack.com
Here is a video screencast that walks through this example after it is up and running:
For more background info see this blog post
The following needs to be installed on your local.
-
minkube v1.12.1+ (assumes os-x w/ hyperkit)
-
ngrok free and ensure the
ngrokcommand is on your$PATH -
kubectl: 1.16+ -
All commands below should run in the
bashshell
You also need to do the following before starting:
-
Clone this project:
git clone https://github.com/bitsofinfo/cicdstatemgr.git -
Create your own fork on github of nginx-hello-world
-
Ensure ngrok is setup and functioning on your local machine
-
Have your own free slack workspace and the proper permissions to install apps into it and manage it.
-
Also this assumes you have cloned this project cicdstatemgr and have a terminal opened to
examples/tekton
You will need to create a new slack app in your workspace by doing the following:
-
Once logged into your slack workspace go to: https://api.slack.com/apps
-
Click on "Create New App"
-
You can name the app whatever you want and choose your workspace for it, then click "create app"
-
Under "Basic Information" click on the "Interactive Components" feature box, then toggle "Interactivity" to "on"
-
For the "Request Url" just enter
https://postman-echo.comfor now and "Save changes" (you will change this later) -
Again, under "Basic Information" and "Add Features & Functionality", click on the "Slash Commands" feature box, then click "Create new command". For "Command" enter
/start-app-deploy, for "Request Url" just enterhttps://postman-echo.comfor now (you will change this later), for "Short Description" enter anything, and for "Usage Hint" enter<cicdContextName> <gitProjectName> <gitCloneUrl> <gitTag>. Finally click to "Save changes" -
Click on the "OAuth & Permission" section, scroll down to "Scopes" and click on "Add an OAuth Scope", then grant app_mentions:read and chat:write
-
Next lets install the app to your workspace. Click on "Install app to workspace", review the permissions presented then Allow
-
IMPORTANT: Once installed you will see the
Bot User OAuth Access Tokendisplayed, copy this value and put it into the filecicdstatemgr/examples/tekton/pipelines/secrets/slack-bearer-token(with no new line) -
IMPORTANT: Next, click on "Basic Information", scroll down to "App Credentials" and copy the value of Verification Token and paste it into the file
cicdstatemgr/examples/tekton/core/secrets/slack-oauth-token(with no new line)
Clone this project (if not already done)
git clone https://github.com/bitsofinfo/cicdstatemgr.git
Run the install script:
cd cicdstatemgr/examples/tekton
./install.sh
When all done reviewing this example, see the cleanup section below.
The install script assumes (and prefers) you have no prior minikube cluster, it starts minikube enables the registry addon, then proceeds to apply a base Tekton installation (complete with the 3 Tekton projects: pipelines, triggers, dashboard). On top of Tekton, it then proceeds to install a Tekton CICD workflow of pipelines which utilize cicdstatemgr to orchestrate all interactions.
Once things are up and running, the script also creates a ngrok tunnel to the Tekton webhook/eventlistener endpoint which is emitted to STDOUT.
IMPORTANT: Keep this terminal open or save the output from the script! We will use the configured NGROK urls below
Now that your local minikube cluster is up and running, we need to do two things.
Update the slack app's interactive component you created earlier to point to your ngrok URI.
- Go your your slack apps' "Basic Information" section, click on "Features and functionality" then "Interactive Components"
- Next update the "Request Url" field with the
ngrokevent listener URI emitted by the install.sh script above. It should look something likehttps://xxyyzz.ngrok.io - ... and again: go your your slack apps' "Basic Information" section, click on "Features and functionality" then "Slash Commands", click the edit icon for the command
/start-app-deploy - Next update the "Request Url" field with the
ngrokevent listener URI emitted by the install.sh script above. It should look something likehttps://xxyyzz.ngrok.io
In your slack workspace, create two channels #cicdstatemgr-dev and #cicdstatemgr-prod, and be sure to invite your slack app to both channels!
Configure YOUR FORK of nginx-hello-world to send webhook events.
-
Go your your github
nginx-hello-worldfork's Settings section. Then click on Webhooks -
Next click on "Add webhook"
-
Set the "Payload URL" field with the
ngrokevent listener URI emitted by the install.sh script you ran above. It should look something likehttps://xxyyzz.ngrok.io -
Set "Content type" to
application/json -
Set the "Secret" to
123 -
For "Events to send" we ONLY NEED the
pushevent. -
Ensure its active and save
Go back to your terminal and find the output from the install.sh you ran earlier.
Find the Tekton Dashboard: http:/x.x.x.x:xxxxx output, grab this URL and open it in your browser.
You can also get it via minikube service list
Once it is up you can trigger the pipeline by pushing a tag to your FORK of nginx-hello-world
cd [myforkof-nginx-hello-world]

git tag -a 1.0.0 -m "1.0.0"; git push origin 1.0.0
This should trigger a new start pipeline run followed by an auto trigger of build. Slack alerts should show up in your Slack workspace's #cicdstatemgr-dev channel and you can view your Tekton dashboard at the URLs emitted from the install script run earlier.
If you click on any deploy/apply buttons this will apply the nginx-hello-world k8s manifests to the k8s cluster within either the apps-dev or apps-prod namespaces.
You can then do a minikube service list to get a local URL to hit them app to verify they are running.
It should look something like this as nginx-hello-world-[version] deployments are applied to the cluster as you click on the buttons.
|------------------|-----------------------------|--------------------|----------------------------|
|    NAMESPACE     |            NAME             |    TARGET PORT     |            URL             |
|------------------|-----------------------------|--------------------|----------------------------|
| apps-dev         | nginx-hello-world-1-0-0    | http/80            | http://192.168.64.34:30691 |
| apps-prod        | nginx-hello-world-1-0-0    | http/80            | http://192.168.64.34:30425 |
....
The example also supports doing a deployment via a Slack slash command. In either of your slack channels you can issue a command like the following to trigger a new CICD context that will permit you to deploy the previously built artifact on demand.
IMPORTANT: for this demo to work, you must have triggered a prior build in order to use the slash command to deploy it. See the prior section to trigger a build.
/start-app-deploy [ dev | prod ] nginx-hello-world https://github.com/<YOUR_GITHUB_USER>/nginx-hello-world.git <TAG>
i.e. for example:
/start-app-deploy dev nginx-hello-world https://github.com/bitsofinfo/nginx-hello-world.git 0.0.9
Would result in output as follows in slack:

This example is intended to serve as... well just that, an example of how you can leverage cicdstatemgr along with Tekton to create CICD workflows and mediate a lot of the interaction via a tool like Slack.
Want to see how Tekton was installed? Check out the core/ components
Want to see how the Tekton pipelines/triggers and EventListener are defined? Check out the pipelines/ components
Want to see how all the Slack messages and interaction work? Check out the pipelines/bases and pipelines/confs directories which contain the configs and pipeline-configs that cicdstatemgr consumes.
Want to just get familiar with how the cicdstatemgr CLI functionality works? see examples/basics
Running the following will kill the ngrok process (the pid is in .ngrok.pid), and then issue a minikube delete
Note that if you run install.sh again, you will have to re-register the ngrok url again with slack/github as the url changes everytime you restart ngrok
./remove.sh
Debugging issues w/ pods in Minikube:
kubectl run -it --serviceaccount=cicd-tekton --namespace tekton-pipelines cicd-toolbox --image bitsofinfo/cicd-toolbox:latest /bin/bash
Get the minikube registry addon's cluster ip
kubectl get svc registry --output=jsonpath='{.spec.clusterIP}' --namespace=kube-system
Fantastic tool for dealing w/ minikube registry DNS issues (push/pull) from within the cluster itself: https://github.com/kameshsampath/minikube-helpers/blob/master/registry/README.md https://developers.redhat.com/blog/2019/07/11/deploying-an-internal-container-registry-with-minikube-add-ons/