Getting Started
If you don't have one already, you'll need to get a Black Magic Probe.
Connect the Black Magic Probe to your computer's USB port with mini USB cable. When connected via USB, the Black Magic probe will enumerate as a CDC-ACM device which the OS should present as a tty device or serial port.
On Linux you can check the kernel log to find the device that was allocated:
user@host ~ $ dmesg
usb 1-1.1: new full-speed USB device number 58 using ehci-pci
usb 1-1.1: New USB device found, idVendor=1d50, idProduct=6018
usb 1-1.1: New USB device strings: Mfr=1, Product=2, SerialNumber=3
usb 1-1.1: Product: Black Magic Probe
usb 1-1.1: Manufacturer: Black Sphere Technologies
usb 1-1.1: SerialNumber: DDE6C7C4
cdc_acm 1-1.1:1.0: This device cannot do calls on its own. It is not a modem.
cdc_acm 1-1.1:1.0: ttyACM0: USB ACM device
cdc_acm 1-1.1:1.2: This device cannot do calls on its own. It is not a modem.
cdc_acm 1-1.1:1.2: ttyACM1: USB ACM device
The first interface provides the GDB server, and the second provides a USB to UART adapter.
On Windows, when you first connect, the Black Magic Probe should be detected as two COM ports. The first COM port is the GDB extended remote server and the second one is USB to Serial adapter on the back of the board. To find the allocated ports, check the Device Manager:

Note: For older Windows versions (Windows 7 and older), you will be prompted to install a driver. You can download the driver here.
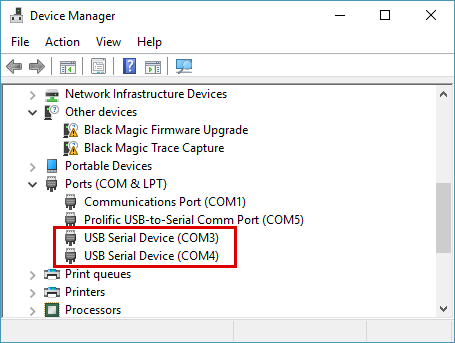
Note: If you are on Windows 10 and want to upgrade the firmware to the probe itself, you can install the libusbK driver. This will give you access to the DFU interface of the Black Magic Probe and allow you to use dfu-util to upgrade the Black Magic Probe firmware. (You do not need to install this driver if you only plan to use the Black Magic Probe and do not need/want to upgrade the firmware.) Also, Windows 10 displays the BMP probe ports using the generic title, "USB Serial Device", as seen below:
To use the Black Magic Probe, you will need an ARM cross toolchain for developing and debugging embedded ARM Cortex applications on your computer. The gcc-arm-embedded toolchain is recommended. The toolchain will include the GNU Debugger, GDB, for debugging ARM applications.
user@host ~ $ arm-none-eabi-gdb
GNU gdb (GNU Tools for ARM Embedded Processors) 7.6.0.20140228-cvs
Copyright (C) 2013 Free Software Foundation, Inc.
License GPLv3+: GNU GPL version 3 or later <http://gnu.org/licenses/gpl.html>
This is free software: you are free to change and redistribute it.
There is NO WARRANTY, to the extent permitted by law.  Type "show copying"
and "show warranty" for details.
This GDB was configured as "--host=i686-linux-gnu --target=arm-none-eabi".
For bug reporting instructions, please see:
<http://www.gnu.org/software/gdb/bugs/>.
(gdb)
The GDB remote debugging protocol is implemented over the Black Magic Probe's CDC-ACM interface. To connect your ARM GDB to the target device use the following commands:
(gdb) target extended-remote /dev/ttyACM0
Remote debugging using /dev/ttyACM0
(gdb) monitor jtag_scan
Target voltage: 3.4V
Device  IR Len  IDCODE      Description
0       4       0x4BA00477  ARM Limited: ADIv5 JTAG-DP port.
1       5       0x06413041  ST Microelectronics: STM32F4xx.

Available Targets:
No. Att Driver
 1      STM32F4xx

(gdb) attach 1
Attaching to Remote target
0x080071b2 in ?? ()
The command monitor swdp_scan may be used to use the Serial-Wire Debug Protocol instead of JTAG to connect to the target.
Once attached, all the standard GDB commands may be used to start and control the execution of the embedded application. Useful GDB Commands provides a quick introduction.
Note: On Mac OS X use the /dev/cu.usbmodem<somenumber>. Don't use the tty version of this device as this one will freeze gdb when it tries to open it.
On Windows, use the the COM port instead of /dev/ttyACM0. For ports >= COM10, add the prefix \\.\, for example:
target extended-remote COM3
target extended-remote \\.\COM10
- See this presentation, porting a basic Unix program to an embedded Cortex-M3 using libopencm3.
- The gcc-arm-embedded readme is also worth a read.