This is a project of mine followed with Dr. Fan Zhang from MIT IBM Watson AI Lab to integrate the application of CNN with Docker and Cassandra.


To generalize this project, a trained-model of Convolutional Neural Network(CNN) is deployed into the container using Docker; Two types of interfaces are designed using Flask for users to submit their images; The program then processes the image with the trained-model to predict a reliable result and expose the result back to the front page with RESTful API. At the same time, the result(the prediction and the testing time) would be deployed and stored in the database Apache Cassandra. If you want to see the main code directly, go to the file 'app.py' above. To further explain the achievement, I've also attached a brief video in file 'my work.mp4' above.
The first step is to train a CNN model. In this project, I chose a classic example the Mnist, namely the model which is able to detect the image of number from 0 to 9. I download the training set from the official site of Tensorflow and use the CNN model the official site offers, I set the training times as 20000, and saved the trained CNN model with .save(sess, "./model2.ckpt").
for i in range(20000):
 batch = mnist.train.next_batch(50)
 if i%100 == 0:
   train_accuracy = accuracy.eval(feed_dict={
       x:batch[0], y_: batch[1], keep_prob: 1.0})
   print("step %d, training accuracy %g"%(i, train_accuracy))
 train_step.run(feed_dict={x: batch[0], y_: batch[1], keep_prob: 0.5})

save_path = saver.save(sess, "./model2.ckpt")
print ("Model saved in file: ", save_path)
The model is saved with 4 files as I uploaded above, the 'checkpoint' is a binary file saving the path to the other three file. Check the file creat_model_CNN if you want to know more details about the training model.
Since the system would finally allow users to submit the testing image, an interface must be designed. Instead of using WSGI, I chose Flask to wirte my front page because WSGI is less abstract compared with Flask, while the code would be easily and well maintained if written with Flask. Here in this part, I wrote two interface '/upload' and '/predict', I personally recommand you to use the path '/upload' since it's better-maintained.
The code for URL '/upload'
UPLOAD_FOLDER = '/home/blark/MIT_bigdata/Dockerfile'
ALLOWED_EXTENSIONS = set(['txt', 'pdf', 'png', 'jpg', 'jpeg', 'gif','bmp'])

app.config['UPLOAD_FOLDER'] = UPLOAD_FOLDER

def allowed_file(filename):
    return '.' in filename and \
           filename.rsplit('.', 1)[1].lower() in ALLOWED_EXTENSIONS

@app.route('/upload', methods=['GET', 'POST'])
def upload_file():
    if request.method == 'POST':
        if 'file' not in request.files:
            flash('No file part')
            return redirect(request.url)
        file = request.files['file']
        if file.filename == '':
            flash('No selected file')
            return redirect(request.url)
        if file and allowed_file(file.filename):
            filename = secure_filename(file.filename)
            file.save(filename)
            return redirect(url_for('uploaded_file',filename=filename))
    return '''
    <!doctype html>
    <title>Upload new File</title>
    <h1>Upload your testing image please</h1>
    <form method=post enctype=multipart/form-data>
      <input type=file name=file>
      <input type=submit value=Predict>
    </form>
    '''
The code for URL '/predict':
@app.route('/predict', methods=['GET'])
def predict_form():
    return '''<form action="/predict" method="post" enctype="multipart/form-data">
              <h>Upload your testing image please</h>
              <input type="file" name="photo"/>
              <input type="submit" value="Predict" class="button-new" style="margin-top:15px;"/>
              </form>'''
So how to use the submitted image to do prediction? Obviously we need to use the CNN model we have trained out, thankfully Tensorflow supplies with the command saver.restore() to call back our model. Make sure that you do some preprocessing to the testing image before you do the prediction, the Mnist-CNN model only support the image of 28×28×2, make sure that you have the right sized image or having resized the image as 28×28 (limited by time, I just wrote several 28×28×2 images myself as the testing images, you can write code to resize the image with PIL).
def imageprepare(directory):
 im = Image.open(directory).convert('L')
 temp = list(im.getdata()) #get pixel values
 new = [ (255-x)*1.0/255.0 for x in temp]
 return new
Note that new = [ (255-x)*1.0/255.0 for x in temp] is because I noticed that the training images are all white number with black backgroud, but my testing image are mostly black number with white background. Note that the color depth is 2, be sure you have transfered the file into binary image !!!
Docker is such a magic tool, or say, a media, that makes everything become easy!!! Once you deploy your service, take this project as an example, you will see that there is no need to deal with complex and annoying works such as configuring the environment, spending large amount of time training your model, you even don't necessarily need to install python. Why? Because I, the docker builder, have done everything for you, what you only neet to do is to pull the docker and run it! So let's talk about how to achieve this.
Typically we need three files to build a docker image. First, an 'app.py', which contains our main program and all functions that supports your service. Second, a 'requirments.txt', which contains all libraries that we would call functions from. Third, a 'Dockerfile' that would be the script for docker to run. In this project, I want my users to use my CNN model, so I also need to 'ADD' my CNN model in the Dockerfile. Here is what my Dockerfile goes:
# Use an official Python runtime as a parent image
FROM python:3.6

# Set the working directory to /app
WORKDIR /app/

# Copy the current directory contents into the container at /app
COPY . /app/
ADD checkpoint /app/
ADD model2.ckpt.data-00000-of-00001 /app/
ADD model2.ckpt.index /app/
ADD model2.ckpt.meta /app/

# Install any needed packages specified in requirements.txt
RUN pip install --trusted-host pypi.python.org -r requirements.txt

# Make port 80 available to the world outside this container
EXPOSE 80

# Define environment variable
ENV NAME World

# Run app.py when the container launches
CMD ["python3", "app.py"]
Cassandra is a widely-used NoSQL database. Here I would like to deploy the prediction and the testing time of each image into the Cassandra database once a time. To start with, I need a Cassandra-driverto connect Python with Cassandra. Make sure to involve Cassandra-driver in the 'requirements.txt' or the docker cannot put the data into Cassandra. To deploy the data in Cassandra, we should first creat a keyspace, and then create a table, note that the 'PRIMARY KEY' is a must in Cassandra which confirms the ordering priority. Here is my code of this part:
def createKeySpace(prediction,testingtime):
   cluster = Cluster(contact_points=['0.0.0.0'],port=9042)
   session = cluster.connect()
   try:
       session.execute("""USE bleekeyspace""")
       params=[prediction, testingtime]
       session.execute("""
                       INSERT INTO CNN_table (prediction,time)
                       VALUES ( %s,%s)""",params)
       session.execute(""" SELECT * FROM CNN_table """)[0]
   except:
       KEYSPACE = "bleekeyspace"
       session.execute("""
                       CREATE KEYSPACE %s
                       WITH replication = { 'class': 'SimpleStrategy', 'replication_factor': '2' }
                       """ % KEYSPACE)
       session.set_keyspace(KEYSPACE)
       session.execute("""
                       CREATE TABLE CNN_table (
                               prediction text,
                               time text,
                               PRIMARY KEY (prediction,time)
                               )
                       """)
       params=[prediction, testingtime]
       session.execute("""
                       INSERT INTO CNN_table (prediction,time)
                       VALUES ( %s,%s)""",params)
       session.execute(""" SELECT * FROM CNN_table """)[0]
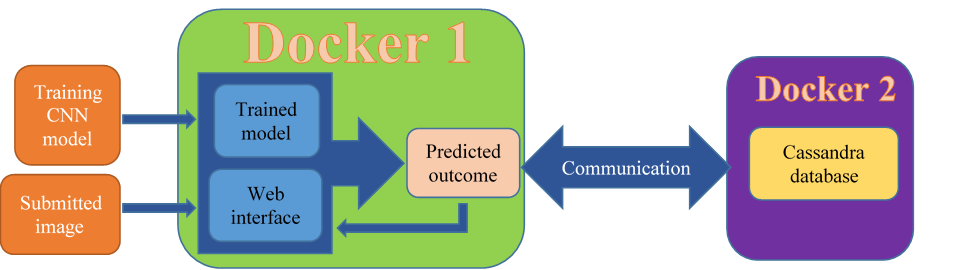
You may feel confused about this subtitle since it seems we've finished everything, we've deployed the service into Docker, we've also deployed the prediction and the testing time into Cassandra. Well, if you think that's OK, you can give it a shot, and you will happily find out that your main service cannot connect to the Cassandra, Why?
It is clear that we need a docker to run our main service and launch data to Cassandra, and another docker to run the Cassandra and receive the data. Another thing, if you are careful enough, you will find it works if you run the main service, namely the 'app.py', on the host machine instead of docker. This is because when the main service is running on the host machine, take this project as an example, the exposing port which launches the data would be at '0.0.0.0:9042', while when the main service is running on the docker, the exposing port should have being the same, but since it doesn't use the host network anymore, the exposing port actually changes, as a result, the other docker cannot receive the data.
To fix the problem, we need to build communication between dockers, the docker running main service and the docker running Cassandra. There are four types of original network in docker. 'None','Host','Bridge' and 'Container'. Intuitively, we can either build the connection using host machine as the media, or directrly 'encapsulate' these two dockers in a local area network. In this project, I chose the later strategy. To be specific,
First, I build a docker named 'maincode' to serve as the docker supporting main service and lauching the data.
docker run -d -it --name=maincode -p 3000:80 mnist
Then, I build another docker named 'blee' to serve as the docker supporting running Cassandra and Receiving the data.
docker run -it --network=container:maincode --name=blee -p 9042:9042 cassandra:latest
Note that here I use the 'container' network environment with --network=container:maincode so that the 'blee' docker create a local area network and pull the 'maincode' docker into this local area network. In this circumstance, the 'maincode' docker would successfully deliever prediction and testing time to the 'blee' docker and manage to deploy in the Cassandra database.
Congrats!!! Now, the whole docker system is perfectly built and works. Have you tasted the charm of Docker and subtlety of this project?