Simple API written in Python using FastAPI to store and retrieve Books and Authors.
This app is intended to run at minimum Python version 3.7. Extra requirements can be seen in requirements.txt file.
It is possible to customize the application to use SQLite or MySQL.
By default, the application uses SQLite and stores the database in the root folder.
To customize the PATH for the SQLite database set the environment variable DB_PATH to the absolute path of the database file.
Environment Variables usages as following:
| ENV | Default Value | Description |
|---|---|---|
DB_TYPE |
sqlite |
Database type, valid values are sqlite and mysql. |
DB_PATH |
./database.db |
Database absolute path for sqlite database only. |
DB_HOST |
127.0.0.1 |
Database host address for mysql database only. |
DB_PORT |
3306 |
Database port for mysql database only. |
DB_NAME |
books |
Database name for mysql database only. |
DB_USER |
user |
Database user for connecting to mysql database only. |
DB_PASS |
password |
Database password for connecting to mysql database only. |
The default webpage is the swagger-ui running at the root path of the webserver (/).
You can also access the redoc-ui at the docs path of the webserver (/docs)
To deploy it locally its suggested to set up a venv.
Clone the repository:
$ git clone git@github.com:caiodelgadonew/books-pyapi.gitCreate a Virtual Environment and source it:
$ python3 -m venv books-pyapi
$ source books-pyapi/bin/activate
After initializing your Virtual Environment install all dependencies
$ pip3 install -r app/requirements.txtExecute uvicorn
$ uvicorn books.main:app --reloadAccess http://127.0.0.1:8000 at your browser.
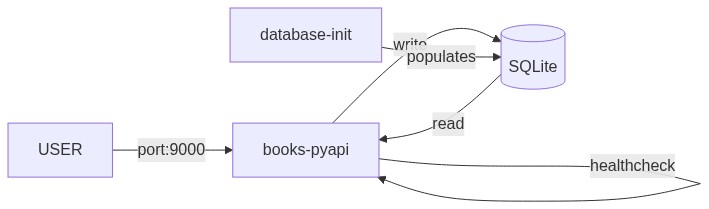
To run the application as a Docker Container you can use the provided docker-compose-sqlite.yml
Be sure to have docker and docker-compose installed before proceeding
Clone the repository:
$ git clone git@github.com:caiodelgadonew/books-pyapi.gitRun docker-compose up to create the environment:
$ docker-compose -f books-pyapi/docker-compose-sqlite.yml upYou can add
-dto thedocker-composecommand to start detached
The database will be automatically populated through the API with two users and some books, if you dont want to populate the database comment the block database-init from docker-compose-sqlite.yml.
After the application healthcheck (30s) the database-init container will start and populate the database with some data.
Access the application at the address: http://<CONTAINER_HOST_IP>:9000
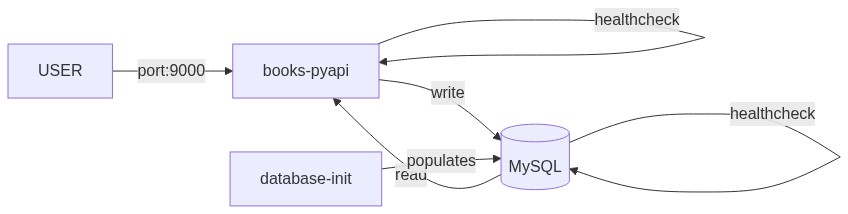
To run the application as a Docker Container you can use the provided docker-compose.yml
Be sure to have docker and docker-compose installed before proceeding
Clone the repository:
$ git clone git@github.com:caiodelgadonew/books-pyapi.gitRun docker-compose up to create the environment:
$ docker-compose -f books-pyapi/docker-compose-mysql.yml upYou can add
-dto thedocker-composecommand to start detached
The database will be automatically populated through the API with two users and some books, if you dont want to populate the database comment the block database-init from docker-compose-mysql.yml.
After the application healthcheck (30s) the database-init container will start and populate the database with some data.
Access the application at the address: http://<CONTAINER_HOST_IP>:9000
There are many ways of deploying this code into AWS using terraform, for those ones there will be a file with explanation on steps to do everything through code in the /infra folder. Be sure to read the /infra/README.md file.
There are two pipelines for this project:
infrastructure.yaml- Terraform - Lint , Security & Drift Detectionpipeline.yml- Code - Lint / Tests / Build / Deploy
To use the pipelines, it is required to set up some Github Secrets and Variables.
Secrets
AWS_ACCESS_KEY_ID- AWS access key from an user with privileges to create the infrastructureAWS_SECRET_ACCESS_KEY- AWS secret key associated with the access key.DOCKERHUB_TOKEN- Dockerhub access token associated with the Dockerhub Username
Variables
AWS_DEFAULT_REGION- AWS Region to send the request to.DOCKERHUB_USERNAME- Dockerhub username with privileges to push the imageTF_STATE_BUCKET- name of the bucket with the terraform state
Be sure to check out ECS Deployment section in /infra/README.md. This pipeline will fail if the infrastructure is not created in advance.
The infrastructure pipeline consists of the following steps:
Only applicable to
./infra/ecs
Terraform Lint and Validate: Verify the terraform code withterraform fmtandterraform validate.Security Check: Verify the terraform code withtfsecfor security issues.Terraform Plan: Verify if there's drift on the infrastructure.
The Infrastructure Pipeline is meant to be as an support step for the Engineer in a way that the code is merged only if there's no changes (the code was applied before). It is possible to do an automatic apply for the terraform changes in the pipeline, but doing it so could be a bit disruptive if it not done in a proper way and since the idea of this code is to give a glimpse of what is possible to do in a infrastructure pipeline, I've decided to not implement such automatic apply.
If you're interested in doing it automatically, I suggest to use one of the following solutions:
- Terraform Cloud - Cloud Platform to run Terraform Code
- Atlantis - Terraform Pull Request Automation
- Spacelift - CI/CD Platform
- Scalr - IaC Platform
Be sure to check out ECS Deployment section in /infra/README.md. This pipeline will fail if the infrastructure is not created in advance and executed on
mainbranch.
The code pipeline consists of the following steps:
Lint code Check: Verify the code linting withflake8.Test Python Versions: Test the application execution and response in multiple Python Versions.python-version: ["3.7", "3.8", "3.9", "3.10", "3.11" ]Build and Push App: If the pipeline runs for themainbranch, it builds the app and pushes to docker registry. If it runs in any other branch or pull request, it builds the app to verify the build process.App Deployment: Deploys the latest revision of the application to the ecs service deployed by the infrastructure pipeline