https://medium.com/@trn84/creating-a-cross-compilation-like-process-for-jetson-tx2-aarch64-using-qemu-with-docker-5cb38f6a65bc
Embedded devices are largely popular for many reasons, like low power consumption, good performance, and competitive prices. Most systems make use of the ARM architecture. One such system is the Jetson TX2 from NVIDIA that is in focus of this guide. This System-on-Module offers many advantages, especially in the context of computer vision and AI.
Although, the performance is quite high, building on the device itself and deployment of software can be quite time consuming. Additionally, since this device is in aarch64 architecture one has to use a cross-compilation tool-chain to realize this in terms of CI/CD. NVIDIA offers some tools directly integrated in their Nsight Eclipse environment which basically has a CMake tool-chain file for cross-compilation and takes care of the dependencies when using that IDE.
This guide shall offer a more flexible approach to cross-compilation by using docker together with QEMU for a build environment that is exactly like the target system itself without wondering about all the correct dependencies, rootfs, paths, libraries, etc.
Finally, we can use this approach to fully integrate this process into a Gitlab CI runner pipeline thanks to the encapsulated nature of docker.
We will start with a step-by-step guide to achieve a cross-compiled CUDA sample from an x86 system onto a Jetson TX2 Development Board.
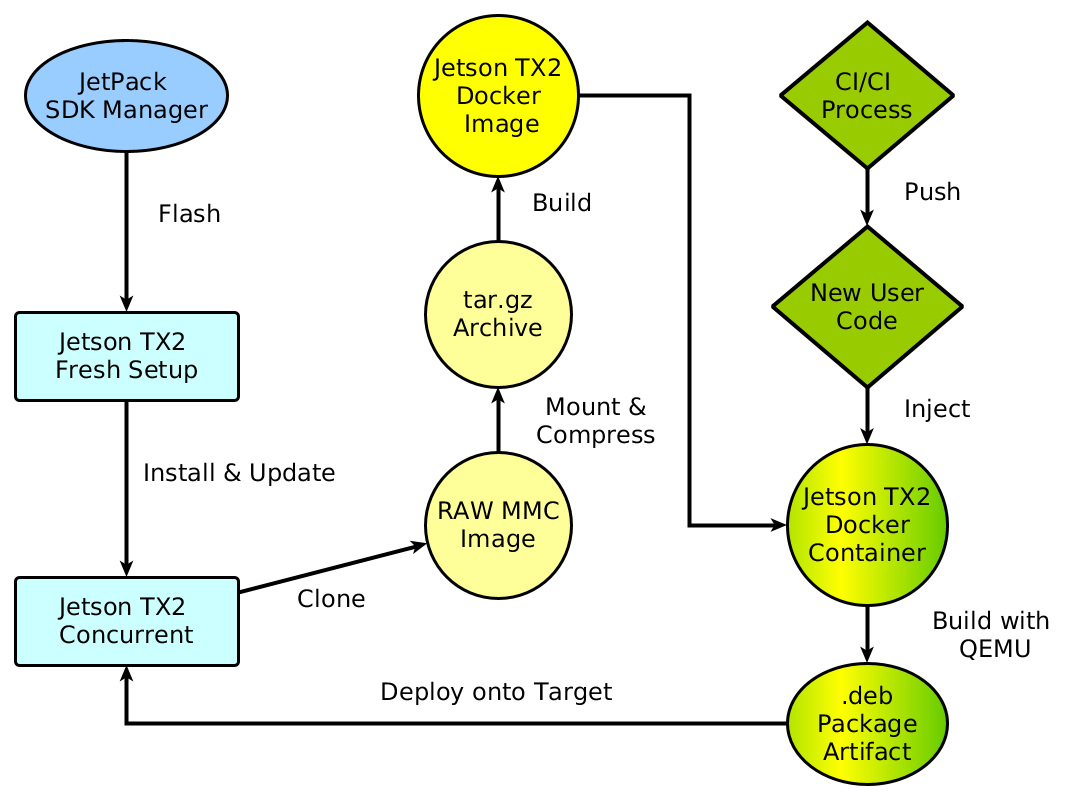
Before we start with the details, first a rough summary of the steps. This guide assumes that you have a Jetson TX2 already up an running by using the JetPack SDK toolkit. We have another guide that encapsulates the SDKmanager completely into a docker environment for ease of use without any issues for the host system (JetPack SDK in Docker). Of course you could just use your working installation of the JetPack SDK.
In a first step we need to make a clone of the current Jetson TX2 system. We wont be using the JetPack SDK Manager for this but rather the actual flashing script directly. You can find it in the folder where you have downloaded the target files. In case of using my JetPack docker image it is found here:
/home/user/nvidia/nvidia_sdk/JetPack_4.3_Linux_P3310/Linux_for_Tegra
Here is the flashing script flash.sh and we need to create a backup image from the current image on the Jetson TX2. The command is:
sudo ./flash.sh -r -k APP -G backup.img jetson-tx2 mmcblk0p1
Be sure to be in the USB recovery mode. The command will create two files. one that is called backup.img which is a “sparse” image of the system and one much bigger file called backup.img.raw which is a byte-by-byte copy of the whole flash space with every empty space. We will use this file but maybe the sparse file could be used as well. For more background on the cloning process please refer to the documentation (image cloning).
Now hopefully everything went fine and we need to mount the image into our system. Create a folder first as the mount point:
mkdir ~/jetson-image-mount
Then mount the raw image file:
sudo mount -o loop backup.img.raw ~/jetson-image-mount/
Now you can checkout the file system and see if all the files were cloned. In a next step we will create a tar archive from the mounted image.
It is highly recommended to create a tarball of the mounted image to be able to use it for docker. Usually, merely using the tar command on a folder will result in an unwanted primary root folder in the archive with the name of the folder. There are many approaches to circumvent this (see discussion https://stackoverflow.com/questions/939982/how-do-i-tar-a-directory-of-files-and-folders-without-including-the-directory-it/39530409#39530409) and none of which is fully satisfying. We are using the following commands:
mkdir ~/docker-build-context
cd jetson-image-mount && sudo tar -czvf ../docker-build-context/jetson-image.tar.gz * && cd ../docker-build-context
This is not ideal since the * operator will not consider hidden files apparently. On the other hand the . operator will create a folder called . as a first folder in the archive. Just keep this in mind if you have issues with missing hidden files.
At this point you should have a tarball called jetson-image.tar.gz. We can now create a dock image from this file. Open up your favorite editor and paste into it the following:
FROM scratch ADD jetson-image.tar.gz / CMD /bin/bash
That is all. We will start from scratch and add the archive as the root of the docker image. Save the file as Dockerfile and bow we will build the image from the same folder simply by:
docker build -t jetson-image .
If everything worked out (will take some time) you can test the docker image by creating a container with:
docker run -it \ --rm \ --user nvidia:nvidia \ jetson-image /bin/bash
You will probably get the following output:
standard_init_linux.go:207: exec user process caused “no such file or directory”
This is because the docker image was made for aarch64 (the architecture of the Jetson) and we are trying to run it on a x86 machine!
Luckily, QEMU offers a very nice option integrated into docker to realize emulation.
Well this part is quite short. We merely have to use the following docker image to register QEMU as the binary that is being executed before every aarch64 binary (read link for more infos https://github.com/multiarch/qemu-user-static):
docker run --rm --privileged multiarch/qemu-user-static --reset -p yes
Now we can execute the command from before and you should be in the shell of our “dockerized Jetson TX2” system.
To test if everything is working we can do some cross-compilation in the docker container. Most simply the official CUDA samples from NVIDIA could be cloned into the container:
git clone https://github.com/NVIDIA/cuda-samples
Change the directory into the deviceQuery example. Execute make and let it compile. Technically we are not cross-compiling since we are using the gcc and nvcc from the Jetson itself. We are using virtualization of the aarch64 rather than having a compiler that is capable of compiling for a different target architecture.
When we execute the generated binary ./deviceQuery This will be the output:
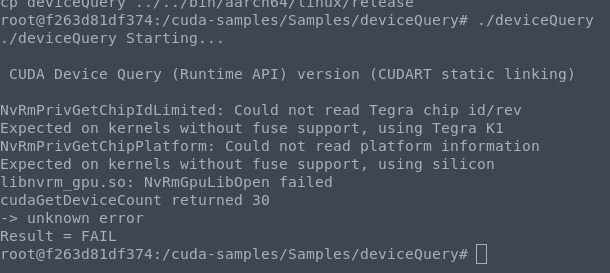
This is not unexpected since, even though we are using virtualization for the build process, of course the actual hardware is not emulated (GPU, ISP, Vision).
In the last step we can deploy or compiled binary from the docker container onto the target Jetson system.
scp deviceQuery nvidia@<IP-JETSON>:/home/nvidia/Downloads/
Here we can execute ./deviceQuery again and now you should get the correct output.
We have shown in seven very simple steps how to build, generate and deploy software from a x86 system for an aarch64 system Jetson TX2 using docker and QEMU. The build environment in the virtualized docker container is EXACTLY like the target system since we are able to use a cloned copy.
This approach can be used to generate artifacts in a CI/CD pipeline on a build farm. This artifacts can then be easily deployed onto the target.
It is also possible to use multi-stage builds in docker and create a “runtime” docker container with the artifacts. However, since the space of the Jetson TX2 platform is rather limited one needs to generate additional docker images just for deployment.