The following chapters explain how to install and update Contao. You will learn how to use the Contao install tool, how to synchronize an existing installation via FTP, how to set up the Safe Mode Hack and how to configure a live server for Contao.
First of all, download the latest Contao archive and extract it on your
local computer. Move the files into the htdocs folder of your local
installation (e.g. XAMPP) or upload them to your server with an FTP program (we
recommend using WinSCP). Depending on your server configuration, the public
folder is most likely called htdocs, httpdocs, html or public_html.
If you have SSH access, you can download and extract the archive with the following commands:
curl -L http://download.contao.org | tar -xzp
To open the Contao install tool, simply add /contao/install.php to the URL of
your Contao installation. Note that the install tool is protected against brute
force attacks and will be locked if a wrong password has been entered three
times in a row. To remove the lock, open file system/config/localconfig.php in
a text editor, find the following line and set it to 0.
$GLOBALS['TL_CONFIG']['installCount'] = 0; // This will remove the automatic lock
Log into your server administration panel (e.g. "Plesk" or "cPanel") and create
a new database for Contao. Then enter the login credentials in the Contao
install tool. Note that the Contao default character set UTF-8 is written as
UTF8 in MySQL!
Once you are connected to the database, Contao automatically checks its tables and displays a list of recommended changes in case they are not up to date. Make sure to read those recommendations carefully, because Contao only knows its own tables and will try to remove those of other applications eventually sharing the database. Confirm the changes and click the "Update database" button.
A template is a preconfigured website that includes an example site structure,
several style sheets to format the Contao core modules and content elements.
The default template is called "Music Academy". To import it, choose the
music_academy.sql option from the drop-down menu an click the "Import
template" button.
Existing data will be overridden during the template import!
If you did not import a template, you have to create an admin user to log into the Contao back end. After you have created the account, the installation process is completed. The link in the lower right corner will take you to the administration area. If you have imported the example website, you can login as user "k.jones" with the password "kevinjones".
If you are running an Apache server and are allowed to use mod_rewrite, you can
make Contao generate search engine friendly URLs that look like static HTML
documents. A set of default rewrite rules is stored in the .htaccess.default
file in the Contao directory. Rename this file to .htaccess so the Apache
server can handle it and then log into the back end and navigate to the system
settings. Select "Rewrite URLs" in the "Front end configuration" section and
save your changes. Now Contao generates static URLs like home.html instead of
index.php?id=12.
While trying to install Contao with the install tool, you might have seen a warning that the local configuration file is not writable.

The term "Safe Mode Hack" is actually misleading, because it implies that the
problem was caused by the PHP safe_mode. However, it is caused by insufficient
file permissions and can occur even if safe_mode is disabled, so it should be
called "File Permission Hack" instead. PHP as an Apache module is typically run
as wwwrun, www-data or nobody, whereas the files that you upload via FTP
belong to you (e.g. web4 or ab5678). The server therefore denies the PHP
script Contao access to those files.
To work around the permission problem, Contao establishes an FTP connection to
modify files and folders. All you have to do is to enter your FTP login details.
Take special care when entering the relative path from your FTP root directory
to the Contao folder (e.g. html/, public_html/ or httpdocs/).
A few directories still require write permissions, because PHP will access them directly:
assets/imagesassets/images/*system/logssystem/tmp
The permissions (CHMOD 777) are set by the install tool automatically and do not have to be adjusted manually normally. Should it be necessary, please only adjust the three directories mentioned above – despite what you might have read in a tutorial or in the Contao forums!
When it comes to manually updating a Contao installation, you can either upload the whole Contao download archive to the server (replacing files) or you can upload only the files that have been modified since the last update (synchronizing files). Either way, you should always back up the following files and folders - just in case there is an error or you accidentally override them:
files/*system/config/dcaconfig.phpsystem/config/initconfig.phpsystem/config/langconfig.phpsystem/config/localconfig.phptemplates/*
This will back up your local configuration, your custom templates and your files.
Replacing the files of a Contao installation is pretty simple. Just unpack the Contao download archive on the server or extract it on your local computer and upload the files with an FTP client. Then restore the files that you have backed up and remove potential leftovers from earlier Contao versions.
Attention: If you have installed any third-party extensions, make sure to backup and restore them, too, or do not overwrite them at all. Otherwise you will have to reinstall the modules and depending on the extension you might eventually lose data!
To synchronize a Contao installation, you can either use the Unix diff utility or an FTP program. Unix utilities are typically used by server administrators only, so they will not be explained here. To synchronize files via FTP, open WinSCP and connect to the server. Backup the files mentioned above and then navigate to the Contao directory and click the "Synchronize files" button.
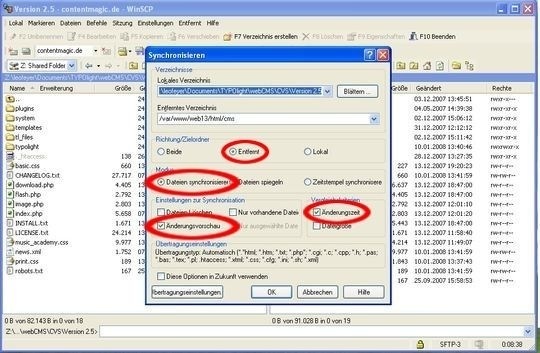
Review the options carefully and make sure to choose "Preview changes", so you can check which files will be updated. Then confirm each file in the preview window and double check the files that are marked for deletion! Click "OK" to start the synchronization process.

After you have updated the Contao files, you need to update the database, too. Fortunately, the Contao install tool will do most of the work for you. Just open it and enter your password, then scroll down to the database section and confirm the changes.
The Contao Live Update Service is a commercial Contao add-on provided by iNet Robots, the company of the Contao founder and core developer, Leo Feyer. It allows you to update your installation with a only few clicks in the back end, without having to download a Contao archive or using an FTP program to replace or synchronize files.
The Live Update includes the following features:
- Arbitrary up- and downgrades to any Contao version
- Automatic database backup before the update
- Individual validation and completion of the Contao installation
- Comparison of the customized templates and the original files


99% of all Live Update issues are caused by wrong file permissions. Contao requires write permissions to manage files and folders, therefore if the Live Update does not work properly, check your server configuration and make sure to set up the Safe Mode Hack as described in this user guide!
If you are having problems activating your Live Update ID or receiving the update archive, please contact the iNet Robots support. If you are having problems configuring the Safe Mode Hack or using Contao, please choose a support option on the support page.
Moving a Contao installation from a local server to a live server is not much different from installing a fresh Contao version, except that you are using the files from your local installation instead of the Contao download archive and an SQL dump of your local database.
Open your FTP program, connect to the target server and upload all files from your local Contao installation.
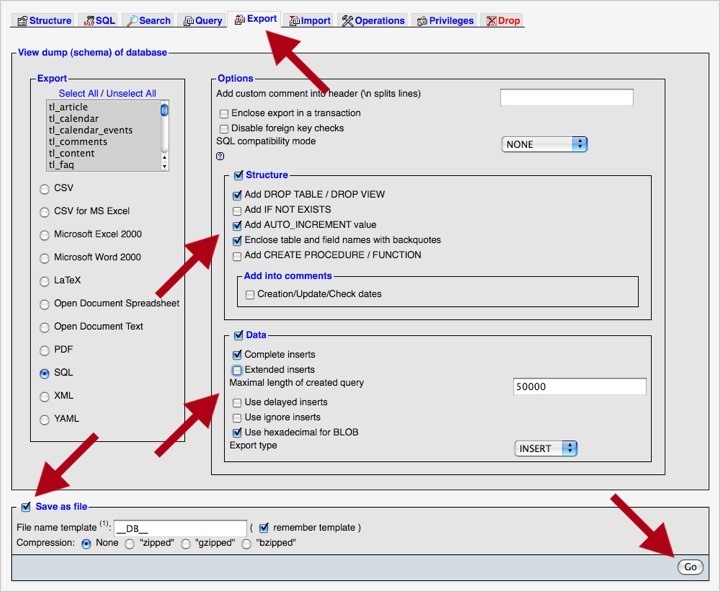
The easiest way to create a MySQL dump is to use the database administration
tool "phpMyAdmin". If you are a server administrator, you can also use the
mysqldump utility of course. Log into "phpMyAdmin", choose the database that
you want to export and click the "Export" tab in the top menu. It is important
to adjust the export settings according to the screenshot below to minimize
MySQL version compatibility problems.
Open "phpMyAdmin" on the target server and create a new database for Contao. Depending on the server configuration, you probably have to use the server administration panel (e.g. "Plesk" or "cPanel") to create new databases. Select the empty database and click the "Import" tab in the top menu. Then upload the SQL dump of your local database and start the import.

Finally open the Contao install tool of the new installation (the password should be the same as for your local installation) and adjust the database configuration if necessary. Then go to the back end and log in with your username and password.
This chapter is not about configuring a server in terms of installing Apache or compiling PHP, which you cannot do on a shared hosting account anyway. It explains how to check whether the Contao system requirements are met and how to enable PHP 5.
Contao requires a webserver like Apache or IIS with PHP and MySQL support. The minimum PHP version is 5.3.2 and the minimum MySQL version is 5.0. You also need the PHP extensions "GDlib" (image resizing), "DOM" (XML files) and "SOAP" (Extension Repository) and optionally "mbstring" (multi-byte character handling) and "mcrypt" (data encryption). Contao has been tested successfully with all major browsers like Firefox (from version 2) or Internet Explorer (from version 8).
Download the Contao Check to find out whether your server meets the Contao system requirements. The script will check whether you can use the Extension Repository and the Live Update and whether you have to use the Safe Mode Hack or not. Depending on your system configuration, you can set up a new Contao installation with the web installer or validate an existing installation.

Extract the Zip file, upload the check folder to your Contao installation
directory and open it in a web browser.
Download the Contao Check | Open the GitHub project
There are a few major Internet Service Providers that require a little extra configuration to get Contao to work. Fortunately, they are just the exception from the rule. The ISP-specific settings are described in the Contao forum. If you are looking for hassle-free Contao hosting, check out the list of Contao hosting partners.
Currently (V3.3.1) are no example Websites included in the download package. Both can be installed ("Contao Official Demo" & "Music Academy") in a new Contao installation as an extension.
Note: Currently, only the Music Accademy is installable for Contao 3.3 & 3.2. A "Contao Official Demo" for Contao 3.2 is in the pipeline (Community Project).