[Tutorial] Flash Asus Z170 Pro Gaming using Ubuntu #98
Comments
|
Hi, great guide, I'm glad you were able to do the flash ! A few remarks from my experience:
|
Great tip. It never crossed my mind that you could bypass UEFITool by using the extracted rom instead.
Why might you want to transfer those to a vanilla BIOS?
Oh wow! I didn't know that. I didn't have any issues though. Luckily DIP8 BIOS chips (like the Pro Gaming's) are apparently ok with it. Phew! |
To keep the MAC address, motherboard serial number, and other unique numbers, see the images in this post.
The same here, but better be on the safe side, the mod is easy to do is you have a soldering iron. |
|
Your right! The LAN mac has been changed! (WiFi mac on separate card is the same) I thought that MAC address & S/N etc were hard-coded somewhere else on the motherboard. So then the easiest method is to just use the extracted BIOS rom and that will preserve them. Its worth pointing out that even with out the MAC address S/N UUIDs etc everything works on Linux! (I guess the main down side would be Windows licenses would be messed up with any changes to them?) Merci beaucoup :) |
|
When you flash a new BIOS with the tools provided by the vendors, they don't write the full chip, only some area/regions (usually the BIOS region obviously, and sometimes they also update the ME region). When you do a full write with a "vanilla" image, or when you buy a new chip, they don't have these unique serial number. Usually the machine will still works fine though, even in Windows. In your case, yes, the easiest method is to just use the backup of the BIOS rom you've made with the SPI programmer. You should also run UBU to update the CPU microcodes (use a Windows VM). If you can't, I can do it for you, just upload your ROM image, send me the link, and I will send you back an updated one. |
|
I'm pretty sure Linux applies the microcode update on-the-fly at each boot via the kernel. Thanks for the offer though. |
|
You're right, the updated microcode can also be applied after the boot by the OS, and since you don't have HT, you aren't affected anyway. |
|
Thanks for sharing your experience, I've added your guide in the "How to apply me_cleaner" page. |
|
@mooms06 Do I need to worry about microcode? I'm applying the latest at boot time currently, but I'm about to go through the process of removing Intel ME from my computer so I figure might as well update microcode, if necessary. |
|
Yes, it's a good idea. |
|
do you have the links for the exact driver you used to get the usb programmer running? and how you installed it? I only moved to linux 3 months ago and im already in the deep end here :) im running zorin which is the latest unbuntu. |
|
Im at the stage where i have the tool, and i have a spare bios chip. I guess my next move is to download the latest bios cap file from asus which i have. |
|
ok i feel a bit stupid. but, for others who are wondering what drivers to install to get the USB flash tool running. i installed flashed using the command. sudo apt-install flashrom opening a terminal in the same directory as the modified rom, i executed sudo flashrom -p ch341a_spi -w 'modified.rom' Calibrating delay loop... OK. It appears I have managed to flash the latest rom for my board onto the new chip. the only thing left to do is swap them over. but first i need to make some recordings of the bios settings. Ill let you know how it goes later. |
|
You should not flash a "vanilla" BIOS from ASUS with the programmer, because it lacks the UUID (board s/n, MAC Address, etc..). The correct way is to dump your BIOS with the programmer, then remove the ME with me_cleaner from this backup, then flash the modified file with the programmer |
|
hi mooms06. Yea, I did actually work. But I was unhappy with the mac address. I tried entering randomly generated value for the UUID, and MAC, and serial and re flashed. However when I got into ubuntu I had no network card at all. |
|
is there a way to generate a fresh UUID and MAC and serial that will keep the network card alive? I know you said I should use the old credentials but I fancy changing it all/. |
|
I don't know. FD44Editor can edit/inject these UUID, but it wasn't updated since a long time. |
|
yea that did actually work. but there must be something about the uuid's and mac's being matched. as when i got in, the network card simply didnt show up. if anyone has any ideas. let me know thanks |
|
Is there anyway to salvage a bad flash. Downgraded to 1101 and now its cpu led stuck. Hoping I can just get a eeprom chip and flash over with out losing the default UUID,mac configs i dont care about |
|
Don't you have made a backup before ? |
|
Stupid me has never done one on either of the boards I've flashed. When I used the uefi tool. I "extract as is" not "extract body" and then flashed. Using fpt.exe -bios -f z170~1.rom. I still have the 1608 bios I successfully flash two nights ago. Could this have the information? |
I managed to fix it. I ended up using Linux and the flashed perfectly fine. I had nothing but issues in windows and various machines. |
|
Great guide, ASUS Z170-AR confirmed working. No problems whatsoever. |
|
Does anyone know if this guide should apply to the Z170-A also? I'm not asking for a guarantee, of course, I just don't know the similarity of the two. |
|
Yes, it will works on any Z170 board, as long as the BIOS chip is mounted on a socket (DIP8). |
|
I've been looking into trying this with my Z170i Pro Gaming MB. I believe the bios chip it uses is a Winbond W25Q128FV. However they seem to be hard to find. Does anyone have a good source for these? Official winbond retailers all seem to have discontinued the chip, and I wouldn't like to try this without a backup chip. |
|
They can be found on eBay and Aliexpress Examples: https://www.aliexpress.com/item/1005002112323822.html |
Ah nice, thanks! |
|
can you share z170 pro gaming bios without intel me |
|
No because all my backups have the UUID of my card. Note that you can also use CoffeeTime to disable the ME, it may be simpler to use if you don't like command line tools like ME_Cleaner, and it can bue used to modify the BIOS to let you use a Coffee Lake CPU (Intel gen 8 and 9) on Z170. CoffeeTime guides: Russian: https://forums.overclockers.ru/viewtopic.php?p=15924512 |
|
not for coffee lake I need for xeon. |
|
can you record a video for this I dont understand and my english is a little bad |
|
Thank you so much for this guide because I unbricked my motherboard with this |
Warning. Follow this at your own risk. You could brick your computer.
Read the me_cleaner Wiki pages first.
I'm new to all this and it took quite a while to gather all this information.
So to save anyone else the trouble here's what I learned.
You'll need access to a second computer to flash the BIOS chip of your main computer.
(Or you could buy a second BIOS chip - they are cheap - flash it and then swap them.)
You can flash the BIOS chip from a 64 bit computer using a 32 bit computer (well it worked for the Z170 Pro Gaming anyway.)
The Asus Z170 Pro Gaming is a great motherboard for flashing the BIOS as the chip is easily removed.
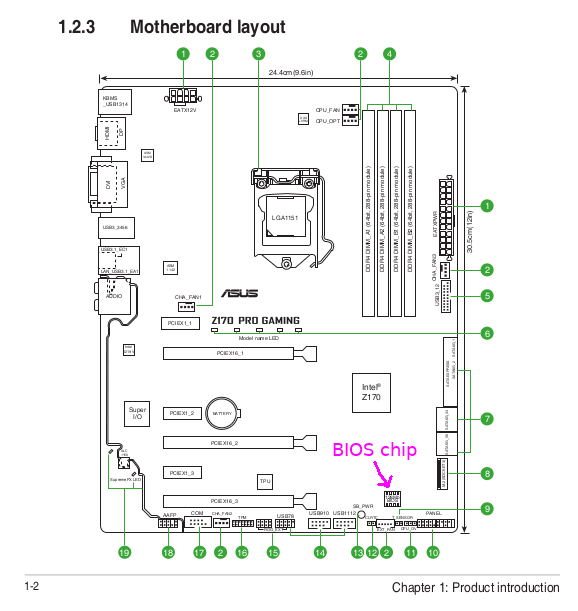
It just plugs in and out of a socket. That makes flashing easier.
The location of the chip is shown on page 1-2 of the Asus User Guide. Its located below the Z170 chip.
Its best to flash the BIOS chip 'externally' as some regions of the chip might be locked or inaccessible if you try flashing 'internally'.
(I tried the internal method using various versions of FreeDOS and various DOS flashing tools and ALL were a waste of time.)
The tool to flash the chip externally (the USB 'Programmer') is very inexpensive. Mine was ~$5.
Search ebay for "CH341A USB bios board programmer 24 25 series"
UPDATE It's probably best to get a green one like this:
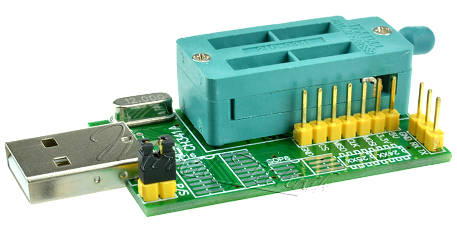
The black ones have a voltage issue. I used a black one and it worked fine - but its better to be safe. See mooms06's comment below.
Make note of any changes you have made to your BIOS setup as they will be lost after flashing.
You can run a couple of commands before and after the flash that will confirm Intel ME is disabled.
Before:
They all confirm that Intel ME is on my system.
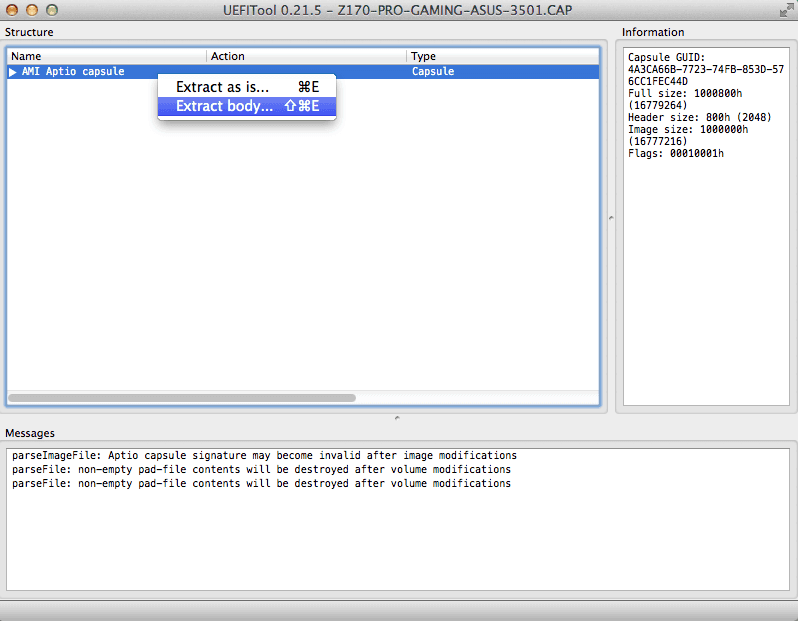
(1) Extract the BIOS .ROM from the Ausus .CAP with UEFITool
UPDATE As mooms06 points out you can avoid having to use UEFITool by using the BIOS rom you extract from the chip in step (4) below then go back to step (2) to disable Intel ME on the extracted rom.
In fact, it's a better method as it will also preserve your LAN MAC address, S/N and UUIDs. If you use a 'vanilla' Asus BIOS you'll have to use another app to restore them manually.
OR
For security/privacy you may prefer not to have any S/N or UUID on your motherboard. I only found out about this after I flashed mine and my MAC, S/N and UUID were cleared. But the system (Ubuntu 17.10) works fine without them! The system (or BIOS?) generated a generic MAC address (you should be able to change it via software in the OS anyway.)
This example explains that you need UEFITool to extract the BIOS rom from the .CAP file that Asus uses. me-cleaner can't work with .CAP files. There are Windows and OS X apps ready to use but on Linux you have to compile your own version. I don't know how to do that but I had access to a mac so I used the OS X version. I used ver 0.21.5 as in the example.
And I used it on Asus' current BIOS ver 3501.
Open the Asus .CAP file with UEFITool and highlight the top line "AMI Aptio Capsule". Right click on it and select "Extract body". Save it with .rom extension.
(2) Disable Intel ME
This may be obvious to some but it took me a while to find it.
There is a built in help in the me_cleaner script:
$ python me_cleaner.py --helpUser mooms06 says the -S option (--soft-disable) is best for the Pro Gaming as it prevents a 15 sec delay on startup
that -s (--soft-disable-only) causes.To disabled Intel ME I used:
$ python me_cleaner.py -O modified.rom -S Z170-PRO-GAMING-ASUS-3501.rom(3) Remove the BIOS chip
Power off your system fully and unplug it from the mains.
Its a good precaution to discharge and staic from your body by touching something metal.
Locate the BIOS chip and remove it.
Take note of the direction the indent on the chip's top is facing, thats important.
Be VERY CAREFUL removing it. I jerked removing mine and bent the pins!
Thankfully none were broken and I was able to straighten them.
I have a sore arm so it was more difficult for me.
With a bit of care it shouldn't be an issue.
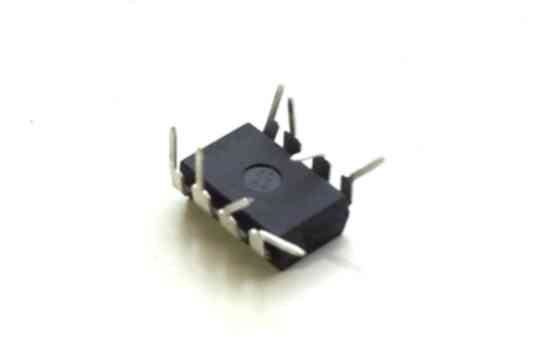
Plug the chip into the USB programmer tool.
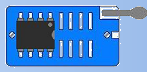
Again, take note to the chip orientation.
It should be like this (note the notch on the chip top):
(4) Check the USB programmer is working
On the second computer install flashrom if its not already installed.
Plug in the USB programmer tool.
I loosely followed this guide's flashrom process.
First I read (extracted) the chip's existing BIOS.
That took 3 mins 20sec.
Read a second copy of the current BIOS
Now compare the two extracted BIOSes with 'diff'
$ diff extracted1.rom extracted2.romThere should be no result if both are the same.
If there is a difference stop and read this and follow his recommendations.
I don't have 'ifdtool' tool to confirm the extracted .roms are BIOSes (and not just junk data). Instead I took a look at extracted1.rom in UEFITool and I could see it seemed ok.
That confirms the UBS Programmer and BIOS chip setup is working.
(5) Flash the BIOS
Here we go:
That took about 7mins.
(UPDATE: It takes about 13mins using a green USB programmer.)
Unplug the USB programmer, remove the BIOS chip and return it carefully to your motherboard.
(6) Reboot your system
The moment of truth.
Start up your PC and go into the BIOS setup by pressing DEL at boot.
You can confirm Intel ME is gone by going into 'Advanced Mode' and under the 'Main' tab the 'ME Firmware Version' should read 0.0.0.0.
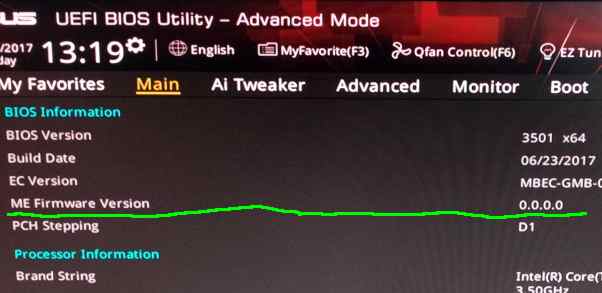
Before it would have read something like 11.6.11.1092
Don't forget to re-apply any modifications you had previously made to your BIOS.
Exit the BIOS and continue into Ubuntu.
You can run the same commands you ran before the flash for comparison:
$ ls /dev | grep mei[nothing]
$ lspci | grep -i communi[nothing]
$ cat /proc/bus/pci/devices | grep a13a[nothing]
The fact they returned nothing shows Intel ME has been disabled.
I'd run 'intelmetool' but you need to compile it yourself and I'm not able to do that.
But the checks we've run are pretty clear that Intel ME is gone.
Finally confirm the computer stays on for more than 30 mins and your are done.
Your computer is Intel ME free.
Thanks to corna and contributors for me_cleaner and thanks to mooms06 for his help. His answers might help you further.
And don't forget to donate to corna if you can.
The text was updated successfully, but these errors were encountered: